
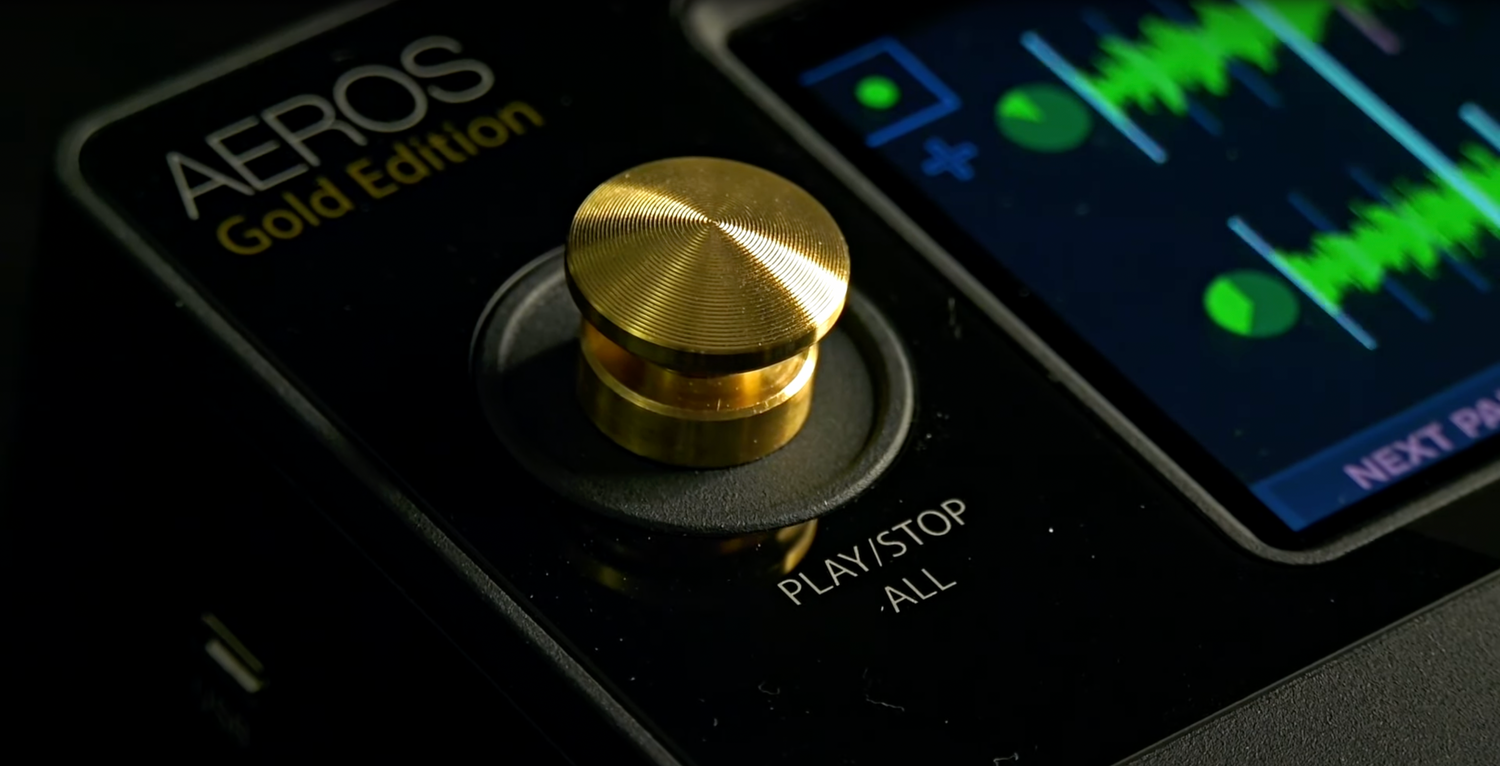
Two major updates to Singular Sound's looper pedal have officially arrived. On the hardware side, the Aeros is now available as the Aeros Gold Edition, an all-new look with silent buttons.
On the software side, the much anticipated Firmware Update 5.0 is out on Wi-Fi. In this post we will explore the new features that make Aeros Gold Edition another evolution in our industry-leading loop pedal.
Let's dive in.

Sleek, Silent and Powerful As Ever
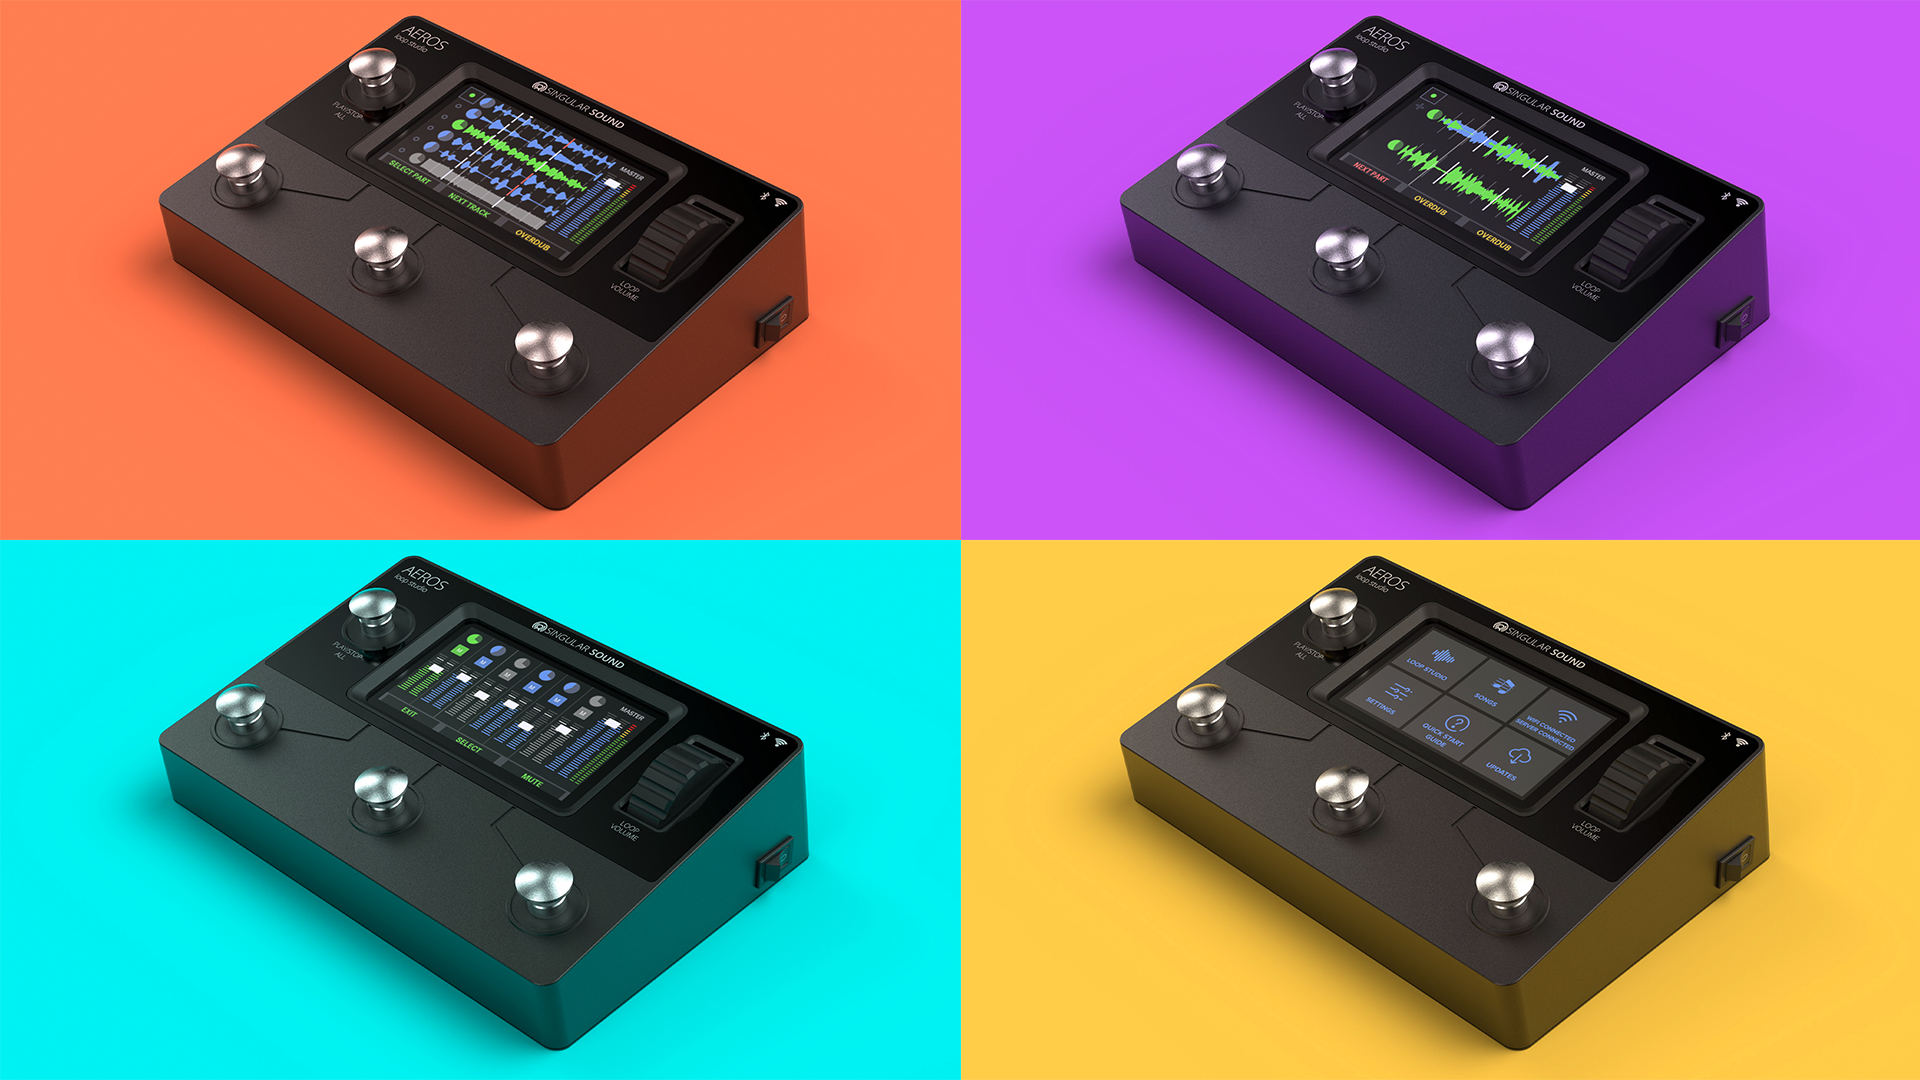
The Aeros Gold Edition loop pedal offers the same incredible core functionality as the original. You can create 36 unique loops, mix your volume live, save and export your beats and more, all on a bright touch-screen display.
There are two changes that make Aeros Gold Edition unique and exceptional. First, we brought a polished and classy look to the pedal with new, golden footswitch tops.
Still, the buttons are more than just a pretty face. Our product development team worked with manufacturers to alter the landing spot of each button, allowing premium dampeners to be added to the pedal's metal housing.
This means cleaner recordings in the studio, a more pleasurable practice experience, and a seamless live show.
Firmware Update 5.0 Has Arrived: Backing Tracks, Autoquantize and More
In addition to our new hardware upgrade, the long-awaited Firmware 5.0 is out, and ready to be downloaded on Wi-Fi. Note that all firmware features are available on the original Aeros Loop Studio as well as the Aeros Gold Edition.
If you'd prefer to watch the new update in action, watch the video below from Joe Vitale.
Additionally, you can read the full forum post here, but now, we're going to take a look at all the newest features available on your looper pedal.
Autoquantize Mode
The best looper pedals adapt to your music. Choose ‘Auto’ in ‘Song Grid Mode’ to enable Autoquantize Mode. This allows you to quantize freeform recordings on the fly.
Here's how it operates:
-
Define tempo of recording based on start and stop points
-
Set length to decide how many measures recording will be quantized to
-
Auto BPM Range setting sets tempo range for autoquantized track
-
Multi-tempo song setting to enable Autoquantize for every part
-
Use Aeros as MIDI transmitter to control device, e.g. the BeatBuddy
-
Enable ‘Send Stop at Empty Part’ to stop drums or playback devices during recording
MIDI Transmitter (Master)
The Aeros Loop Studio can now act as the MIDI Out in sync with other devices. Here's how to use it:
-
Set ‘MIDI Mode’ to Transmitter (MIDI Master) to send internal clock, time signature, transition, Start, and Stop commands to MIDI Output
-
Individual behaviors can be turned off in MIDI In/Out settings
-
Aeros ignores incoming clock but still responds to non-filtered CC commands
-
Optional MIDI Out behaviors include RPO command, sending MIDI Start, and sending Stop
Auto Record
-
Start recording from stopped state once input audio signal meets specific threshold
-
Set threshold in Behavior Settings
-
Aeros action button will say “Arm” instead of “Record” when stopped
Hands Free Slide Out Menu

We've taken the Aeros user interface to a new level in this update. More options and more freedom provide superior control during performances. Mastering a looping pedal has never been easier.
Here's the gist:
-
Hold down bottom left Aeros button to engage menu
-
There are two separate menus: Playing and Stopped. Different options will be available based on which mode you're in. All of these can be edited in Hands Free settings, but you'll get abilities like:
-
Mixer
-
Switch RPO/ROP
-
Undo, Mute, Reverse, Solo, Fade to Mute
-
Lock/Unlock Track, Sleep Screen, Save Song, Clear Song, Delete Last Part, Open Album, New Song 2x2, New Song 6x6
Please note that these settings cannot be used while you're recording or overdubbing a track.
You can now scroll through options on the home screen with the built-in scroll wheel. "Select" will be performed using the right-most button on the Aeros Gold. Here are some redesigned screens.
Clean functionality is part of what makes Aeros Gold Edition one of the best looper pedals on the market. Let's take a look at the screen grabs so you can get a better feel for what we mean.
Stopped Screen Redesign:

The icons you see listed on the right side are as follows:
- Edit Song
- Home
- Save
- Create Song
- Songs
Additionally, you have the metronome icon (set to "On" in this picture). Below that, you can see the number of measures of count-in time, which is customizable. Next to that, the "Record" and/or "Playback" options. This dictates whether the count-in will occur just before recording or after playback begins.
On the next row down, you'll find the Tempo setting. In addition to the BPM, this will show whether the MIDI clock is being sent or received. If you have a mismatch between the internal BPM of the song and the external BPM, the text will turn red.
Next to Tempo, you'll find the customizable time signature.
Some more options available with hands-free command are:
- MIDI Mode: Select whether the Aeros acts as the Transmitter (Master) or Receiver (Slave).
- MIDI In: Start
- Record/Playback: whether Aeros begins recording or playback when receiving a MIDI Start command.
- This can be edited using the touch screen!
- MIDI Output
- Merge/Thru/Out/Off
Albums and Songs Page Redesign:

All Aeros songs are now inside folders called ‘Albums.' Albums can be named and hold songs organized by Date, Name, or ‘Track’ (in a Custom Order).
Pressing the 3 dot menu in the top right or holding the bottom left Aeros button will open up the Songs Slide Out Menu and allow you to change the track order.
Songs List is now just called ‘Songs.' You can find the Songs page inside every album. Inside the Song page you can press and hold the bottom left Aeros button to bring up a Slide Out Menu for the Songs.
(Albums/Songs) options can now be explored using the wheel, and you can interact with each selection using the buttons.
The right Aeros button will open a selected album or song when it is tapped.
If you hold down the right Aeros button while selecting a song, it will engage the Multi-Select mode. Multi-Select can also be selected in the Songs Slide Out Menu.
While Multi-Select is enabled, tap the Middle Aeros button to Move a song or multiple songs. To copy song(s), hold down the Middle Aeros button.
Copy and move actions are also available as options in the Songs Slide Out Menu. If Multi-Select mode is not enabled, choosing one of these options in the Slide Out Menu will only affect the currently selected song in the Album.
You can delete an album by pressing the Trash icon when the album is selected.
Loop Pedal Settings Menu Redesign:

All device settings have now been organized into categories, as follows:
- Routing
- Behavior
- MIDI
- MIDI IN
- MIDI Out
- Hands Free
- Pedal
- Fades
- System
- Diagnostic
All these settings can be accessed hands-free using the wheel, and options for the currently selected setting can be toggled using the right Aeros button.
Any slider-based settings allow you to "Edit" its value using the right-most Aeros button. Press it to activate the slider, then use the wheel to change the value.
- Tapping the bottom left Aeros button will cancel the change.
- Tapping the right button will confirm it.
Use the same process to alter any settings with +/- integers, such as Time Signature under song settings.
You can tap the middle button over any selection in the settings page to get more info on its function.
Backing Tracks

Backing Tracks represents one of our biggest features to date. You can now upload backing tracks into the Aeros as .wav files! Here's how it works:
- Once you boot the Aeros with the SD card inserted for the first time, it will reformat the empty SD card or ask you to convert existing files (Read Bottom of Forum Post First)
- Once formatted, the SD card will have a Backing Tracks folder which you can drag and drop your files into.
- The Aeros will only support .wav (PCM) files that are 44.1kHz and 24bit. They can be mono or stereo.
- To import a file, you must be in an empty song or create an empty song that is in freeform mode (we plan to make backing tracks compatible with Autoquantize and Quantize mode soon). If you wish to import multiple tracks per part, you must turn Sync Tracks off. If you wish to have sync tracks on, you can only import one backing track per part into the first track.
Backing tracks must be loaded sequentially starting with the first track.
We may expand the possibilities for file formats and sync rules later but this is a great first step
Step-by-step guide to load a Backing Track:
- Click the pencil icon to edit the song
- Make sure you have Song Grid Mode set to freeform. If you want to import multiple backing tracks per part, you must have the Sync Tracks setting off.
- Note: You cannot change the Song Grid Mode to freeform and then load the file, first change the setting, hit save, open the edit screen again, and then start importing tracks.
- Scroll down and select Load File with your finger on the touchscreen
- Choose a file from the list using the touchscreen. This can also be done using the wheel to change the selection and the right Aeros button to choose an option.
- Once selected, you will return to the song settings screen, click Save in the top right to load in the backing track.
- Repeat steps 3-5 to load multiple backing tracks into a song part
Fade Time
We've made fade settings their own categories in the settings menu, and made them customizable. You can now independently set Start, Stop, mute and unmute fades to a custom time (1-60s).
To do this, set it to "Timed" to choose the desired value.
Expression Pedal Setup (EXP)

Our brand-new Expression (EXP.) pedal setup page has been added to the settings menu. After pressing "Calibrate," simply follow the steps on-screen to set up your connected expression pedal.
Offscreen Actions
We've made it possible to know when pending offscreen actions are incoming. A small bar with the same color as the upcoming event banner will fill up from bottom to top along the height of the track.
For example, if you set a long track to mute at the end of the track, you will see a gray bar rising on the right side of the track until the Mute banner appears.
USB Access to Internal Memory
You can now access the internal memory of the Aeros on your computer through the USB port, making backing up your songs an easy process.
To access the internal memory: With the Aeros powered OFF, connect it to your computer via USB and then power the Aeros ON.
-
Do not connect the Aeros while powered ON or the memory will not be accessed until it is rebooted
-
To access the SD card, insert it in the SD card slot before turning the Aeros on while it is connected to your computer via USB.
Improved Undo/Redo
The Undo/Redo functionality has been improved to allow for multiple levels of undo/redo. This means that you can now undo and redo multiple actions in a row, rather than just the last one. This is especially useful when you are trying to make complex edits to your loops.
Improved Song Navigation
The Aeros now allows you to navigate between parts of a song more easily. You can use the left and right foot switches to move between parts, or use the new Song Navigation screen to quickly jump to a specific part.
On-Screen Notifications for Received MIDI Commands
The Aeros will now display the MIDI commands it receives if they are switching settings on or off. Note: this currently only works for switching ROP mode to RPO mode and vice versa.
Default Naming Convention
You can now customize the default name for every new song on the Aeros. The change will take effect after editing the setting and making a new song. Old songs will not be affected.
One press song part change
Change the song part in 6x6 just like the song parts in 2x2, with one tap to transition. The parts work like the tracks in 6x6, when selecting an empty part, a recording will be cued in the empty part.
If you tap Next Part again while there’s a pending transition to an empty part the first part will be selected again and transitioned to.
Keep pressing the Next Part button to toggle through the song parts sequentially.
It is suggested that you set the Change Parts behavior setting to End of Loop to get the most of this setting - that way you have time to select different parts before the transition occurs.
On screen labels as buttons
You can now tap the on-screen button labels using your finger! The response is not as good as the physical buttons for multiple taps but works well for the first tap.
Multi time signature/tempo

You can now have songs with either multiple tempos (one per part), time signatures (one per part), or both!
Auto record next track toggle
Turn off the Automatic recording function in 6x6 when selecting an empty track, instead you will have to manually start a recording once the empty track is selected. Settings > Behavior
Loop Decay
The Loop Decay will decay the track’s base layer every time a new overdub is started by the amount set in the Decay Rate. If you set the decay rate to 50%, the base track will decay by 50% or become half as loud when an overdub is started. If you set the decay rate to 100%, the base track will decay by 100% or be totally silent when an overdub is started.
Note: this is a destructive audio process. The decay process cannot be reversed. It is recommended that you save and copy a song before adding loop decay to it to avoid decaying and losing any old recordings.
The Loop decay will only engage when a new overdub layer is started, the loop decay does not apply at every loop seam.
Loop decay is able to be turned on and the decay rate can be set in the song settings. Currently the decay rate cannot be changed without stopping audio and saving the song.
Other Improvements and Bug Fixes
In addition to the above features, the Aeros 5.0 firmware update includes a number of other improvements and bug fixes, including:
-
Improved audio quality
-
Improved audio routing
-
Improved file management
-
Improved synchronization with external devices
-
Fixed bugs related to MIDI mapping and MIDI clock synchronization
Overall, the Aeros 5.0 firmware update is a significant improvement over previous versions, and adds a number of highly requested features. If you own an Aeros looper, we highly recommend updating to the latest firmware to take advantage of these new features.
To get the latest news the moment it happens, subscribe to our email newsletter. Make sure to follow us on Instagram, TikTok and YouTube for product demos, artist features and more.

Leave a comment
All comments are moderated before being published.
This site is protected by hCaptcha and the hCaptcha Privacy Policy and Terms of Service apply.