https://www.singularsound.com/blogs/news.atomSingular Sound - Blog2023-09-28T12:05:29-04:00Singular Soundhttps://www.singularsound.com/blogs/news/guitarists-guide-how-audio-cables-impact-tone-performance2023-09-28T12:05:29-04:002023-09-28T12:06:59-04:00Guitarist's Guide: How Audio Cables Impact Tone & PerformanceAnthony SostreAs guitarists, we have a habit of focusing on instruments, amplifiers, and recording equipment. Yet, lurking in the shadows, playing a silent but pivotal role, are audio cables.
These unsung heroes of the audio world ensure that the music's soul travels unblemished from source to listener. But what makes a quality audio cable stand out? And how can you tell if your trusted cable is on the brink of failure? Journey with us as we unravel the science, signs, and stories behind audio cables, drawing from technical insights and personal experiences.
The Science Behind Audio Cables
When we think of our audio setup, be it a home theater system, a professional recording studio, or a simple guitar rig, cables might not be the first thing that comes to mind. However, these seemingly inconspicuous components play a pivotal role in shaping the sound we hear.
At the heart of every audio system lies the signal - the music, the voice, the sound effects. This signal travels through various components, and the cables are the highways for these signals. Just as a smooth, wide highway allows for efficient and fast movement of vehicles, a good quality audio cable ensures that the audio signal travels without hindrance or loss of quality.
To appreciate the nuances of audio cables, we need to understand some fundamental electrical engineering principles that govern their operation.
Every strum of a guitar, every note sung, every beat of a drum is transformed into an electrical signal. This signal, representing the sound wave, travels through the audio cable. The fidelity and strength of this transmission are paramount. Any loss or alteration can change the sound's character, sometimes subtly, sometimes drastically.
There are a few different ways that a cable can alter your signal, starting with resistance.
Resistance:
Imagine walking through water. The deeper the water, the harder it is to walk. That's resistance in the world of audio cables. It's the opposition faced by the signal as it travels. Factors influencing resistance include:
Material: Copper is a common choice for audio cables due to its excellent conductivity. However, materials like silver, while more expensive, offer even better conductivity.
Thickness: A thicker cable, often denoted by a lower gauge number, provides a wider path for the signal, resulting in lower resistance.
Length: The longer the cable, the more material the signal has to pass through, increasing resistance. Generally under 20’ won’t impact the tone, but above that, and especially above 30’ you’ll start to notice some of the treble roll off.
Sound Implications:
A cable with high resistance might attenuate the signal, especially over longer distances. This can lead to a sound that's quieter or lacks dynamism. On the tonal front, high resistance can sometimes reduce the brightness or "sparkle" in the sound, making it sound warmer or muddier.
Capacitance:
Capacitance refers to the cable's ability to store an electrical charge. In audio cables, capacitance can influence the transmission of higher frequencies. Factors affecting capacitance include:
Insulation Material: Different insulating materials have different dielectric constants, which can influence the cable's capacitance. For instance, materials like polyethylene tend to have lower capacitance than PVC.
Cable Geometry: The way conductors are arranged in the cable, their spacing, and the thickness of the insulation can all impact capacitance. Twisted pair cables, for example, can have different capacitance values compared to parallel conductor designs.
Shielding: The type and effectiveness of shielding can also play a role in a cable's capacitance. Foil shields, for instance, can increase capacitance due to their proximity to the cable's conductors.
Sound Implications:
A cable with high capacitance might roll off some of the higher frequencies, leading to a warmer sound. This can be desirable for some instruments or vocals but might not be ideal for those seeking a bright, detailed sound.
Inductance:
Inductance is the property of an electrical conductor to oppose a change in the electric current passing through it. In audio cables, it can affect the transmission of lower frequencies. Factors influencing inductance include:
Cable Length: 20’ or longer cables inherently have higher inductance simply because there's more material for the signal to pass through.
Cable Geometry: Just as with capacitance, the arrangement and spacing of conductors can influence inductance. Coaxial cables, for instance, tend to have lower inductance than other designs due to their concentric conductor arrangement.
Conductor Size: Thicker conductors (lower gauge) can reduce inductance, as there's a larger area for the signal to flow.
Sound Implications:
While inductance is generally less of a concern in most audio setups, especially over short distances, very high inductance can lead to a reduction in bass response, making the sound thinner.
Signs of a Quality Audio Cable
Building on our understanding of the electrical principles that govern audio cables, it becomes clear that not all cables are created equal. While they might often be overshadowed by flashier pieces of equipment, seasoned musicians and audiophiles know that a cable's quality can profoundly influence sound. So, with the science in mind, how do we identify a truly exceptional audio cable? Let's delve into the hallmarks of quality, enriched by both technical insights and personal experiences.
Material and Construction:
Conductors are the heart of any cable, transmitting the electrical signals that represent sound. High-purity metals, such as oxygen-free copper or even silver, are sought after for their ability to ensure minimal resistance and optimal signal transmission. The purity and conductivity of these metals play a pivotal role in preserving the integrity of the sound.
Insulation is another critical component. While its primary role is to isolate the conductor and prevent short circuits, the choice of insulating material can have sonic implications. For instance, cables insulated with polyethylene tend to offer lower capacitance compared to those using materials like PVC. This reduced capacitance can help maintain the integrity of higher frequencies, ensuring a clearer and more detailed sound.
Shielding is the unsung hero of audio cables. Its primary role is to guard the cable against external interferences, such as electromagnetic fields or radio frequencies. Effective shielding, whether it's braided, foil, or a combination of both, is vital. A well-shielded cable stands as a bulwark against hums, buzzes, and other unwanted noises, ensuring a clean and interference-free sound.
When it comes to connectors, there's often a debate between gold-plated and regular metal variants. Gold, with its superior conductivity and resistance to corrosion, is a favored choice for high-quality audio connectors. These gold-plated connectors, while ensuring a reliable and low-resistance connection, are often backed by a base metal like brass or copper. Since the gold is just a thin layer over another metal (commonly brass or nickel), one might wonder if this combination could introduce any interference or signal degradation.
In theory, when two different metals are in contact, there's a potential for a very tiny voltage to be generated at the junction due to the metals' differing electron affinities. This phenomenon is known as a "galvanic potential" or "contact potential." In a highly sensitive setting, like precision electronic measurements, this could be a concern. However, in the context of audio connectors, this effect is negligible.
In general, the difference between the two connector types is likely to be less noticeable than any of the other factors we’ve discussed.
How to Identify a Failing Audio Cable
Audio cables, like all components of an audio setup, have a lifespan. Over time, due to wear and tear, environmental factors, or manufacturing defects, a cable can start to degrade. Recognizing the signs of a failing cable early can save you from unexpected disruptions during performances or recording sessions. Here's how to spot a cable that's on its way out:
1. Intermittent Sound:
One of the most common signs of a failing cable is intermittent sound. If you find the audio cutting in and out or notice sudden drops in volume, there's a good chance your cable might be the culprit. This can be due to internal breaks in the cable's conductor or issues with the connectors.
2. Noticeable Noise:
A healthy cable should transmit sound without adding any noise. If you start hearing hums, buzzes, or static when using a particular cable, it might be deteriorating. This noise can be due to compromised shielding, allowing external interferences to creep in.
3. Physical Damage:
Always inspect your cables for visible signs of wear and tear. Look for kinks, fraying, or any damage to the insulation. Exposed conductors not only pose a risk of short circuits but can also degrade sound quality.
Protecting Your Cables with Cabli:
One of the best ways to extend the life of your cables and protect them from physical damage is by using tools designed for cable care, like the Cabli. The Cabli ensures that your cables are wound and stored correctly, preventing kinks and reducing wear. By maintaining a consistent and safe winding pattern, the Cabli not only helps in organizing your cables but also plays a crucial role in preserving their integrity and sound quality.
4. Connector Issues:
If plugging in or unplugging the cable produces crackling sounds or if the connectors feel loose, it's a sign that they might be worn out or damaged. The soldering inside the connectors can also degrade over time, leading to poor connections.
5. Coloration of Sound:
A failing cable can sometimes introduce tonal colorations. If your instrument or audio source suddenly sounds different – perhaps muddier or lacking in treble – it's worth checking if the cable is the cause.
6. Testing with a Multimeter:
If you have access to a multimeter, you can test the cable for continuity. Set the multimeter to the continuity setting, and touch the probes to the respective ends of the cable (tip to tip, sleeve to sleeve). If the multimeter doesn't register continuity, there's a break somewhere in the cable.
I've had my fair share of cable issues over the years. One memorable incident involved a guitar cable that seemed perfectly fine when playing clean tones. However, when I tried to introduce some distortion, the signal just wouldn't break up. It took me a while to realize that, while the cable was transmitting sound, the signal strength was compromised. The cable was failing, and it was affecting the dynamics of my playing.
Conclusion
Audio cables might not command the same attention as a vintage guitar or a state-of-the-art amplifier, but their role is undeniable. As we've journeyed through the intricacies of audio cables, from the science that governs them to the tales of their impact, one thing is clear: never underestimate the power of the unseen. As you plug in and play, take a moment to appreciate these silent workhorses.
]]>
https://www.singularsound.com/blogs/news/guitar-room-acoustics-understanding-improving-sound-quality2023-08-25T13:02:30-04:002023-09-05T12:42:35-04:00Guitar Room Acoustics: Understanding & Improving Sound QualityAnthony SostreWhen the iconic sounds of the 60s, like surf music, were being recorded, bands would set up in large, untreated rooms, their electric guitars echoing off the walls. The natural reverb of these spaces, combined with the raw energy of the musicians, created a sound that was distinctive and full of character.
Fast forward to today, and the landscape of sound recording has evolved dramatically. Gone are the days when artists relied solely on the acoustics of a room. Now, almost every recording space, from professional studios to home setups, incorporates some level of acoustic treatment.
This shift, while enhancing sound clarity and quality, has also contributed to the distinct difference between the sounds of old and modern recordings. The amplified reverb that characterized genres like surf was, in part, a product of recording and performing in untreated spaces.
As we delve into the nuances of acoustic treatment, we'll explore how to harness the power of sound in any space, blending the best of both worlds to build out a listening or recording space that amplifies your sound.
Understanding Reverb Time (RT60)
Reverb Time, commonly referred to as RT60, is a crucial metric in the world of acoustics, especially for guitarists. But what exactly is it? In simple terms, RT60 measures the time it takes for the sound in a room to decrease by 60 decibels. Imagine strumming your guitar with vigor and then listening intently to how long it takes for that sound to fade away until it's barely audible. That duration is essentially what RT60 captures.
Now, you might wonder, what's the ideal RT60 for a room where a guitar is played? The industry standard rule of thumb targets a reverb time of 0.20 to 0.40 seconds at 1000Hz. This range is considered optimal for ensuring clarity of sound without making the room feel too 'dead' or 'live'.
However, it's essential to note that while these figures are widely accepted in the industry, acoustic treatment is as much an art as it is a science. Every guitarist has a unique playing style, and every listener has individual preferences. What sounds perfect to one person might seem off to another. Therefore, while the mentioned range is a great starting point, you might want to fine-tune your room's acoustics based on specific frequencies that resonate with your style and preferences.
In essence, understanding and optimizing RT60 is not just about adhering to industry standards but also about personalizing your space to achieve the sound quality that feels 'just right' to you.
How Much Acoustic Treatment to Use?
Acoustic treatment is essential for achieving optimal sound quality in a room, especially for guitarists. However, there's a fine line between just right and too much. Striking the right balance is crucial to ensure that the room doesn't sound too 'dead' or overly dampened. So, how do you determine the right amount of treatment for your space?
As mentioned above, it’s all based on achieving the target reverb time or RT60. The best way to hit your target is to use an online calculator such as the one provided by ATS acoustics. But what happens if you just throw all the foam at your wall?
Risks of Overtreatment
Over-treating a room is a common pitfall many enthusiasts fall into. While it might seem like adding more foam or panels will enhance sound quality, it can lead to several issues:
Loss of Natural Ambience: A room that's heavily treated can lose its natural reverb, making instruments sound flat and lifeless.
Diminishing Returns: The principle of diminishing returns applies to acoustic treatment. The first chunk of foam or panel you add will likely make the most significant difference. However, as you add more, the benefits decrease, and you might not notice any substantial improvement.
Aesthetic Concerns: Overloading a room with treatment materials can make it visually unappealing. It's essential to strike a balance between functionality and aesthetics.
Cost Implications: Acoustic materials can be expensive. Over-treating means you're spending more without necessarily getting the best value for your money.
It's essential to remember that the goal of acoustic treatment is to enhance sound quality, not suppress it. While the industry provides guidelines and standards, it's crucial to listen to your room. After all, acoustic treatment is as much about personal preference as it is about technical specifications. Start with the basics, assess the sound, and then decide if you need to add more.
Where to Place Your Foam
Acoustic treatment is not just about the materials or how many panels you use, but also where you place them. Proper placement can significantly enhance the effectiveness of your treatment, ensuring that you achieve the desired sound quality.
Understanding Reflection Points
Reflection points are areas in a room where sound waves from speakers bounce off surfaces and return to the listener's ears. These reflections can cause interference, leading to muddied sound or unwanted echoes. By treating these points, you can achieve clearer sound and reduce unwanted reverberations.
To understand reflections, imagine throwing a ball against a wall. The point where the ball hits and bounces back is akin to a reflection point for sound. Now, in the context of a room, sound waves behave similarly, reflecting off walls, ceilings, and other surfaces.
To identify the primary reflection points:
Speaker-to-Wall Reflection: Sit in your listening position and have a friend slide a mirror along the wall. Where you can see the speaker in the mirror marks a reflection point. This method can be used for side walls, the ceiling, and even the floor if you have a reflective surface like hardwood.
Corner Reflections: Corners, where walls meet, can create strong reflections. Bass traps or thicker foam panels can be effective in treating these areas.
Behind the Listener: Sound waves also reflect off the wall behind the listener. Placing foam or diffusers here can help reduce these reflections.
Understanding and treating these reflection points is crucial for achieving optimal sound in a room.
Ceiling and Floor Treatment
While walls are often the primary focus of acoustic treatment, the ceiling and floor play equally pivotal roles in shaping a room's sound. Sound waves don't just travel horizontally; they move in all directions, reflecting off every surface they encounter.
Ceiling Reflections: Just like side walls, the ceiling has its reflection points. Especially in rooms with high ceilings, untreated surfaces can lead to strong, unwanted reflections. Acoustic panels or foam tiles can be strategically placed to combat these reflections. For those with drop ceilings, acoustic ceiling tiles can be a practical solution.
Floor Reflections: The type of flooring can significantly influence a room's acoustics. Hard surfaces like wood or tile can cause strong reflections, while carpeted floors naturally absorb some of the sound. If you have a hard floor, consider using rugs or carpeting in key areas to reduce reflections. For recording studios, raised platforms with absorptive materials can also be beneficial.
Window Treatments
Windows are often overlooked in acoustic treatment, but they can be significant sources of sound leakage and reflections. Glass is a hard, reflective surface, and untreated windows can introduce unwanted noise and echo into a room.
Curtains and Drapes: Heavy, dense curtains can help reduce sound reflections. Look for curtains labeled as "acoustic" or "soundproof." These are designed to absorb sound more effectively than regular decorative curtains.
Window Panels: Acoustic panels designed specifically for windows can be an effective solution. They can be attached when needed and removed when not in use.
Sealing Gaps: Ensure that windows are well-sealed. Even small gaps can let in outside noise, disrupting the room's acoustics. Weatherstripping or acoustic sealants can be used to seal any gaps or cracks.
Acoustic Foam vs. Tiles and More
When diving into the world of acoustic treatment, one of the first decisions you'll face is choosing the right material. Acoustic foam and tiles are among the most popular choices, but there are other materials to consider as well. Let's break down the pros and cons of each:
Acoustic Foam:
Pros:
Lightweight and easy to install.
Effective at absorbing mid to high-frequency sounds.
Available in various shapes and designs, allowing for aesthetic flexibility.
Cons:
Less effective at absorbing low-frequency sounds.
Can deteriorate over time, especially if exposed to sunlight or extreme temperatures.
Acoustic Tiles:
Pros:
Typically made of denser materials, making them effective at absorbing a broader range of frequencies.
Durable and long-lasting.
Can be painted or customized to match room aesthetics.
Cons:
Heavier and may require more robust installation methods.
Can be more expensive than foam.
Other Materials:
Bass Traps: Designed specifically to absorb low-frequency sounds, these are essential for rooms with pronounced bass issues.
Diffusers: Instead of absorbing sound, diffusers scatter it, increasing RT60 and creating a more natural sound environment.
Hanging Baffles: Suspended from the ceiling, these are effective in large rooms or spaces with high ceilings.
Choosing the Right Material
The best material for your room depends on various factors, including the room's size, the primary sound sources, and your budget. It's also essential to consider the type of sound issues you're facing. For example, if your room is too dead, diffusers might be more effective than foam. On the other hand, if you're dealing with background noise or mid-frequency disturbances, acoustic foam or tiles might be the best choice.
Remember, acoustic treatment is as much an art as it is a science. While technical specifications and guidelines can guide you, listening to your room and trusting your ears or the ears of someone else is best.
Installation Methods
Proper installation is crucial to ensure the effectiveness of your acoustic treatment. Whether you're using foam, tiles, or other materials, securing them correctly will ensure they function as intended and remain in place over time.
Acoustic Foam:
T-Pins: These are ideal for temporary installations or if you're unsure about permanent placement. They cause minimal damage and can securely hold lightweight foam.
Adhesive Sprays: These provide a more permanent solution. Ensure the spray is suitable for both the foam and the wall material. Remember to allow the adhesive to become tacky before pressing the foam onto the wall for a stronger bond.
Double-Sided Tape: Another temporary solution, suitable for lighter foam panels.
Acoustic Tiles:
Construction Adhesive: Given the weight of tiles, a robust adhesive is recommended. Apply the adhesive to the back of the tile and press it onto the wall. Bracing the tile until the adhesive sets might be necessary.
Mounting Clips: Some tiles come with clips that can be screwed into the wall. The tile then clips onto these mounts, allowing for easy removal if needed.
Other Materials:
Bass Traps: These are typically corner-mounted using construction adhesive or mounting brackets.
Diffusers: Depending on their weight, diffusers can be hung using screws, mounting brackets, or adhesive.
Hanging Baffles: These are suspended from the ceiling using chains or cables. Ensure the ceiling anchors are secure, especially for heavier baffles.
Tips for Installation:
Surface Preparation: Clean the surface thoroughly to ensure adhesives bond correctly. Remove any dust, grease, or loose paint.
Measurement: Before installation, measure and mark where each panel or tile will go. This ensures even spacing and alignment.
Safety: Always wear protective gloves and eyewear, especially when using adhesives or drilling.
Proper installation not only ensures the effectiveness of your acoustic treatment but also contributes to the room's aesthetics. Taking the time to install materials correctly will pay off in the long run, both in sound quality and appearance.
Conclusion
The journey of sound has been a fascinating one, from the raw, unfiltered recordings of the past to the meticulously treated studios of today. Acoustic treatment, while technical, is also deeply personal. It's about understanding the science behind sound and marrying it with individual preferences to create the perfect auditory experience.
Whether you're a professional musician, a budding artist, or simply someone who appreciates good sound, investing time and effort into understanding and implementing acoustic treatment can transform your space.
As we've seen, it's not just about the materials you use, but where and how you use them. So, as you embark on your acoustic treatment journey, remember to listen, experiment, and most importantly, enjoy the process. After all, at the heart of it all is the love for sound.
]]>
https://www.singularsound.com/blogs/news/modern-musicians-guide-to-getting-fans-online-and-locally2023-08-17T17:43:17-04:002023-08-24T11:46:29-04:00Modern Musician's Guide to Getting Fans (Online and Locally)Anthony SostreToday the global stage is literally at the fingertips of every musician. From a local bar gig to streaming platforms reaching millions, opportunities abound for artists willing to navigate both the online and offline music scene.
This guide will walk you through building genuine connections with your fanbase, both locally and online. In doing so, you can solidify their place in the industry and nurture a community that grows organically.
Engage with the Local Scene
With social media and streaming platforms, it's easy to forget the importance of connecting with music fans right in your backyard. A robust and genuine local following can serve as a sturdy foundation for any budding artist, amplifying your growth both online and off. Let's delve into the nuts and bolts of engaging with the local music scene.
Attend and Play Shows in Your Local Area
Starting in your local community can offer a hands-on experience for understanding your audience, fine-tuning your live performances, and making memorable impressions.
Experience and Learn: Attending local gigs isn’t just about promoting yourself. It’s an opportunity to learn from other performers. Typically you’ll be coming after or before another performance. Arrive early (or stay late) and watch their stage presence, audience engagement techniques, and even how they manage technical mishaps. These experiences can be invaluable as you grow as a performer.
Showcase Your Talent: Playing shows isn’t just about getting your music out there. It's about telling a story, connecting with fans, and creating an experience that attendees will talk about and share with others. Remember, word of mouth is powerful, and a killer live show can generate a lot of buzz.
Make Friends Who Are Musicians
In the world of music, networking is key. This isn’t the shallow, business-card-swapping kind of networking, but genuine relationship-building.
Shared Opportunities: By making friends in the industry, you might find opportunities to collaborate, share gigs, or even team up for promotional efforts. Perhaps you can open for a band with a slightly larger following, or they can introduce you to important contacts like local radio hosts or event organizers.
Learn and Grow Together: Fellow musicians can offer valuable feedback on your music, share their own experiences, and provide emotional support during tough times. Think of them as colleagues in a unique workplace where camaraderie can lead to collective success.
Cultivate a Live Audience
Your local audience can be your initial online ambassadors. They’re the ones who'll share your music, tag you in posts, and bring the online traction that’s crucial in today’s music scene.
Engage at Shows: After a performance, take the time to chat with attendees. Thank them for coming, ask for feedback, and encourage them to connect with you on social media. Personal connections can make a fan feel special and invested in your success.
Online Engagement: Once you’ve built that local fan base, nurture it online. Share behind-the-scenes glimpses of rehearsals, songwriting sessions, or even the challenges you face. Responding to comments and messages can also further solidify your bond with fans.
Use Locality to Your Advantage: Local landmarks, events, or even quirks can be highlighted in your posts to resonate with your local audience. As your local followers engage, the algorithms of social media platforms will take notice, showing your content to an even broader audience.
Utilize the Internet Effectively
If we think of your fanbase as a tree, local connections form the roots, but online platforms are the branches that allow your music to spread far and wide. Harnessing the power of the internet can amplify your reach, bringing your sound to fans across the globe. Let's explore how to make the most of the online world.
Craft a Strong Music Portfolio
Before venturing into the competitive landscape of online music, ensure you have a vault of quality tracks. Your sound is your signature, so it’s worth investing time in refining and mastering it. Regularly review your songs, solicit feedback, and be open to making changes. Remember, quality always trumps quantity.
Consistent Releases on Streaming Platforms
Platforms like SoundCloud and Spotify have emerged as pivotal spaces for independent artists. Regular and consistent releases can keep you in the listeners' radar, ensuring that your music stays relevant. Use tools and analytics provided by these platforms to understand your listeners' preferences and optimize your releases accordingly.
Effective Promotion Techniques
Once you have a song ready, it deserves to be heard. Dedicate resources to promote your tracks, especially during their launch phase. Spotify ads and SoundCloud promotions can boost your tracks' visibility, helping them reach potential fans. Equally, platforms like SubmitHub offer opportunities for your tracks to be featured on prominent YouTube channels, blogs, or even radio stations.
YouTube channels and playlists on streaming platforms can be a huge resource for artists to get heard by potential fans looking for new music in their favorite genres.
Collaborate and Network Online
Connect with other artists, especially those who complement your sound. Collaborations can introduce your music to another artist's fanbase, and vice versa. Engaging in online music scenes, like forum discussions or social media groups, can also offer exposure and valuable insights.
If you’re wondering which artists are the best to connect with, try looking at the following:
“Fans Also Like” or “Similar Artists” sections on your soundcloud or streaming profile pages.
The artists your fans follow.
Artists who are one step removed in your network. (e.g. you collaborated with artist A, and artist A collaborated with artist B, so you ask A to introduce you to B.)
Engage with Your Online Community
Interaction is the heartbeat of online success. Every like, comment, or share is an endorsement of your work. Responding to fans, thanking them for their support, and even addressing criticisms can foster a dedicated online community. Not only does this build loyalty, but active engagements also feed into platform algorithms, potentially enhancing your visibility.
Conclusion
In the music industry, versatility and adaptability are paramount. As we've explored, the balance between forging local connections and utilizing online platforms is the key to a sustainable musical journey. Embracing both can set the stage for an artist's longevity and success.
Stay passionate, stay connected, and remember: your music has the power to resonate, both at home and beyond.]]>
https://www.singularsound.com/blogs/news/songsterr-vs-ultimate-guitar-an-in-depth-comparison2023-08-09T14:06:27-04:002024-03-11T19:32:05-04:00Songsterr vs Ultimate Guitar: An In-Depth ComparisonAnthony Sostre
Have you ever wondered where to turn for the best guitar tabs and lessons online? Two names often pop up in this discussion: Songsterr and Ultimate Guitar. But which one truly stands out? Let's find out by taking a look at the following factors:
pricing
accurate tabs
tab collections
player feedback
Pricing Comparison: Which Guitar Tab Platform is the Cheapest?
Songsterr's paid version costs $9.99 a month, a stark contrast to Ultimate Guitar Pro's $25 monthly fee. However, for those looking for a longer commitment, Ultimate Guitar provides an annual subscription option at $99. This makes Ultimate Guitar cheaper, if you're willing to fork up the cash up front. Of course both offer a free version as well, which removes some of the helpful functions like solo mode,
A notable mention for Ultimate Guitar is its unique offer where contributors can sometimes get premium access for free by submitting a tab. This not only encourages community participation but also provides an affordable way for budding musicians to access premium features.
When it comes to value for money, it's essential to delve deeper into what each platform offers, ensuring that users get the most bang for their buck.
But How Good are the Guitar Tabs?
At the end of the day, no other features, pricing, or anything matters if the guitar tabs from Ultimate Guitar or Songsterr are no good. So how do the guitar tabs from each platform compare?
Song Selection
As an avid player myself with a penchant for rock, stoner, metal and even video game soundtracks, I play a pretty wide and varied selection. In some cases, I'm looking for tracks from popular artists that have just released and in others a niche sound track that the majority of guitarists may not have even heard of!
At the end of the day, Songsterr tabs are fewer and take longer to get onto the platform, whereas the tabs on Ultimate Guitar Pro are more plentiful and get updated/uploaded faster. That being said Songsterr doesn't slouch and will likely meet most guitarists appetite for guitar tabs.
Accuracy and Authenticity
While a broad song selection is a significant advantage, the accuracy of tabs is equally crucial. Songsterr, despite its slightly smaller collection, often stands out for its tabs that mirror the exact position on the fretboard used by the original artists. This precision becomes evident when comparing songs across platforms.
Take, for instance, the song "Emotion Sickness" by Queens of the Stone Age. After watching a live performance and observing Josh Homme's playing, it was clear that Songsterr's tab was more in line with the original.
However, personal preferences play a significant role in tab selection as well. While the Songsterr tabs offered a more accurate rendition, the Ultimate Guitar tabs, although not exact, provided a unique advantage. Positioned differently on the neck, it allowed for more improvisation and ad-libbing during performances, making it a preferred choice for me.
Tabs, in essence, are more than just about accuracy; they're about how they resonate with the player. Some might seek authenticity, while others might opt for tabs that offer more freedom and flexibility in their performances. And in any case, we only tested a limited selection, and you may find that the tabs in your genres of choice/from your artists of choice are better on one platform or another.
Ease of Use and Functionality
Both Songsterr and Ultimate Guitar offer a similar feature set, but the user interface and features.
Songsterr's Sleek Design
Songsterr stands out with its modern and user-friendly interface. One of the most appreciated features is its dark mode, which not only gives the platform a contemporary feel but also reduces eye strain during extended browsing or practice sessions. The platform's layout is intuitive, with clearly labeled sections and a straightforward search function. Additionally, Songsterr's display of difficulty levels for each song provides users with a quick overview, allowing them to gauge if a song aligns with their skill set.
Ultimate Guitar's Functional Approach
Ultimate Guitar, on the other hand, takes a more functional approach. While its interface might not win design awards, it's practical and gets the job done. The platform's strength lies in its vast content, and the UI is designed to make this content easily accessible. One area where Ultimate Guitar could improve is its difficulty filter. Currently, it's tucked away, offering only three levels: beginner, intermediate, and advanced. Bringing this feature to the forefront could enhance the user experience, especially for those looking to find songs that match their proficiency.
What are Others Saying About Songsterr vs Ultimate Guitar Pro?
Forums, social media platforms, and review sites are flooded with discussions, debates, and opinions about every conceivable guitar-related topic. When it comes to Songsterr and Ultimate Guitar, the online guitar community has a lot to say.
Songsterr often receives accolades for its sleek and modern user interface. Many users appreciate the platform's dark mode, which offers a visually pleasing experience, especially during extended sessions. The accuracy of Songsterr's tabs, particularly for certain songs and genres, is another point of praise. However, some users have pointed out that while Songsterr offers quality, it might not always match the vast quantity of tabs available on other platforms.
One of the few areas where the community favors Ultimate Guitar is do to its inclusion of multiple versions. This feature is liked by guitarists who value the ability to see multiple takes on the same piece of music.
Conclusion
Both platforms, with their unique strengths and weaknesses, cater to a diverse range of guitarists, from budding strummers to seasoned shredders. While Songsterr shines with its modern interface and focus on quality, Ultimate Guitar stands tall with its vast collection and community-driven ethos. At the end of the day, the choice between the two often boils down to individual preferences and specific musical needs.
]]>
https://www.singularsound.com/blogs/news/unleash-the-beast-top-doom-metal-fuzz-pedals-compared2023-07-28T17:54:05-04:002024-03-11T19:29:27-04:00Unleash the Beast: Top Doom Metal Fuzz Pedals ComparedAnthony Sostre
When it comes to playing Doom Metal, the right fuzz pedal can make all the difference. From budget-friendly options to standard favorites and boutique gems, there's a vast array of pedals out there, each offering its unique flavor of fuzz. In this guide, we'll explore a selection of fuzz pedals that stand out in the doom metal scene, discussing their features, tonal qualities, and how they can shape your sound.
March 2024 Update:
Since this article's original creation I've been trying more fuzz pedals (especially on the boutique front) on my never ending quest to find my "perfect tone". I've also been playing live more and gained more experience with settings, and wanted to edit this article to reflect my experiences with new doom pedals as well as how I'm setting them these days.
Understanding and Crafting the Perfect Doom Metal Tone
In the realm of Doom Metal, the tone is not just a component of the music—it's the very essence that defines it. The heavy, slow, and powerful sound of Doom Metal is a sonic signature that sets it apart from other genres. But how does one craft this unique style of metal music? Let's explore the elements that contribute to the perfect Doom Metal tone.
Dialing it in: Thick and Heavy Amp Settings
In Doom Metal, the amp plays a crucial role in shaping the overall sound. Tube amps are often favored for their warm, rich tones and natural distortion, but in doom, it's some of the most popular amps are solid states. Marshall, Sunn, Orange, and Laney amps are popular choices among Doom Metal guitarists for their ability to deliver a thick, heavy sound.
If you're in search of a great amp for doom metal, a common and affordable option is the Orange Super Crush 100. EQ is going to vary based on the amp you're using, but generally pushing more bass frequencies is advisable. It's common to scoop the mids a tad (not quite as much as other metal genres) but while this sounds good playing alone, you'll need to bring the mids back up to cut through in a band mix.
Typically, doom metal requires a high level of gain to achieve its signature heavy, distortion. Try setting your gain around 8. This should give you a good amount of distortion without losing the definition of your notes. Alternatively, and especially if you're using some of the pedals below, you can run your amp as a clean pedal platform.
Remember, these are just starting points. Every guitar, amplifier, and pedal will respond differently, so don't be afraid to tweak these settings to suit your gear and your personal taste. The key is to experiment until you find the sound that's right for you.
The Many Faces of Doom: Subcategories, Related Genres, and Inspiration
Doom Metal itself is a broad genre with various subcategories, each with its own distinctive sound and feel. Traditional Doom, for example, often features a cleaner, more classic rock approach, while Funeral Doom goes for an extremely heavy, distorted walls of sound to create a slow, mournful approach to metal. Stoner Doom, on the other hand, is known for its fuzzy, psychedelic tone. Understanding these subcategories can help you refine your gear and playing based on the specific style of Doom Metal you're aiming for.
Here's a full list of subcategories with brief descriptions and examples:
Traditional Doom: Classic rock-inspired with cleaner distortion. Example: Pentagram, "Relentless"
Funeral Doom: Extremely heavy, slow, and mournful. Example: Skepticism, "Stormcrowfleet"
Stoner Doom: Fuzzy and psychedelic with a heavy emphasis on riff-driven structures. Example: Sleep, "Dopesmoker"
Sludge Doom: Combines the slow tempos of doom metal with the aggression of hardcore punk. Example: Crowbar, "Odd Fellows Rest"
Drone Doom: Minimalistic, with long, sustained notes and heavy distortion. Example: Sunn O))), "Monoliths & Dimensions"
Epic Doom: Incorporates clean vocals and melodic elements, often with fantasy-themed lyrics. Example: Candlemass, "Epicus Doomicus Metallicus"
Death/Doom: Combines the slow tempos of doom metal with the growling vocals and double-kick drumming of death metal. Example: My Dying Bride, "Turn Loose the Swans"
Black/Doom: Fuses the slow tempos and heaviness of doom metal with the raw atmosphere of black metal. Example: Forgotten Tomb, "Songs to Leave"
Gothic Doom: Incorporates gothic elements like dark, romantic, and melancholic atmospheres with clean vocals. Example: Paradise Lost, "Draconian Times"
For inspiration, you should also listen to the pioneers of the genre. Many guitarists consider Black Sabbath's debut album a masterclass in Doom Metal, with Tony Iommi's heavy, distorted guitar setting the standard for the genre. Another more recent example is "Dopethrone" from Electric Wizard, which showcases the power and depth that can be achieved with the right combination of gear and technique. I've also personally found Windhand to be an excellent source of inspiration.
Now that we've explored the various subgenres of Doom Metal and the importance of amp settings, it's time to delve into the heart of the Doom Metal: the fuzz pedal. This essential piece of gear is what gives Doom Metal its signature heavy distortion. Whether you're on a budget or looking to splurge on a boutique model, there's a fuzz pedal out there perfect for you.
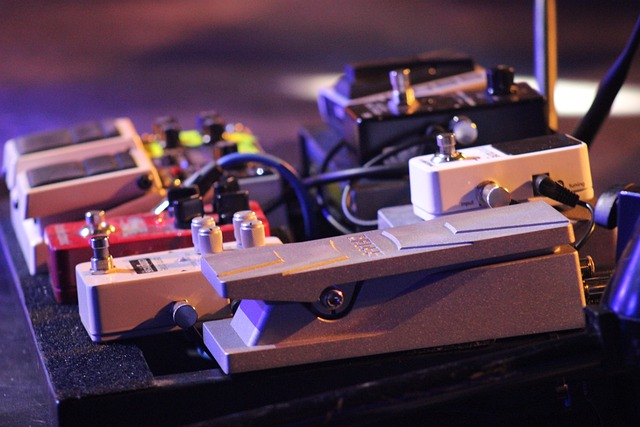
Doom on a Budget: Affordable Fuzz Pedals
When it comes to crafting your perfect Doom Metal pedal board, you don't necessarily need to break the bank. There are several budget-friendly fuzz pedals that deliver fantastic sound quality. Each pedal we're looking at here costs $50 or less (at the time of writing). Let's take a closer look:
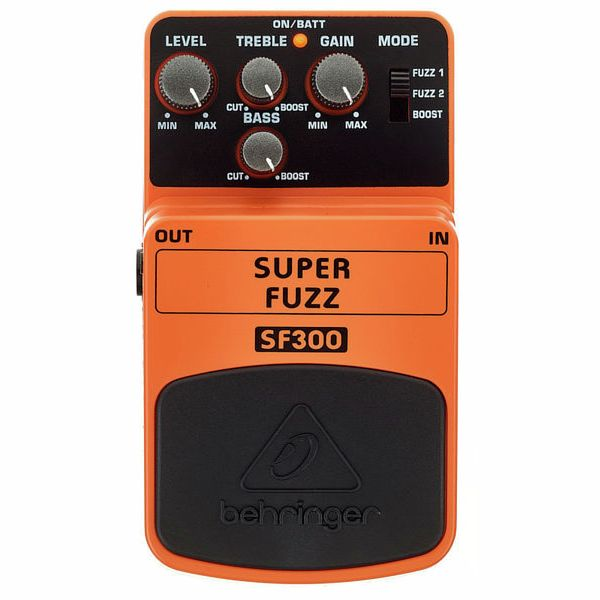
Behringer SF300 Super Fuzz Pedal
This pedal is a clone of the legendary Boss FZ-2 Hyper Fuzz, a pedal that has been a staple in the rigs of many Doom Metal guitarists. The SF300 offers three different modes: Fuzz 1, Fuzz 2, and Boost. Each mode provides a unique tonal character, giving you a range of possibilities from a smooth, vintage fuzz to a more aggressive, modern tone.
Despite its budget-friendly price, the SF300 is capable of delivering a rich, heavy sound that's perfect for Doom Metal. But what about its durability? The SF300 is made of plastic, which might initially raise some eyebrows. However, many users have reported that the pedal is quite sturdy and reliable despite its plastic construction. It seems to hold up well under regular use, and we couldn't find any instances of the pedal breaking online.
In fact, quite to the contrary, we found a pretty crazy torture test of the pedal by the YouTube channel "The Tone Mob":
As far as controls go, you may want to start with the Fuzz 1 mode, then set the level to the desired volume and run high gain for a heavy distorted sound.
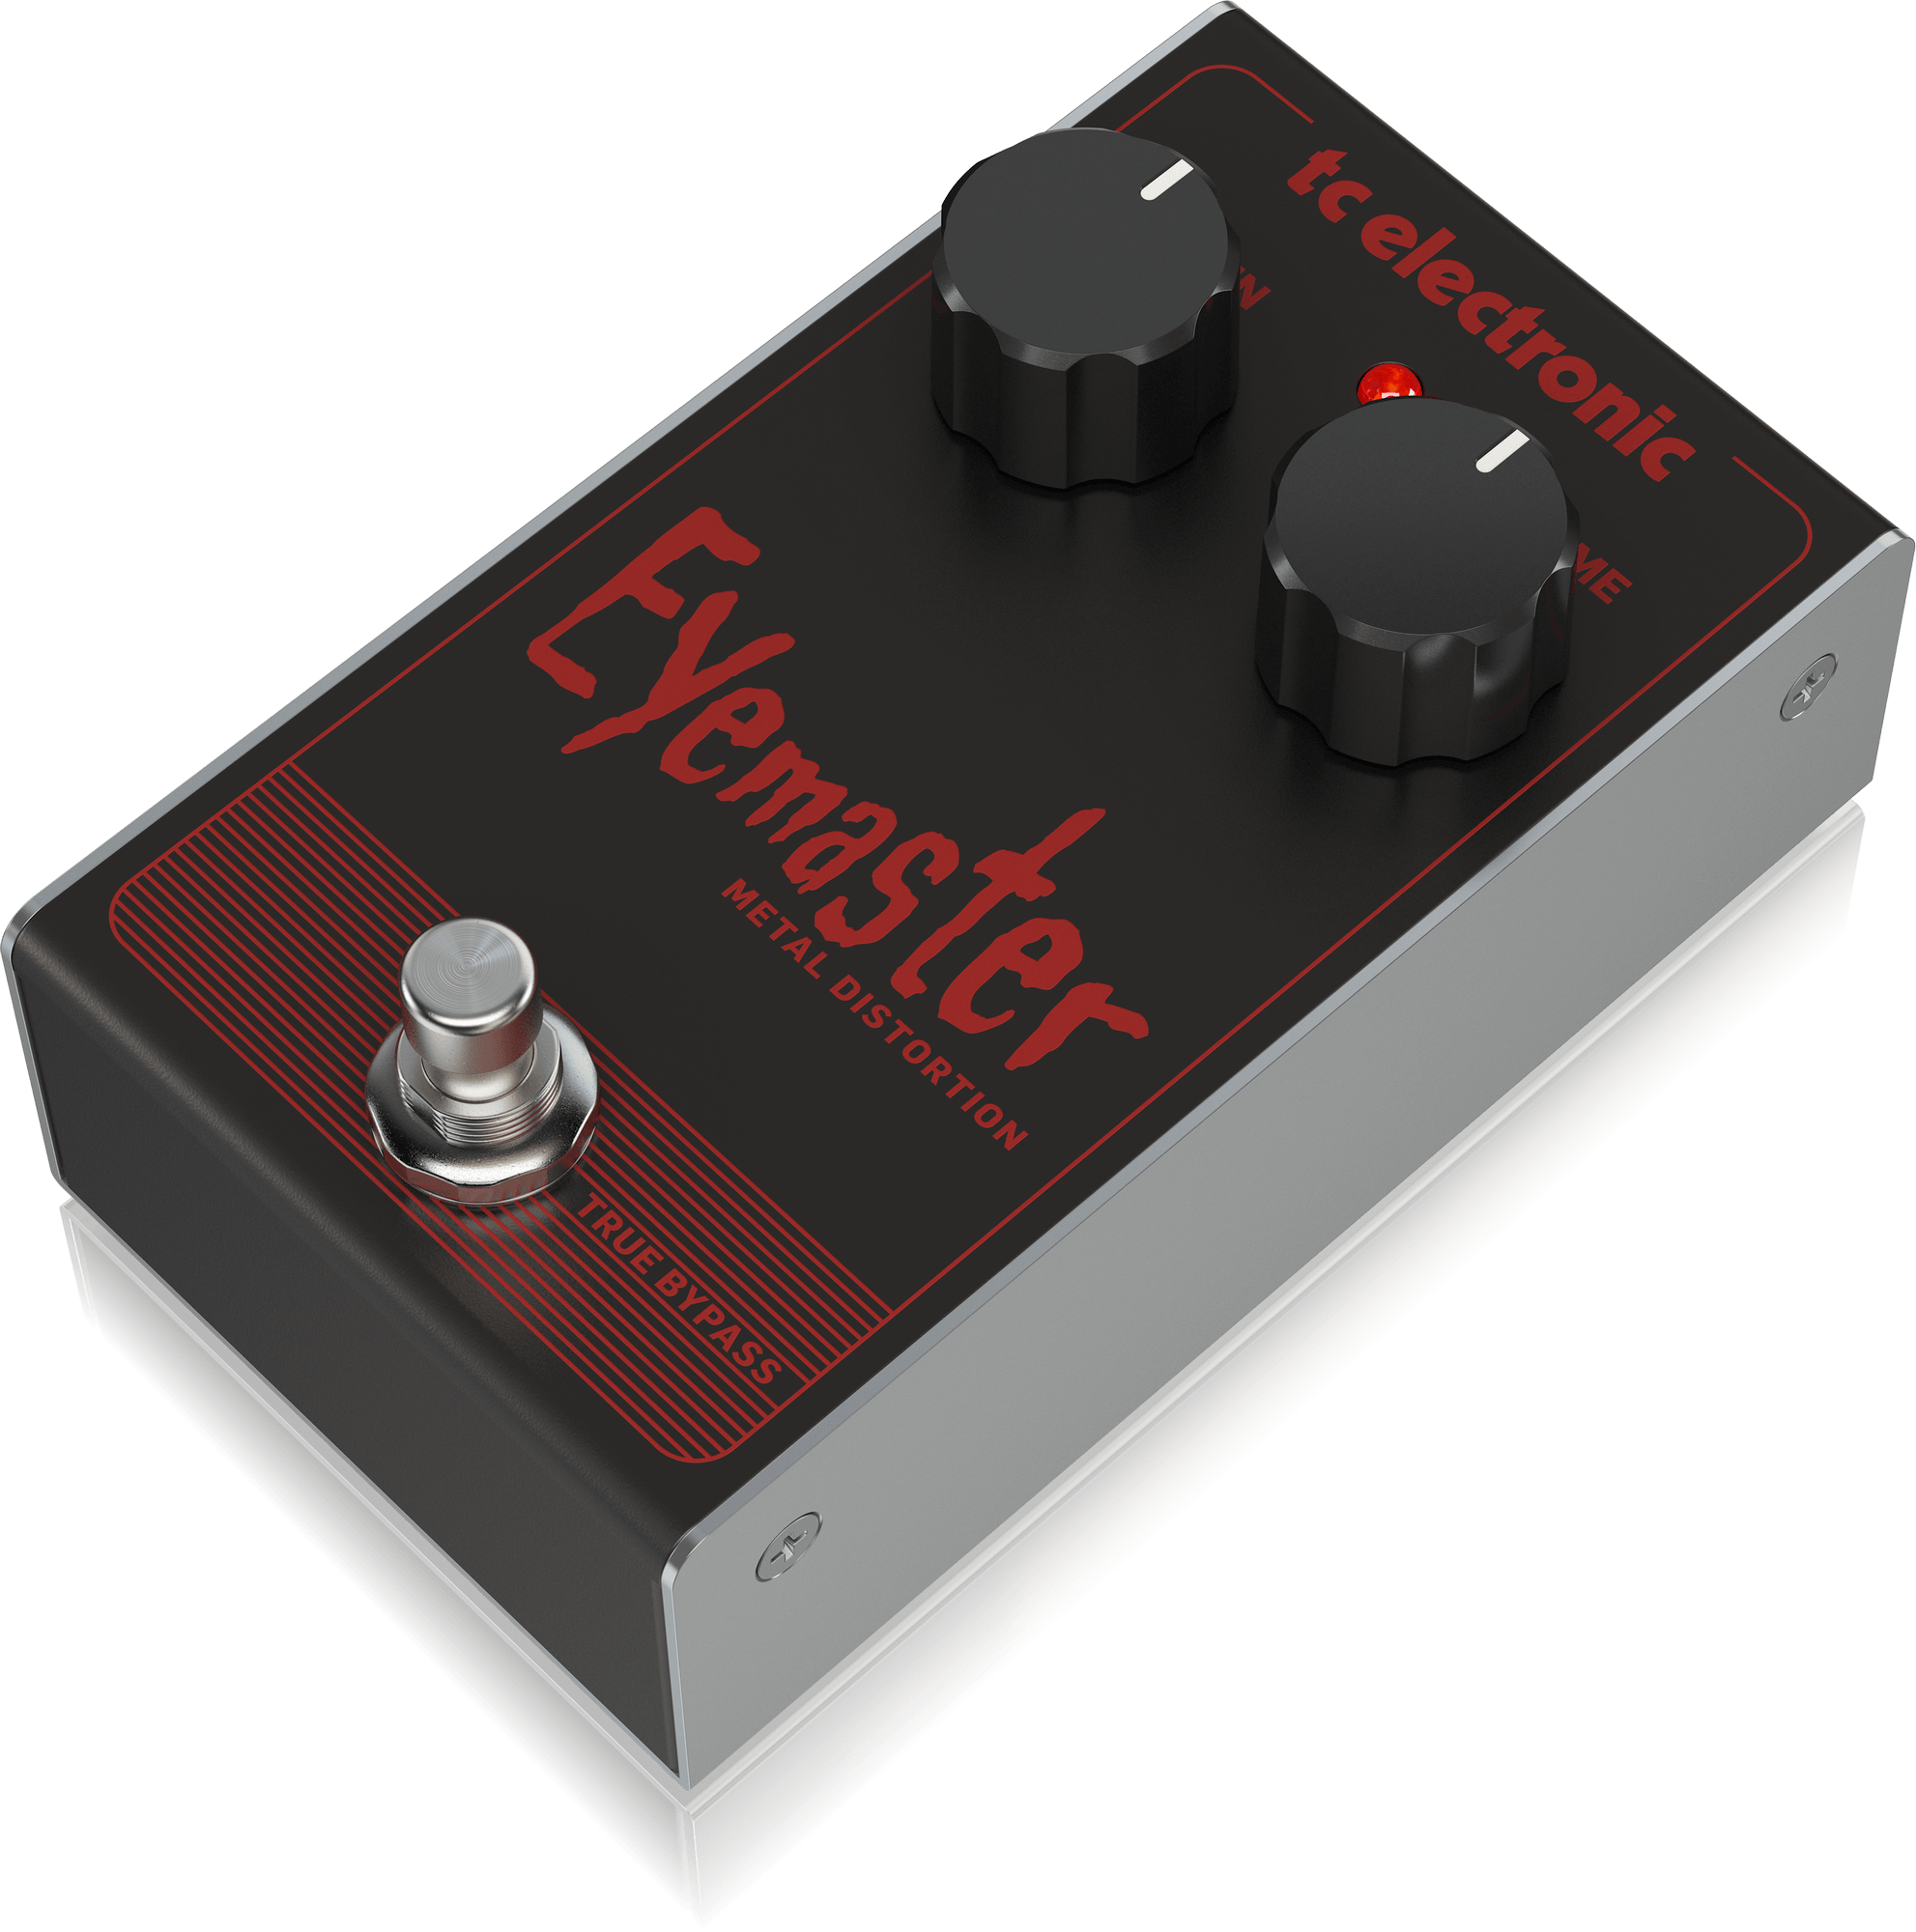
TC Electronic Eye Master
Inspired by the Swedish Death Metal scene, the Eye Master is more than capable of delivering the heavy, distorted tones required for Doom Metal. Its simple two-knob design makes it easy to dial in your sound, but don't let its simplicity fool you. The Eye Master can deliver a massive, distorted tone that's perfect for heavy riffs. Whether you're playing slow, crushing riffs or faster, more aggressive sections, the Eye Master has you covered.
As far as settings go, we'll take a line straight off of TC Electronic's website: "Just set the volume (all the way up, right?) and adjust the gain (anything less than all-the-gain is sacrilege) and start riffing."
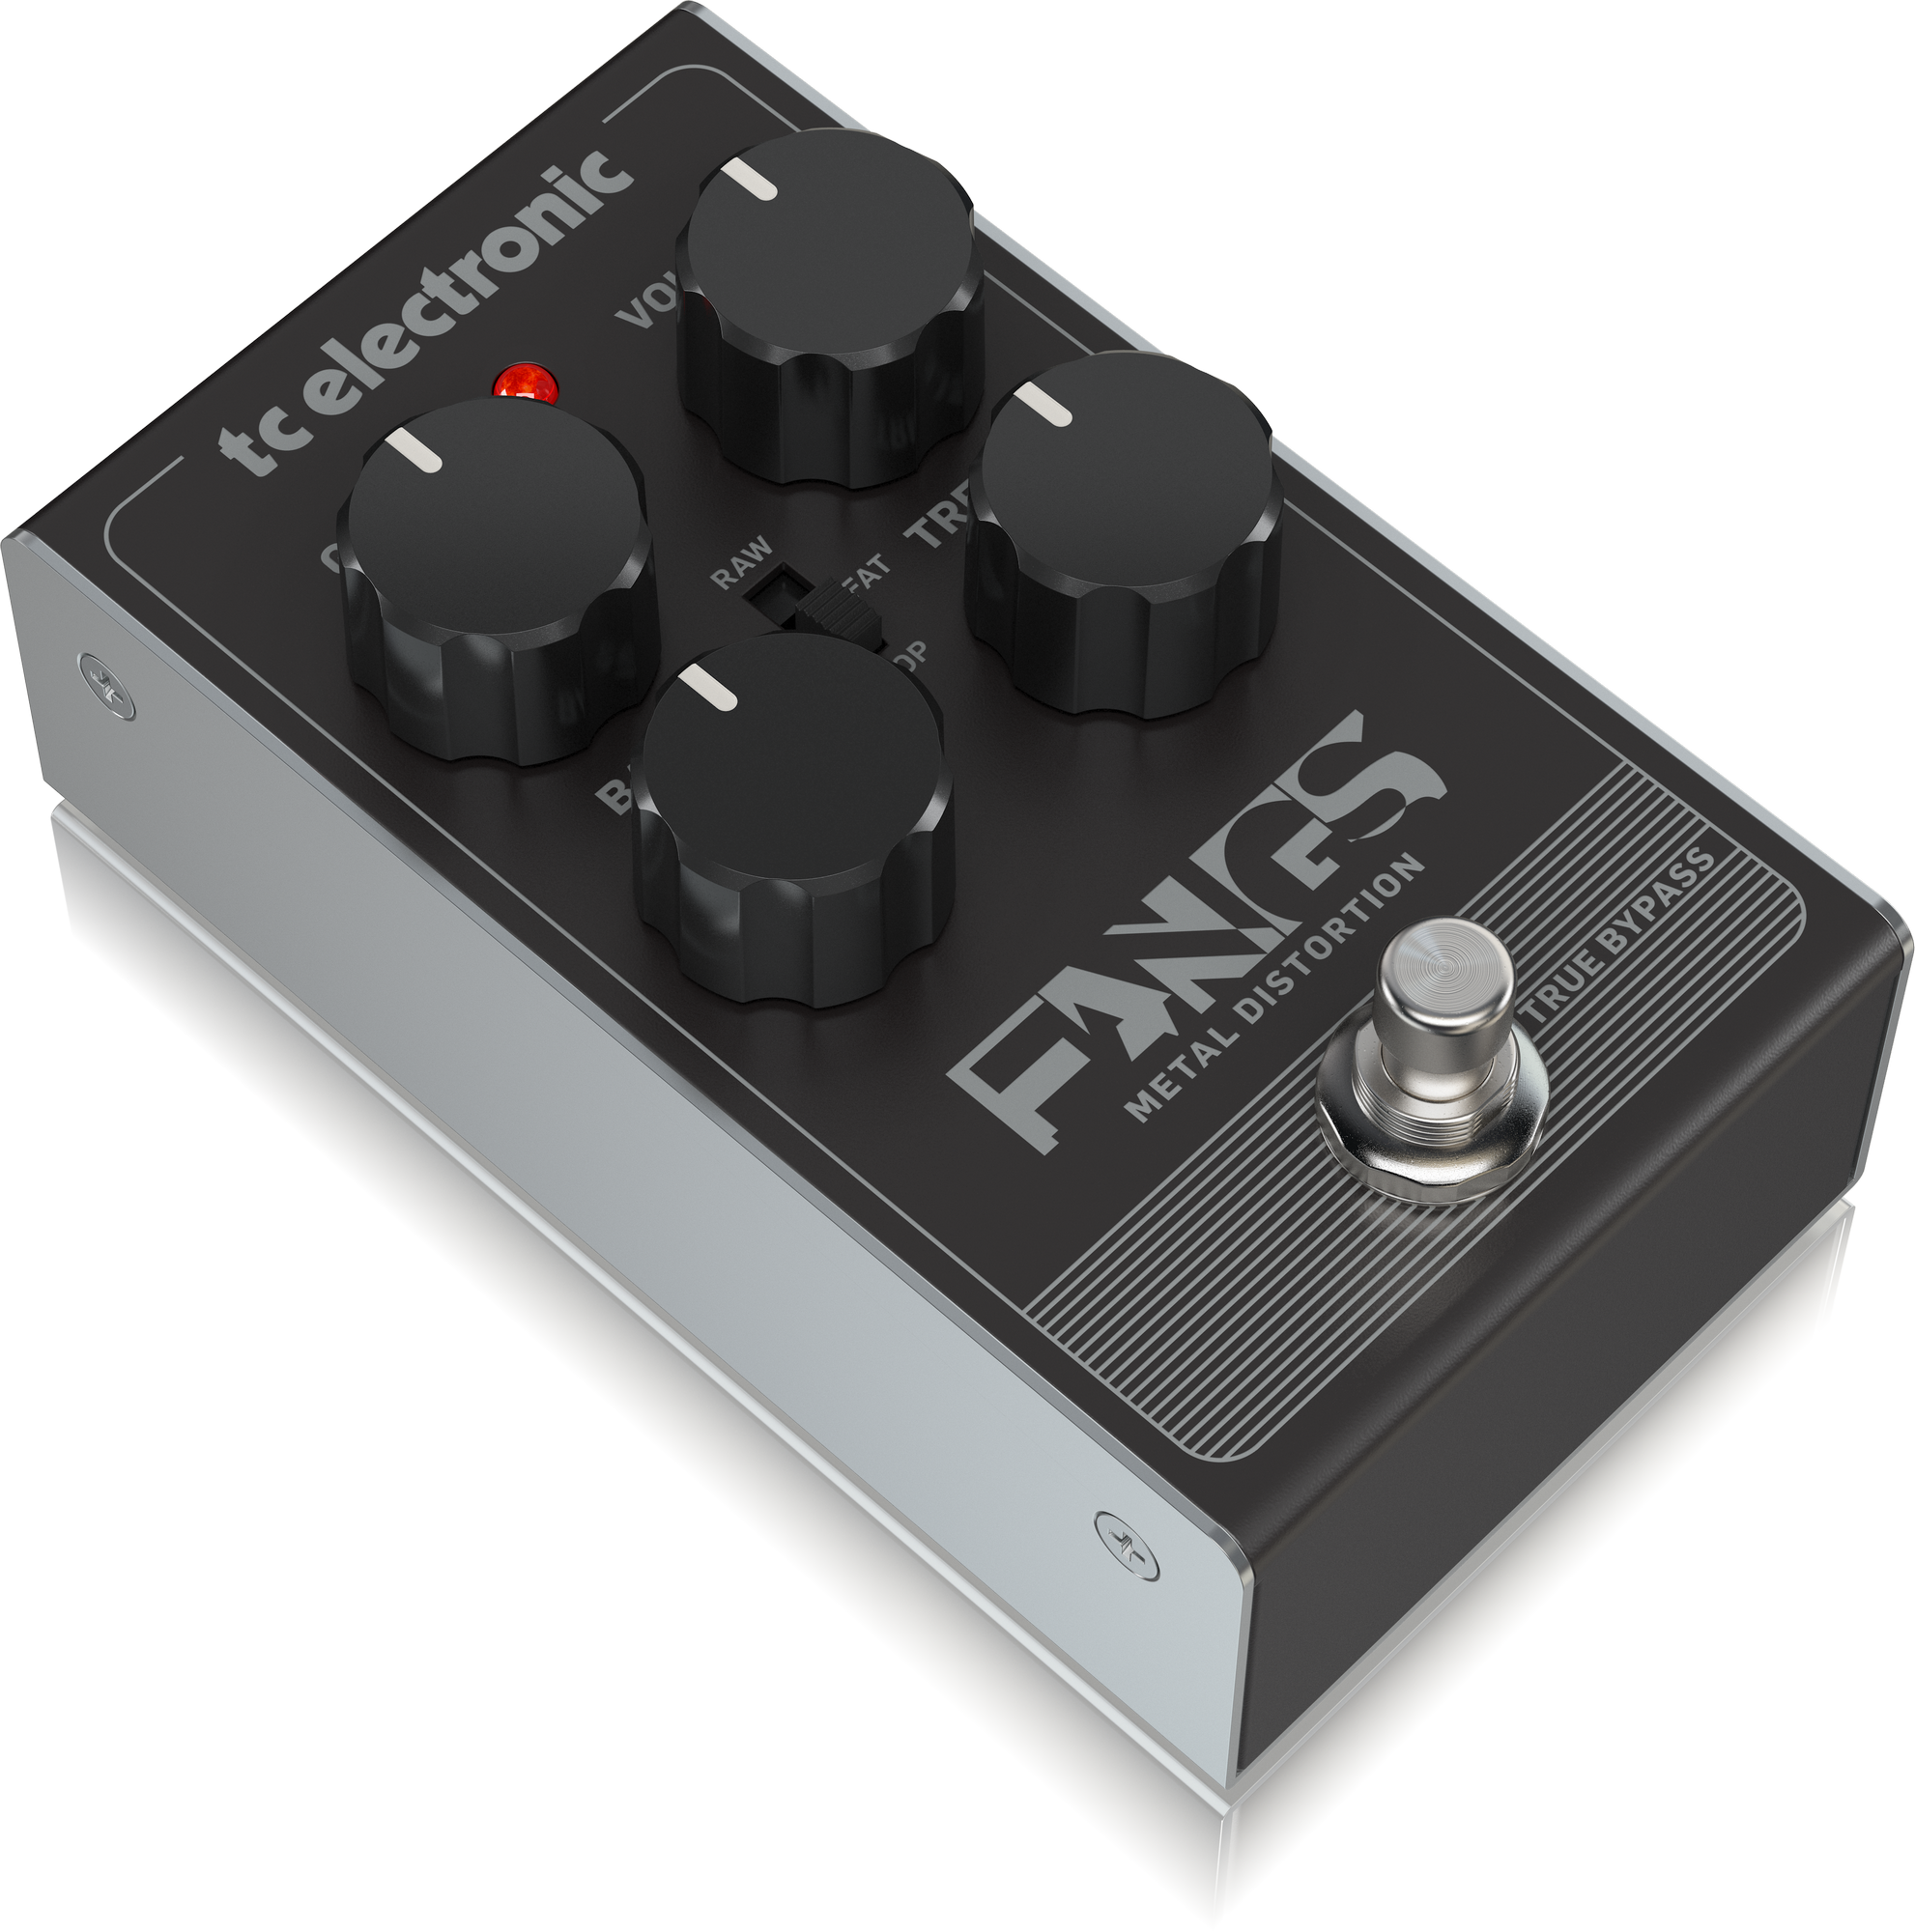
TC Electronic Fangs
Another pedal in TC Electronic's affordable line, the Fangs is a versatile fuzz/distortion pedal that offers a wide range of distorted tones. From a light, fuzzy overdrive to a heavy, doom-laden distortion, the Fangs can do it all. Its three-way toggle switch lets you choose between different clipping modes, adding even more tonal variety. The Fangs is not only affordable but also compact, making it a great choice for guitarists with limited pedalboard space.
It has a bit more flexibility than the previously mentioned pedals on our list, with a three-way toggle switch for different clipping modes. For Doom Metal, you might want to try the "Raw" setting for a heavy, unfiltered distortion. Set the volume and gain high for a thick, saturated sound, and adjust the tone to bring out the low frequencies.
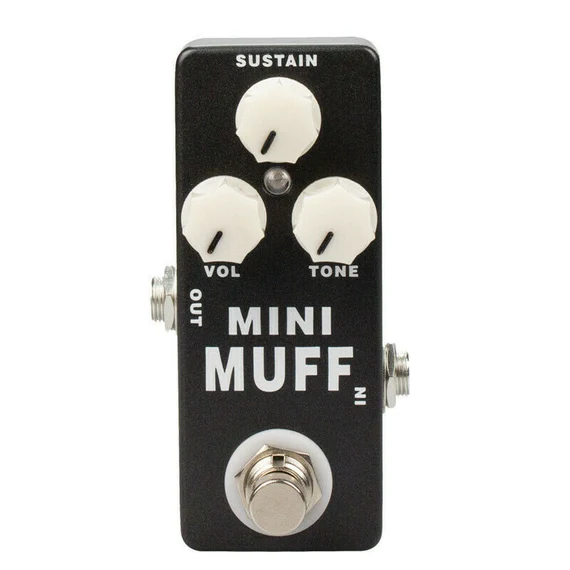
Mosky MINI MUFF
This pedal is a clone of the Big Muff Pi, known for its rich, creamy fuzz. It's regularly available on Amazon and eBay for around $30 and features a smaller form factor than a Big Muff while nailing the sound.
For Doom Metal, you might want to set the sustain high for a heavy, sustained tone. The tone control on the MINI MUFF is a bit unique: turning it clockwise increases the amount of high frequencies and decreases the amount of low frequencies, and vice versa. For Doom Metal, you might want to turn the control counterclockwise to emphasize the low end.
Tried and True: Most Common Fuzzes
When it comes to crafting the quintessential doom metal tone, certain pedals have earned their place in the pantheon of essential gear. These are the pedals that you'll frequently find on the pedalboards of seasoned doom metal guitarists, offering a balance between quality, versatility, and accessibility. In this section, we'll delve into some of the most popular and widely-used fuzz pedals, exploring their unique characteristics and how they contribute to the heavy, distorted sound that defines the genre.
The pedals we'll be discussing include the iconic Big Muff, known for its massive, fuzzy distortion; the Proco Rat, celebrated for its wide range of tones; the EQD Acapulco Gold v2, designed to emulate the sound of a cranked vintage tube amp; the EQD Hoof Reaper, a three in one pedal with a built-in octave up effect; the DOD Carcosa, a versatile fuzz pedal that can produce a wide range of tones; and the EQD Hizumitas, another pedal designed to emulate a cranked vintage tube amp.
Each of these pedals brings something unique to the table, and understanding their individual characteristics can help you choose the right one for your doom metal sound. Let's dive in and explore each one in more detail.
The Big Muff (and its Countless Variants)
The Big Muff is a legendary line of pedals that have been a staple in the world of rock and metal for decades. Known for rich, creamy fuzz and massive sustain, Big Muffs have been used by countless artists across various genres, including many doom metal guitarists.
One of the unique aspects of the Big Muff is that it comes in several different versions, each with its own distinctive sound.
The NYC Big Muff is the standard version that most people are familiar with. It delivers the classic Big Muff sound with a big, heavy fuzz and a significant amount of sustain.
The Triangle Big Muff, named for the layout of its knobs, was the original version of the pedal. It's known for its smooth, violin-like sustain and slightly less aggressive fuzz compared to later versions.
The Ram's Head Big Muff, named for the small ram's head symbol on its face, is known for its slightly scooped mids, making it a bit clearer and less muddy than other versions.
The Russian Big Muff, which comes in several versions itself (including the Black Russian and the Green Russian), is often recommended. It's known for its darker, smoother tone with less grit and more low-end compared to the NYC Big Muff. This makes it perfect for the heavy, downtuned riffs that are characteristic of doom metal.
The best version for you will depend on your specific gear and personal preferences. Don't be afraid to experiment with different versions and even clones and derivatives to find the one that fits you the best.
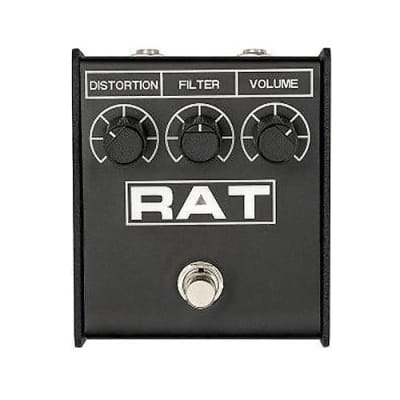
Proco Rat
I'm cheating a little bit by including this on the list as technically the RAT isn't a fuzz, but it can definitely get into the territory when you really push the gain.
One of the standout features of the Rat is its filter control, which works in reverse compared to the tone controls on most other pedals. Instead of adding treble when turned clockwise, the filter knob on the Rat reduces high frequencies, allowing you to dial in a darker, heavier tone.
When setting up the Rat, you might want to start with the distortion set fairly high to achieve a heavy, saturated tone. The filter can be adjusted to taste, but a lower setting (turned more clockwise) will give you a darker, more doom-laden sound. The volume can be set to match the level of your clean tone or adjusted for a boost.
Here's a suggested starting point:
Distortion: Set to around 3 o'clock for a heavy, saturated tone, lower gain levels start to act as a distortion and then overdrive.
Filter: Adjust to taste. There's really no rule of thumb here, I run mine at around 11 o'clock.
Volume: I prefer to push my volume up a bit higher than unity gain. One of the peculiarities of the RAT circuit is that volume affects the EQ. I'm usually somewhere between 1:30 and 3 o'clock.
Remember, these are just starting points, and the best settings will depend on your specific gear and personal preferences. Don't be afraid to experiment with different settings to find your perfect doom metal tone.
One thing to add is that the RAT can make an excellent EQ shaping tool and additional gain stage when stacking pedals. In particular the RAT + Muff combo is one of the best pedal combinations I've ever tried, capable of delivering punishing walls of sound and thick, just tight enough, chugs. I highly recommend trying some form of RAT into a muff, you won't be disappointed.
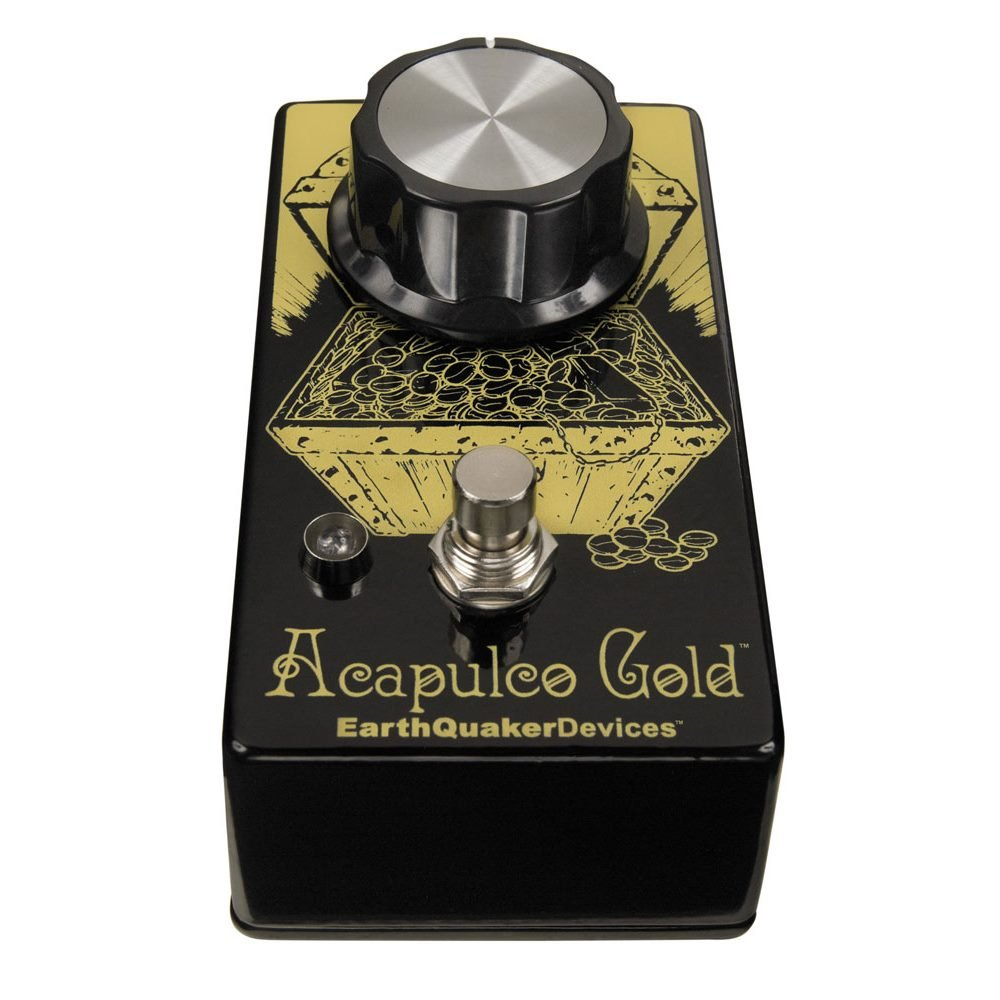
The EQD Acapulco Gold V2 is a unique beast. Often referred to as a one knob fuzz, this pedal is designed to emulate the sound of a cranked vintage tube amp.
The single volume knob on the pedal controls the output level, but the real magic happens with your guitar's volume knob. By adjusting your guitar's volume, you can go from a light, gritty overdrive to a heavy, saturated distortion, all while maintaining the character of your guitar's tone.
You may worry that the lack of a tone knob would be limiting, but the Acapulco Gold V2 proves that this isn't the case. Despite its simplicity, its capable of delivering a wide range of tones, from bright and cutting to dark and heavy. The key is to use your guitar's tone knob to shape the sound. By rolling off the tone on your guitar, you can achieve a darker, doomier sound.
The pedal is certainly one of the most unique I've tried, but in the end it didn't stay on my board. I found it to be too noisy in particular, and prefer the added flexibility I can get through stacking a fuzz and distortion/overdrive together.
EarthQuaker Devices Hizumitas
The EQD Hizumitas is a unique fuzz pedal that's designed to capture the signature sound of Wata from the Japanese band Boris. Known for her heavy, fuzzy tone, Wata's sound has been meticulously distilled into this pedal, making it a fantastic choice.
The volume knob sets the output level, the sustain knob adjusts the amount of fuzz, and the tone knob allows you to shape the pedal's EQ.
The Hizumitas is known for its darker, heavier sound, which is perfect for the low-tuned, slow-tempo riffs that characterize doom metal. Despite its heavier nature, the pedal is surprisingly versatile. By adjusting the sustain and tone knobs, you can dial in everything from a light, gritty overdrive to a heavy, saturated fuzz.
You might worry that the lack of a mid control would be limiting, but the Hizumitas proves that this isn't the case. The tone knob allows you to shape the sound to your liking.
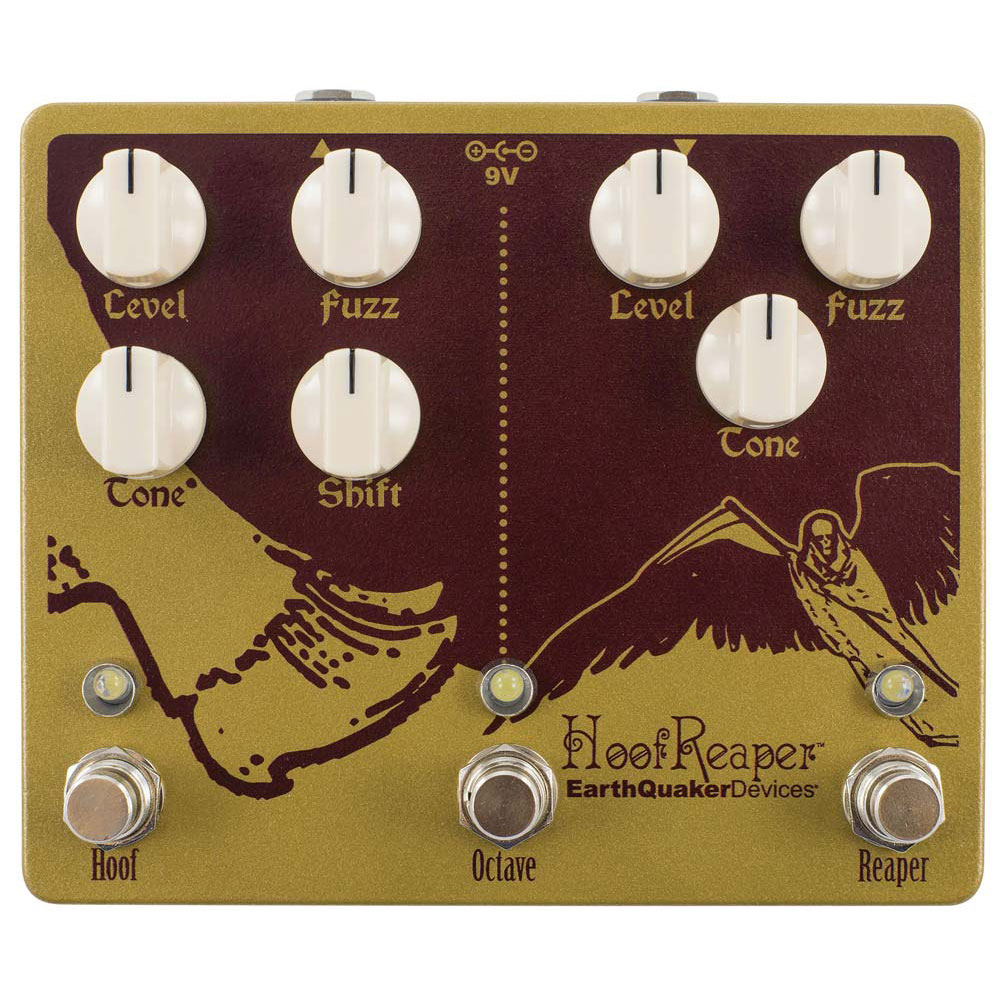
EarthQuaker Devices Hoof Reaper
The EQD Hoof Reaper is a premium fuzz pedal that combines two of EarthQuaker Devices' most popular pedals, the Hoof and the Tone Reaper, with an added octave up effect. This makes it one of the most versatile doom pedals on the market, capable of delivering a wide range of tones.
The Hoof side of the pedal is based on the classic green Russian Big Muff, known for its smooth, creamy fuzz and deep low end. The Tone Reaper side is a vintage-style fuzz that's designed to capture the raw, gritty tone of a classic 60s fuzz. The added octave up effect can be used with either side or both, adding a high, piercing tone that can cut through the mix.
One thing to note about the Hoof Reaper is its price. At $299, it's one of the more expensive pedals on our list. However, considering that you're essentially getting three pedals in one, many guitarists find it to be a worthwhile investment.
As for the settings, the Hoof Reaper offers a lot of flexibility. Each side of the pedal has its own set of controls, allowing you to dial in a wide range of tones. For a typical doom metal sound, you might want to set the fuzz controls high for a heavy, saturated tone and adjust the tone controls to bring out the low end. The octave up effect can be used sparingly to add a bit of edge to your sound.
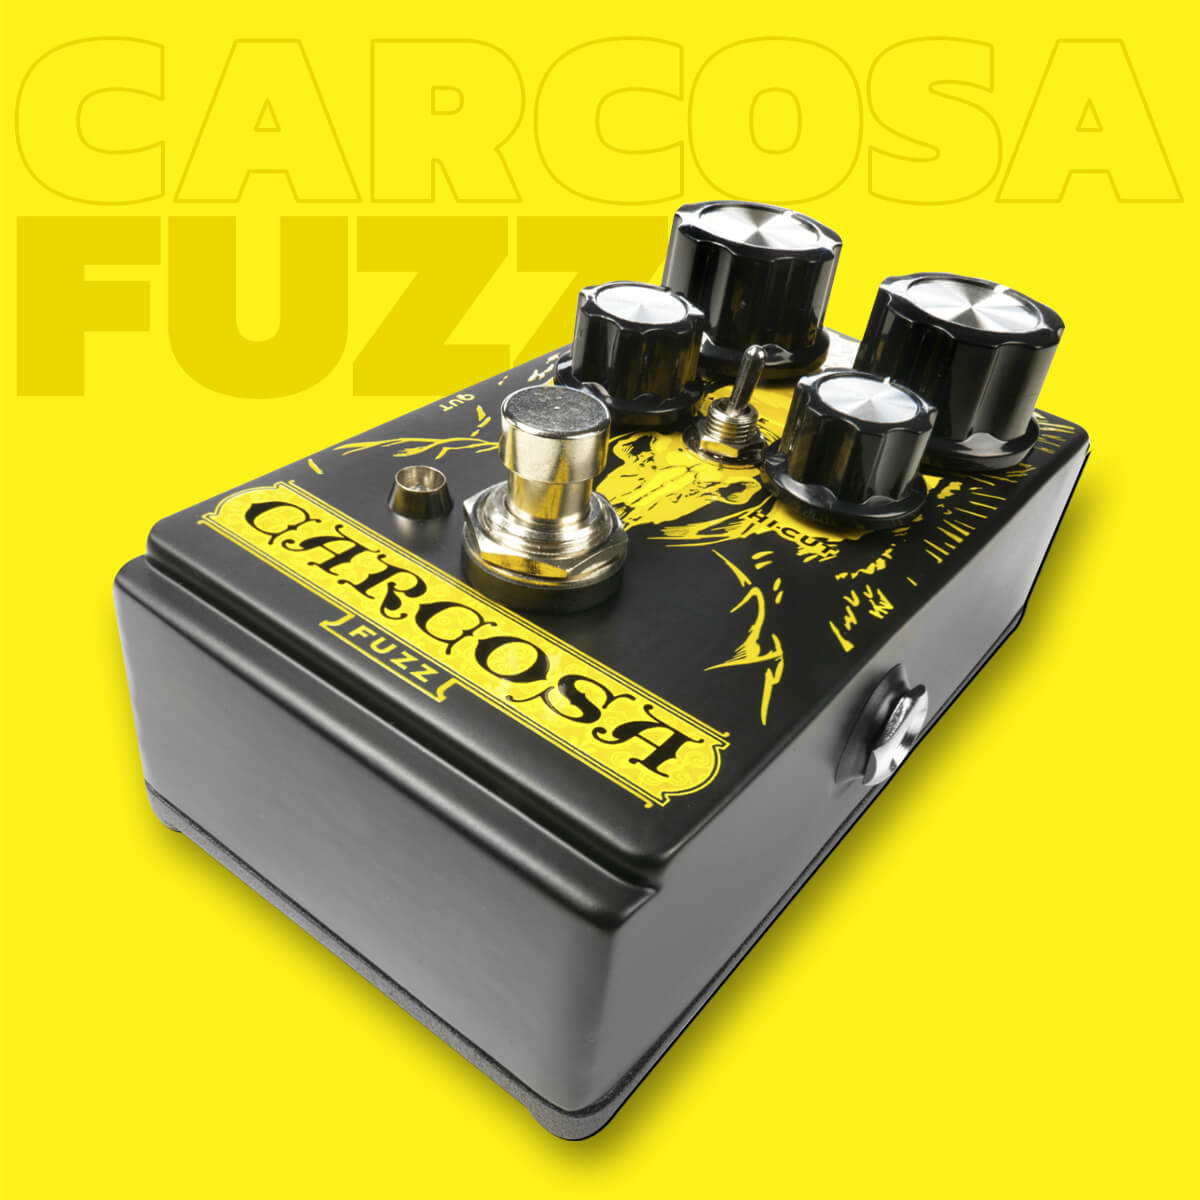
DOD Carcosa
The DOD Carcosa is a versatile fuzz pedal that's known for its wide range of tones. From a light, gritty fuzz to a heavy, saturated distortion, the Carcosa can cover a lot of ground, making it a killer choice for doom metal.
The Carcosa features two modes, Hali and Demhe, which offer different clipping options. The Hali mode provides a more open, less compressed sound, while the Demhe mode offers a tighter, more compressed tone. This allows you to switch between a more vintage-style fuzz and a modern, high-gain fuzz, depending on your needs.
The Carcosa also features the following knobs:
Before (gain)
Controls the amount of fuzz
After (output volume)
Sets the output volume
Hi-Cut
Enables you to roll off high frequencies
Output
Adjusts the overall volume of the pedal
For a typical doom metal sound, you might want to set the Before and After controls high for a heavy, saturated tone. The Hi-Cut control can be adjusted to taste, but a lower setting can help to emphasize the low-end frequencies.
Luxuriously Thick tone: Boutique Pedals
As we venture into the realm of boutique fuzz pedals, we're exploring a world where craftsmanship, innovation, and exclusivity reign. Boutique pedals are often the product of small-scale manufacturers who pour their heart and soul into every pedal they create. These pedals are not always more expensive than their mass-produced counterparts, but they often offer unique features, distinctive tones, and a level of quality that's hard to find elsewhere.
However, the boutique tag comes with a few considerations. These pedals can be harder to get your hands on, especially in the used market. Speaking of the used market, the pedals can be slower to sell in case you find they don't work for your specific tone, as fewer guitarists are aware of them. Many boutique manufacturers build their pedals to order, which can mean longer lead times. But for many guitarists, the wait is well worth it.
In this section, we'll be discussing a few select pedals that we know of personally. However, it's worth noting that the world of boutique pedals is vast and ever-growing. There are countless boutique builders out there crafting incredible pedals, so if a pedal isn't on this list, that doesn't mean it's not a great choice.
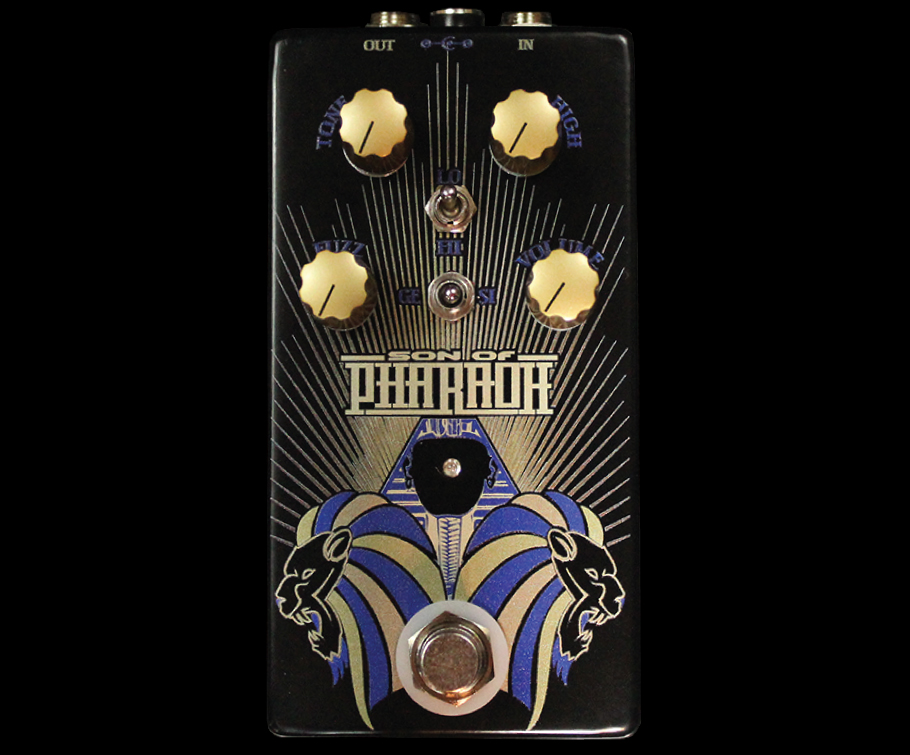
Black Arts Toneworks Son of Pharaoh
Black Arts Toneworks makes a number of pedals that work well for doom pedalboards, but for the purpose of our list we'll focus on the Son of Pharaoh. Son of Pharaoh is a compact fuzz pedal that packs the same punch as its larger counterpart, the Pharaoh. In fact, it features all the same parts and components as the original, just handwired into a smaller enclosure.
The Son of Pharaoh is known for its wide range of tonal possibilities. It can deliver everything from a clean boost to a light overdrive, all the way to a heavy, saturated fuzz. This makes it a versatile choice, capable of accommodating a variety of styles and preferences.
The pedal features a hi/lo input switch, similar to your favorite tube amp. The low setting offers more headroom and less clipping, while the high setting provides less headroom and more clipping. This allows you to switch between a more vintage-style fuzz and a modern, high-gain fuzz, depending on your needs.
The Son of Pharaoh also includes a standard fuzz knob, a full-range tone control, and a high-end compensation knob to replenish the highs cut by the tone control when boosting lows. This gives you a great deal of control over your sound, allowing you to dial in the perfect tone for your riffs.
The pedal also includes a diode selector switch that allows for different modes of clipping. You can choose from silicon diodes for a raspy distorted sound, diodes out for more volume and less clipping, or asymmetrical germanium clipping diodes for a warm, tube-like old school sound.
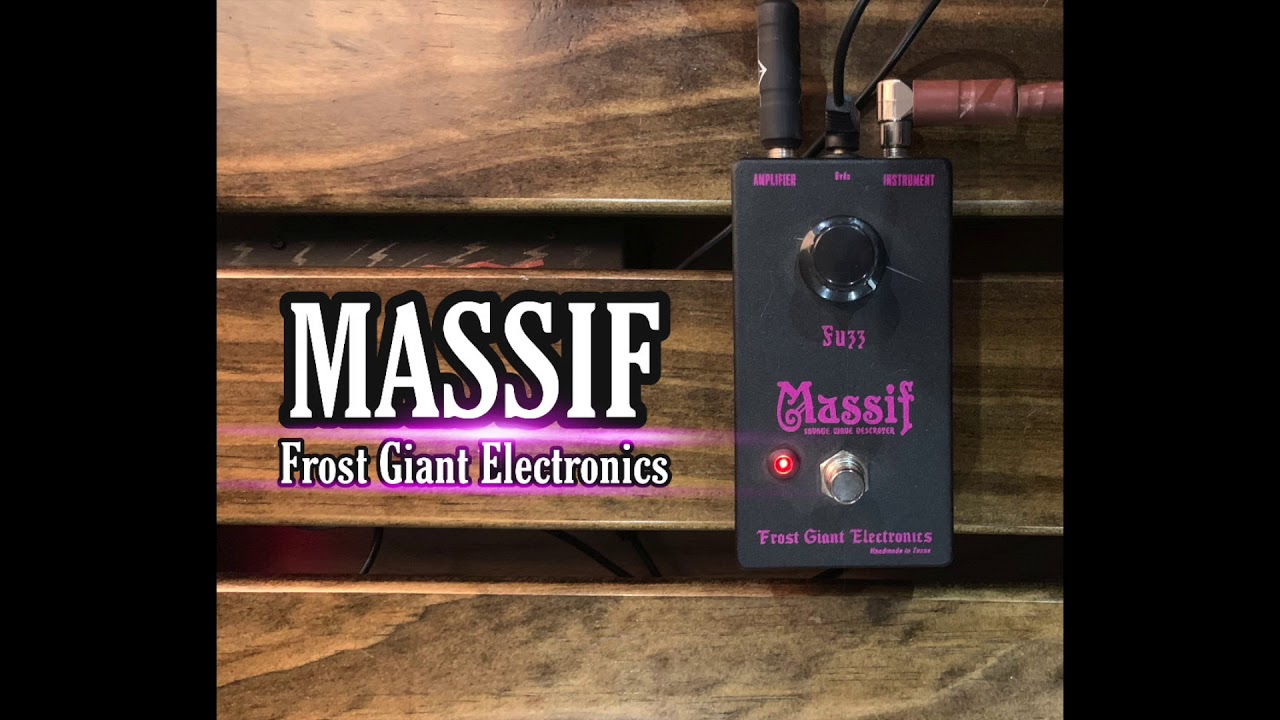
Frost Giant Electronics Massif
This pedal is Frost Giant's take on the Colorsound 1 Knob Fuzz, but with a unique twist that sets it apart. The Massif is designed to deliver a tone that's very mid-focused, with a distortion-like fuzz quality that's smooth and articulate, yet aggressive.
It's known for its punishing lows, making it a great choice. Despite its simplicity, the Massif offers a range of tones depending on where the single knob is set, so don't be fooled into thinking it has just one sound.
The Massif's single knob controls the volume, which Frost Giant describes as a "beats you in the face kinda tone." This simplicity makes it easy to dial in your sound, but also allows for a surprising amount of versatility. Whether you're looking for a light, gritty fuzz or a heavy, saturated tone, the Massif can deliver.
One thing to note about the Massif is that the pedal sounds best with a clean, not dirty amp setting. Some buffers, like those found in Boss pedals, can make the pedal sound brighter or react differently than without.
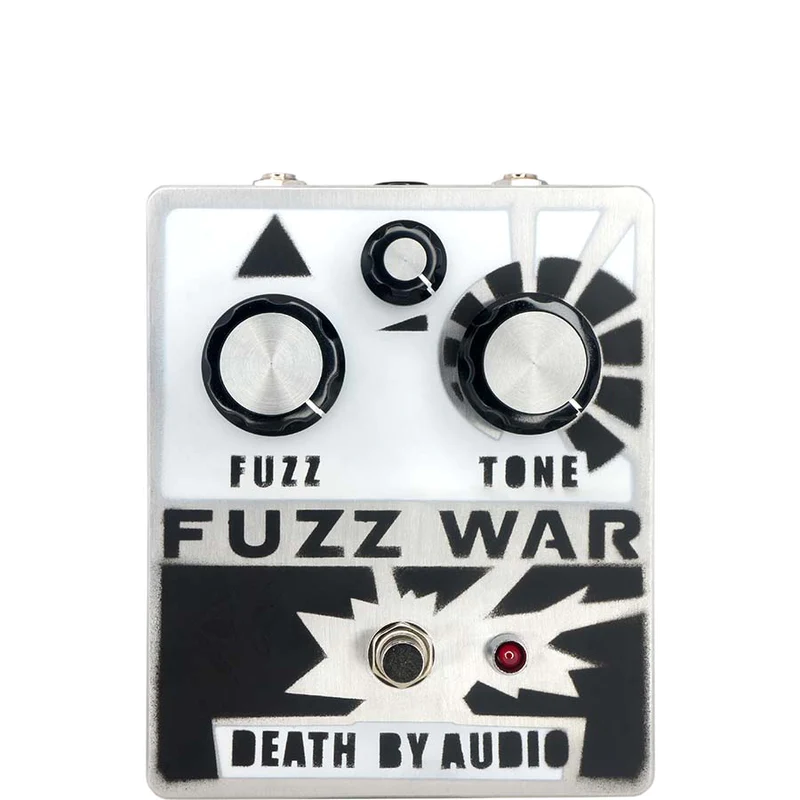
Death By Audio Fuzz War
The Death By Audio Fuzz War is a pedal that's been described as the "fuzz of all fuzzes." This pedal is designed to deliver an endless wall of fuzz, with a circuit that explodes into the meanest, nastiest, most insane distortion, making you the ruler of the fuzz universe.
The Fuzz War features three knobs that control volume, fuzz, and tone. The volume knob controls the overall output level, while the fuzz knob controls the gain of the fuzz circuit. At its lowest setting, the pedal acts as a tone shifter, but as you turn the fuzz knob up, it sweeps from a booster to an overdrive to a thick distortion to a full-on blown-out war of fuzz. The tone knob is a specially designed multi-curve shaping filter which changes the timbre of the pedal from super deep bass sludge to screaming highs.
The Fuzz War is a versatile pedal that can deliver a multitude of tones, from light, gritty fuzz to heavy, saturated distortion. It's a great choice with its ability to deliver a thick, sustaining fuzz sound.
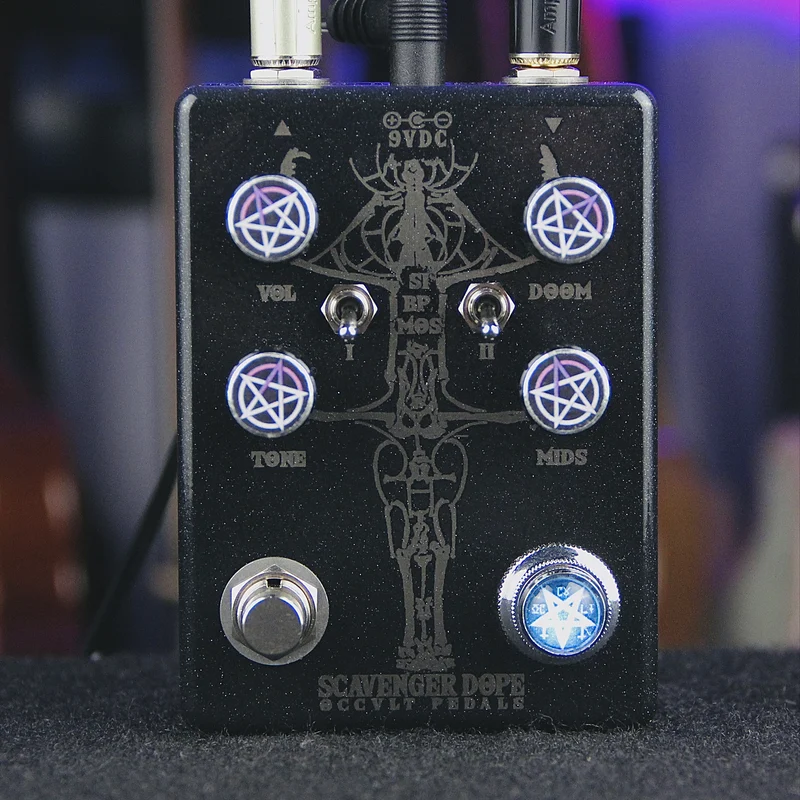
Occvlt Pedals Scavenger Dope
The Occvlt Pedals Scavenger Dope is designed to elevate your heavy, doomy riffing to new heights. It offers super flexible tone control, nine available clipping configurations, and a massive amount of gain on a tap.
At the heart of the Scavenger Dope Fuzz lies its remarkable tone control, providing a wide range of tonal possibilities. The tone knob’s versatility allows you to explore a spectrum of sounds, from dark and immersive tones with a massive low-end presence to bright and piercing fuzz that cuts through the mix effortlessly. Additionally, the pedal features an additional mids knob, enabling you to shape the overall tone with options ranging from heavy scoop to mids boost.
One of the key highlights of the Scavenger Dope fuzz is its remarkable versatility, courtesy of nine available clipping configurations. Equipped with two switches, this pedal allows you to choose between various clipping options. Whether you prefer the distinctive character of silicon diodes, the harmonically rich mosfet clipping, or even a massive volume boost to hit your amp harder, the Scavenger Dope fuzz has got you covered.
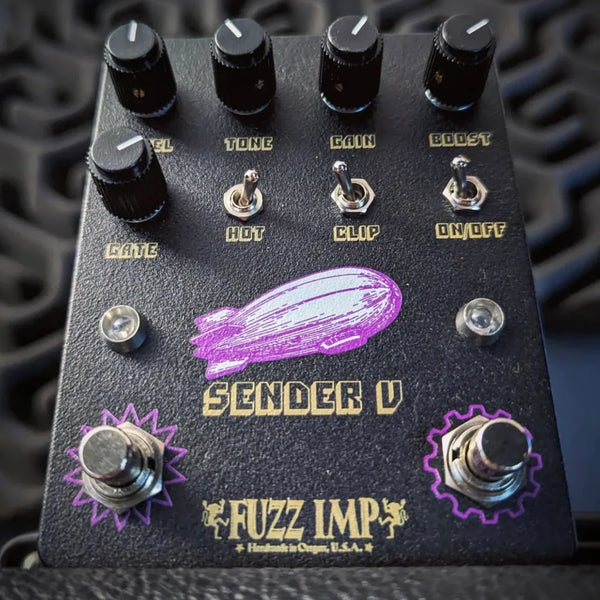
Fuzz Imp Sender V
Recently, I've been messing with a couple of pedals from Fuzz Imp including the precursor the the Sender V, the Sender v3. While my experience is with the earlier variant, I can speak to the uniqueness of this pedal.
It can be tempting to look at pedals that are inspired by existing circuits as all the same, and in a lot of cases that's true. Many builders merely clone the pedals with a few small tweaks, resulting in a sound that's similar to the original but with a slight twist.
That isn't the case with Fuzz Imp's Sender V. While you can hear the muff DNA inside, this pedals tone is unique so far as all the muff flavored fuzz pedals I've tried. Particularly, it's no clipping mode, (center on the 3-way toggle), enables the fuzz to have a mid forward, open sound with huge volume.
I've found that this pedal is one of my favorite stand alone fuzzes where with other fuzz pedals I prefer stacking them after a distortion or overdrive to bring some mids and attack back into the sound.
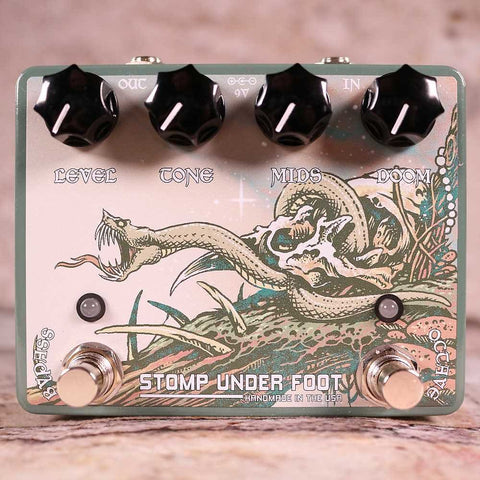
Stomp Under Foot Demogorgon V2/Deluxe
I'm constantly visiting my local guitar stores to find cool new used gear. Luckily for me, one of the original Demogorgons was in my Guitar Center, and when I tried it out I instantly fell in love.
My understanding is that the Demogorgon fuzz was specifically designed to get you a tone like Windhand, and if true, it delivers! It's clear this fuzz pedal was made to doom, covering standard tuning and lower tunings both with equal aplomb. The fuzz and volume level can be crushing and it's one of the few fuzz pedals I dial back the volume level on.
I haven't been able to test a v2 to experiment with the mids control, but I can definitely say that if you're looking for a roaring and thick tone, this pedal does the trick. As a bonus it takes RAT pedals in front of it really well.
Conclusion
Finding the perfect fuzz pedal for your doom metal sound is a journey, and we hope this guide has offered some valuable insights to help you along the way. Whether you're just starting out with your first budget-friendly pedal or looking to invest in a boutique piece, remember that the best pedal is the one that inspires you to play and create.
]]>
https://www.singularsound.com/blogs/news/the-best-distortion-pedal-for-tube-amps-in-20232023-07-14T11:58:45-04:002024-02-29T17:57:58-05:00The Best Distortion Pedal for Tube Amps in 2023Anthony Sostre
Ever wondered how your favorite rock and metal guitarists achieve that thick, aggressive tone that makes the crowd go wild? The answer lies in the magical little box known as a distortion pedal. This powerful tool can turn your mild-mannered tube amp into a roaring beast ready to unleash a wave of sonic fury. In this blog we'll be taking a look at the best distortion pedals for tube amps.
Short Summary
Distortion pedals provide gain, saturation and aggression when used with a tube amp to optimize high gain requirements.
Top distortion pedals include the ProCo RAT 2, Boss DS-1 and Revv G3. Budget friendly options such as Behringer VT999 are also available.
High Gain Distortion Pedals offer heavy metal tones while versatile models like Fender Pugilist & Walrus Audio Eras can be used for various genres. Consider sound quality, control options & compatibility when selecting one that works best with your specific amp.
Why Use a Distortion Pedal with a Tube Amp?
If you’re a fan of rock, metal, or any genre that requires a hefty dose of grit and grind in your tone, a distortion pedal is a must-have in your arsenal. The beauty of distortion is its ability to increase gain, saturation, and aggression beyond the capabilities of an overdrive pedal, providing a more aggressive sound to your guitar or bass when used with a tube amp. But why use a distortion pedal with a tube amp? The answer lies in the unique characteristics of tube amps. They offer warmth and dynamic response but may not always meet high gain requirements. This is where distortion pedals come to the rescue. They can optimize high gain requirements, balance volume levels, and provide an immediate solution to any issues with the preamp section.
Distortion pedals come in a variety of flavors, from transparent gain pedals to pedals that drastically alter the sound of your rig, offering a world of tonal possibilities. For rock or metal players, using an overdrive pedal or even overdrive pedals can help achieve the desired sound, and placing the distortion pedal earlier in the chain, after overdrive or boost pedals, can achieve a cranked tube amp sound.
Ultimately, the choice of a distortion pedal depends on your desired sound. Some guitarists prefer the raw, aggressive tone of hard clipping, while others might lean towards the softer, more textured sound of soft clipping. Whether you’re aiming for a great metal tone or a softer overdriven tone, distortion pedals can help you fine-tune your sound to match your vision.
Top Distortion Pedals for Tube Amps
Now that we’ve established the importance of distortion pedals, let’s dive into some of the top picks that have won the hearts of guitarists worldwide. Each of these pedals brings a unique flavor to the table, promising to elevate your sonic experience to new heights.
ProCo RAT 2
First on our list is the ProCo RAT 2, a classic and highly versatile distortion pedal that has been used by many renowned guitarists. Its popularity stems from its ability to deliver a wide range of tonal possibilities thanks to its Distortion and Filter controls. The ProCo RAT 2 is equipped with controls for distortion, filter (tone), and volume, allowing you to craft your perfect tone. Whether you want a mild overdrive or a full-on fuzz, the ProCo RAT 2 can deliver it all with ease.
In terms of power, the ProCo RAT 2 is powered by either a 9V battery or a standard 9V power pedal power supply, offering flexibility for different gigging situations. This pedal is a true testament to the saying, “Big things come in small packages.”
With its classic and versatile sound, the ProCo RAT 2 stands tall among distortion pedals. It’s a reliable companion for any guitarist looking to add some serious grit and grind to their tone.
Boss DS-1
Next up is the Boss DS-1, a versatile and affordable distortion pedal that has been a mainstay on pedalboards for decades. This pedal can be adjusted to produce a variety of distortions, particularly when used with a tube amp, making it a versatile tool in any guitarist’s arsenal.
The Boss DS-1 offers increased versatility and can be employed as a clean boost, providing an added edge to your tone. However, it’s worth noting that it is notably compressed, which might not be suitable for those seeking a more dynamic response.
Despite its simplicity, the Boss DS-1 is a classic pedal that has been used by renowned guitarists such as Kurt Cobain, John Frusciante, and Steve Vai. Its reputation speaks for itself, proving that sometimes less is more when it comes to achieving great tone.
Whether you’re a beginner looking for your first distortion pedal or a seasoned pro seeking a reliable workhorse, the Boss DS-1 is a fantastic choice that delivers great value for money.
Revv G3
If you’re seeking a distortion pedal with a smooth tube-like sound, the Revv G3 might be right up your alley. Modeled after the Purple Channel of a Revv amplifier, this pedal delivers a wide range of harmonics, offering a tube-like sound that is versatile and satisfying. Weighing in at just three-quarters of a pound, the Revv G3 boasts a robust build quality with an aluminum housing that provides enhanced rigidity. It’s not just about looks, though. This pedal boasts impressive features such as a true bypass circuitry ensuring that when not in use, it does not alter the tone of your guitar.
One of the standout features of the Revv G3 is its aggression switch, which determines the voicing of the pedal. This feature, coupled with its robust signal-to-noise ratio and wide frequency response range, makes it a top choice for tube amps. With its warm, tube-like sound and adjustable controls, including a mode switch, the Revv G3 is an excellent companion for tube amps. It’s particularly suitable for producing thick modern metal tones, making it a top choice for metal enthusiasts.
Budget-Friendly Options
While distortion pedals can offer an incredible range of sounds, they don’t always have to break the bank. Let’s take a look at some budget-friendly options that deliver great sound without leaving a gaping hole in your wallet.
There are a few different types of distortion pedals available, each with its own unique sound.
Behringer VT999
The Behringer VT999 is a cost-effective tube distortion pedal that does not compromise on sound quality. It features a built-in noise gate and a 12AX7 tube for added tube warmth, offering excellent distortion at a cost-effective rate. The Behringer VT999 is renowned for its affordability without compromising on the quality of its sound. This makes it an excellent choice for those on a budget or beginners venturing into the world of distortion pedals.
Despite its budget-friendly price tag, the Behringer VT999 does not skimp on features. It offers a range of controls that allow you to tweak your sound to your liking, ensuring that you get the most bang for your buck. If you’re on a tight budget but still want to achieve great distortion, the Behringer VT999 is a fantastic option to consider. It proves that great tone doesn’t have to come with a hefty price tag.
TC Electronic Dark Matter
Another cost-effective option that delivers excellent distortion is the TC Electronic Dark Matter. This pedal is a versatile and affordable option, featuring a 2-band EQ and voicing switch, making it highly adaptable for different musical styles. The TC Electronic Dark Matter offers a four-knob interface, including a tone knob, for controlling EQ, saturation, and output level, as well as an all-analog circuit, dual-band tone controls, level, and drive. These features provide you with an extensive range of tonal possibilities, including tone control, ensuring that you can achieve your desired sound no matter your genre of music.
One of the standout features of the TC Electronic Dark Matter is its versatility. It functions optimally as an independent distortion pedal and the sound emulates that of a tube amp utilizing EL34 tubes, making it an excellent option to introduce an alternative distortion tone.
Whether you’re a beginner looking for your first distortion pedal or a seasoned pro on a budget, the TC Electronic Dark Matter provides excellent value for money. It’s proof that you don’t need to spend a fortune to achieve a great distortion sound.
High Gain Distortion Pedals
For those of you who play heavy metal, doom, or any genre that requires a hefty dose of distortion, high gain distortion pedals with a gain knob are your best friends.
Let’s dive into some of the most popular distortion pedals for high gain, which are also considered the best distortion pedals on the market.
Electro Harmonix Metal Muff With Top Boost
The Electro Harmonix Metal Muff With Top Boost is a high-gain distortion pedal that is perfect for those seeking an aggressive tone. It features a 3-band EQ and Top Boost circuit for added aggression, making it an ideal choice for heavy metal and doom genres. This pedal offers three EQ bands, six controls for sound shaping, and a Top Boost feature with its own control knob and footswitch button. Additionally, the bass boost switch enables you to navigate a wide range of tones, from a mild crunch to full-on metal mayhem.
The Electro Harmonix Metal Muff With Top Boost pedal offers a high-gain distortion sound with added intensity from the Top Boost circuit. Additionally, it gives you the ability to alter the sound with its three EQ bands and six controls, providing a wide range of tonal possibilities.
If you’re a fan of heavy metal or doom genres and are looking for a high-gain distortion pedal that can deliver a punch, the Electro Harmonix Metal Muff With Top Boost is a worthy contender to consider.
MXR M116 Fullbore Distortion
Next up is the MXR M116 Fullbore Distortion, a high-gain distortion pedal that is designed to deliver the heaviest tones. This pedal features a 3-band EQ, a scoop switch, and a built-in noise gate, making it a perfect choice for genres that require high gain.
The MXR M116 Fullbore Distortion pedal is equipped with a 3-band EQ with sweepable mid-range frequencies, volume, gain, a scoop switch that boosts high & low frequencies, and a built-in noise gate. These features allow you to dial in your perfect heavy metal tone with ease.
In terms of power, the MXR M116 Fullbore Distortion pedal can be powered by either a standard 9V battery or a 9V power supply, and it is true bypass. This ensures that when the pedal is not engaged, it will not interfere with your guitar’s signal, providing you with pure, unaltered tone.
If you’re seeking a high-gain distortion pedal that delivers a wide range of tones and has a built-in noise gate, the MXR M116 Fullbore Distortion is a fantastic option to consider.
Versatile Distortion Pedals for Various Genres
While some guitarists stick to a specific genre, others enjoy dabbling in a variety of music styles. If you fall into the latter category, you’ll need a distortion pedal that can adapt to your ever-changing musical journey.
Let’s take a look at some versatile distortion pedals that can accommodate various genres.
Fender Pugilist Distortion
The Fender Pugilist Distortion is a two-channel pedal that offers a range of flexible routing options, making it suitable for lower gain settings such as blues. Its versatility makes it an excellent choice for guitarists who play a variety of music styles.
The Fender Pugilist Distortion pedal offers two channels, flexible routing options, and is suitable for lower gain settings such as blues. This flexibility allows you to switch between genres with ease, ensuring that you always have the perfect tone at your fingertips.
The distinct characteristics of the Fender Pugilist Distortion pedal lie in its two channels. The A channel offers a milder, more rhythmic distortion, while the B channel provides increased saturation and sustain for lead playing. This versatility makes it a valuable tool for any guitarist’s pedalboard.
Whether you’re a blues guitarist looking for a mild overdrive or a rock guitarist seeking a saturated lead tone, the Fender Pugilist Distortion pedal has got you covered.
Walrus Audio Eras
The Walrus Audio Eras distortion pedal is another versatile option, offering five distinct distortion settings and a two-band EQ for a range of musical genres. The Walrus Audio Eras distortion pedal offers a 5-position rotary knob that provides access to five distinct distortion modes. This pedal is manufactured in the USA and offers a wide range of tonal possibilities, making it a great choice for guitarists who like to experiment with different genres.
One of the standout features of the Walrus Audio Eras is its versatility. It offers five distinct distortion settings and a two-band EQ, enabling it to be utilized for a variety of genres. Whether you’re playing blues, rock, or metal, the Walrus Audio Eras distortion pedal can adapt to your style, making it an excellent addition to any pedalboard.
How to Choose the Right Distortion Pedal for Your Tube Amp
Choosing the right distortion pedal for your tube amp may seem daunting with so many options available. However, by considering a few key factors, you can find the perfect pedal that will complement your amp and enhance your sound. The first step is to consider your desired sound. Different distortion pedals offer different tones, ranging from mild overdrive to full-on fuzz. If you’re a fan of rock or metal, you might prefer a pedal that provides a more aggressive sound with increased gain. On the other hand, if you play blues or jazz, you might prefer a pedal that offers soft clipping for a more textured sound.
Another important factor to consider is the control options offered by the pedal. Some pedals offer a simple setup with just a few knobs, while others offer more complex controls for tone shaping. If you like to tweak your sound, you might prefer a pedal with more control options. However, if you prefer a straightforward setup, a simple pedal like the MXR M104 Distortion+ might be more suitable.
Lastly, consider your budget and the compatibility of the pedal with your tube amp. Some pedals are more suitable for certain types of amps, so it’s important to research and test different pedals to find the one that works best with your specific amp. Remember, the best distortion pedal is not necessarily the most expensive one, but the one that best suits your needs and helps you achieve your desired sound.
Summary
In conclusion, choosing the right distortion pedal for your tube amp is a crucial step in shaping your guitar tone. Whether you’re playing blues, rock, or metal, a good distortion pedal can enhance your sound and bring your music to life.
Remember, the best distortion pedal is not necessarily the most expensive one, but the one that best suits your needs. So whether you’re looking for a budget-friendly option like the Behringer VT999 or a high-gain beast like the Electro Harmonix Metal Muff With Top Boost, there’s a distortion pedal out there for you. Happy playing!
Frequently Asked Questions
Can you use a distortion pedal with a tube amp?
It’s generally not necessary to use a distortion pedal with a tube amp since most tube amps have both a dirty (gain) and clean channel. This allows you to dial in your distorted tones along with the desired clean sound.
However, for tube amps that don't have a dirt (or dirty enough) channel, or cases where you're chasing a very specific sound, you may want to use a distortion pedal into your tube amp.
What pedals to use with tube amp?
An overdrive pedal is essential to get the most out of a tube amp, as it increases its natural warmth and grit.
It can also be used to add a bit of extra gain to a clean amp, allowing for more dynamic playing and a wider range of tones.
Do you need an overdrive pedal with a tube amp?
No, you do not need an overdrive pedal with a tube amp. Most tube amps have both a dirty and clean channel, so you can get the desired distorted tones without needing a digital pedal.
However, if you want to add more gain or a different type of distortion, an overdrive pedal can be a great addition to your setup. It can give you something.
Does John Mayer use a distortion pedal?
John Mayer does not use a distortion pedal, however he does use an Ibanez Tube Screamer and a Fulltone ‘69 Fuzz.
What is a distortion pedal?
A distortion pedal is an effects pedal used to give guitarists a heavier, grittier sound by providing increased gain, saturation, aggression and sustain compared to overdrive pedals.
Distortion pedals are often used to create a heavier sound for rock and metal genres, but they can also be used to create a more subtle, warm tone for blues and jazz. They can also be used to create a unique sound for experimental genres.
]]>
https://www.singularsound.com/blogs/news/biography-beatbuddy-drum-machine2023-06-29T13:51:52-04:002023-08-24T11:47:40-04:00A Comprehensive Look at the BeatBuddy Drum MachineTravis GoureHow can you control a drum machine while focusing on playing live? This question produced years of intensive research, and we managed to create a device that would do it all: a customizable, full-scale drum machine in the form of a guitar pedal.
In honor of its 10 year anniversary on the market, we're going to take a comprehensive look at our drum machine: what it does, how it's changed, and where it's going in the future.
Let's dive right in.
What is the BeatBuddy Drum Machine?
In 2013, our founder, David Packouz, was having a problem. While he was pursuing music he found it incredibly difficult to find drummers to play with. Not only that, the drummers he did find were often unreliable, out of practice, or unprepared.
From then on he began to consider the obstacle and how it could be remedied in a way he could count on. The BeatBuddy was the invention that would solve the problem. He needed a drum machine that sounded like a real drummer, and one that could cover all the genres and sounds that he wanted for his music.
Still one problem remained. David was a guitarist and vocalist. How would he manage to control a drum machine while focusing on his performance? The question produced years of intensive research, and he managed to create a device that would do it all: a customizable, full-scale drum machine in the form of a guitar pedal.
Since then, Singular Sound has worked to hone the drummer pedal to be more efficient and more powerful. Through firmware updates, physical upgrades and new content, we've developed the BeatBuddy into the ultimate tool for songwriters, performers, practice sessions and studio recording.
Let's explore everything it can do for you.
Core BeatBuddy Features and How They Work
Authentic, Human Drum Beats
One the BeatBuddy's primary distinctions is its extensive catalog of drum kits, beats, patterns and more, and every single sound on the pedal is recorded on real drum kits by a real, professional drummer.
Yet that alone doesn't account for things like improvisation and style. That's why our Content Producer records the sounds with varied velocities, and comes with the BeatBuddy Manager software that allow you to edit beats to match your style. You can even upload your own.
Customization is a crucial part of the BeatBuddy experience. With the tap of a foot you can add unique transitions, fills, intro and outros, and with the Footswitch+ add-on, you can perform custom accent hits on demand.
What's Included in the BeatBuddy Default Library?
The BeatBuddy drum machine boasts more than 220 drum styles and 24 different musical genres to choose from. Within that, there are different drum kits, time signatures and more.
Here are some of the genres you can choose from:
Metal drum beats: heavy cymbals, blast beats, odd time signatures
Country beats: swing beats and shuffles, waltzes, Americana, Nashville Sound and more
Rock beats: 360 beats spread across 90 songs, qt. note and 8th note pulse, 4 unique song parts
The BeatBuddy is meant to allow your hands to focus on the riffs your playing, the mic you're holding, or the keys you're pressing. We spent years on the pedal's design to make it intuitive and efficient for playing with your feet.
Core functionality is simple and powerful:
Tap the main button once to begin a song. It will automatically begin with an intro fill, though this can be removed if so preferred.
Tapping once during a song will play a unique drum fill, and will never play the same one twice in a row.
Hold down the main button while playing to play a transition fill which then moves you to the next part of the drum track. Ideal for going from verse to chorus to bridge, etc.
Use the knobs to adjust volume, tempo and move between menus for selecting songs, genres and more.
Double tap while playing to trigger a unique outro and end the song.
Physically, we designed the BeatBuddy to be compact, durable and incredibly comfortable for your feet. The built-in screen shows you the BPM of your song and which part you're playing.
Dream Gear for Studio or Stage
What good is a guitar pedal if it doesn't sound good? You can't walk into the studio or venue with gear that emits poor sound quality. Having a reliable studio setup is paramount to good performance.
The BeatBuddy provides legitimate 24-bit audio for your show or recording session. It can plug directly into the PA, and provides instant usability with no setup time.
It's convenient inputs make getting your gear ready a breeze.
Inputs:
(2) 1/4" TS
(1) Mini-B,
(1) PS/2 MIDI input (you'll need this adapter for it)
SD-card slot
(1) 1/4" TRS Footswitch input
Outputs:
(2) 1/4"
(1) 1/8"
You can upload all of your beats right into your favorite DAW for mixing, or edit them and put the new versions back on the drum machine.
A MIDI Drum Machine that Doesn't Monopolize Your Board
Naturally, a drum machine built for songwriters and performers needs to play well with other gear. The BeatBuddy is fully midi-enabled, letting you pair it with your favorite guitar pedals, MIDI controllers and instruments.
MIDI gear often means sacrificing a massive amount of space on your pedalboard and choosing between which effects pedals you need the most. The BeatBuddy is far more economical than that, taking up roughly a 3 x 5" area.
The small form factor doesn't compromise durability, with a sturdy metal housing and solid rubber footswitch top your BeatBuddy can stand the rigors of tour.
We've designed a special MIDI port for the BeatBuddy's low-profile construction, and a MIDI breakout cable to connect it.
The BeatBuddy Dream Team: Aeros Loop Studio and MIDI Maestro
Singular Sound's products are individual powerhouses, but as a trio, they can run your entire show, serve as your songwriting and recording hub, and even help mix your next album.
Your Aeros will automatically quantize whatever loops you're playing to the BPM you choose on the BeatBuddy, allowing you to move to different sound parts automatically just by performing a transition on the drum machine pedal.
The MIDI Maestro comes out-of-the-box with dedicated modes for the BeatBuddy and Aeros Loop Studio. With them, you can get hands-free control over the Aeros with one-touch actions like undo/redo, mute/unmute, and even change the order of your song parts.
Plus, the MIDI Maestro comes with a Custom MIDI Mode, where you can get full MIDI control over any MIDI-ready pedal of your choosing.
Likewise, you can control the BeatBuddy to adjust the tempo of your song, double and half time your beats, and add accent hits to accentuate a particularly powerful moment in your show.
The BeatBuddy Now, and Onto the Future
Singular Sound has come quite a ways since 2013's Indiegogo campaign, with the introduction of new guitar pedals and guitar accessories like the Cabli. Naturally, the BeatBuddy has evolved in its hardware and software.
Here's the first generation of the BeatBuddy drum machine pedal:
We've cleaned it up a bit, and made its footswitch far more comfortable:
On the software side, we've made crucial Firmware Updates that improve the experience of using the pedal. Here's some highlights:
Improved hands-free content navigation
Major MIDI optimization and added commands
Playlist creation: organize your songs without having to use the BB Manager.
Disable transitions
Loop Forgiveness: allows the BeatBuddy to receive a song part transition MIDI command and change song parts immediately while keeping time with the beat.
The command must be received in the first 300ms of the measure.
Join our Community and Help Us Improve the BeatBuddy
Our products grow when users give us feedback on what works and what doesn't. That's the spirit of our Firmware Updates and new-generations of our pedals.
Thanks for reading! Check out the rest of our blog for tips on Singular Sound pedals and musician-geared content to help you get the most out of your music.
Keep rockin'
]]>
https://www.singularsound.com/blogs/news/5-ways-to-use-guitar-loop-pedal2023-04-24T18:35:27-04:002023-08-24T11:48:11-04:005 Creative Ways to Use a Guitar Loop PedalTravis GoureMore]]>
Guitar loop pedals are becoming more and more popular as practice tools, live performance centerpieces and FX hubs. In this post we explore 5 creative ways to use a loop pedal in your setup.
Let's get right into it.
1: Use your looper as a high-tech practice tool
I know what you're thinking. Loopers are a little pricy to just use for practice. Don't worry, we'll discuss plenty more than that. However, practice and tinkering with your instrument is the lifeblood of creativity, songwriting, and amazing live performance.
Depending on which guitar looper you purchase, you can practice in ways you'd never have access to otherwise, like:
Endless riffing
If you have an idea for a riff or phrase but need to flesh it out, a loop pedal is by far the best way to explore it.
Set a base track of the chords you want to work with, and then play away. You won't have to worry about stopping and starting over every time you have a new idea. Plus, if you finalize a track, you can move on to the next with ease.
Improve your ear for composition
Writing a song requires a lot more than lyrics and a beat. Layering your instruments, pacing the song, experimenting with softness and crescendos, it's all a part of the experience of the musician and the listener.
There's no better way to develop your sense for composition than to easily layer your ideas. Now, it's important to note that some looping pedals will make you choose between looping in parallel (one track on top of another) or sequentially (one track after another, like a verse and chorus).
Either way, you can experiment with your creativity. However, getting a guitar looper that can do both, like the Aeros Gold Edition, opens up far more doors for you as a songwriter and performer.
Easily evaluate your technique
The ability to instantly play back your tracks allows you to quickly determine where you need to edit and improve. That is, after all, the basis of musical learning. Practicing, learning, and practicing more.
Loop pedals are tailor made to make this as easy as possible. Some loopers offer features that reinforce this ability, like unlimited overdubs, one-press undo/redo, and full-screen visualization.
Constant practice and adjustment is the greatest tool of professional musicians. If you have your sights set on becoming a studio guitarist, or traveling the world performing, the more you can adapt to your playing style, the better.
Master Improvisation
While working on your fundamentals is vital, there's no ignoring the fact that improvisation is incredibly important, especially for playing gigs. Looper pedals allow you to explore improvisational riffs, rhythms and harmonies.
You can keep your main tracks moving while you belt out a guitar solo, or move to a different instrument.
2: Create full-band sound without full-band drama
Songwriters and solo-performers rejoice: with a looper pedal you can play all the positions in the band.
However, it should be noted that to do this, you'll need a loop station that has a capacity of more than 2 tracks.
The Aeros Loop Studio and Aeros Gold Edition lead the industry in loop capacity, offering up to 36 total loops per song, (6 sequentially and 6 in parallel) at the same time.
If you score a guitar looper pedal that can hold as many tracks as you desire, you can become the entire band by yourself. You can add guitar tracks, bass tracks and vocal tracks. Recently, the Aeros gained the ability to support Backing Tracks, which means you can even add drum tracks in the form of .wav files!
All this means there's no bickering about who plays what, whose vision is best, and who is late to practice every week.
3: Use your looper for added FX
Some loopers out there, like the Aeros and Pigtronix Infinity Looper Pedal offer unique effects that can add creativity to your sonic arrangements.
For instance, both pedals offer a Reverse Track function. With it, you can create wonderfully deep, dynamic, experimental tracks without having to play additional tracks. This is an especially great feature for electronic artists and guitarists across musical genres looking to develop unusual cadences and timbres in their music.
See it in action:
Of course, you can have your looping pedal take on the FX of other devices in your chain. By pairing your loop station with a delay pedal, reverb pedal, overdrive, or other external guitar pedals, you can turn your current loop into anything you want.
An entry level looper may not support an expression pedal, so if you plan to be an fx loop wizard, you may want to invest in a more advanced looper pedal.
4: Use your loop station for production and engineering
Though this may not always apply to any old regular looper, the best looper pedals will let you connect to a computer. In doing so, you can record multiple loops directly into a DAW.
This is a frequently overlooked use for loop pedals, and there are endless possibilities for creativity in this practice.
Easily add drum kits to your mix
If your looping options don't allow you to add drums directly into the pedal, adding them through a DAW is the perfect option for songwriting.
Many DAWs come with stock drum patterns, but you can, of course, engineer them yourself. Plus, you can tune the drums to match the key of your guitar lines.
Bonus: if you're a BeatBuddy user, you can take advantage of our song matching tool to cover your favorite songs live:
Tweak loop volume on command
The Aeros from Singular Sound is the only looper pedal on the market that offers a live mixing mode. With it, you can turn the scroll wheel into a volume knob, and adjust both your master volume and the volume of each individual tracks.
However, if you don't have those features on your looper, you can still accomplish this (and more!) in your DAW of choice.
Ensuring the best possible sound quality is vital to good mixing and mastering, making looper pedals with at 24-bit audio or higher the optimal choice.
If your loop pedal has a headphone output, you can get a better feel for which tracks need tweaking, and if you're unsatisfied with one of your loops, you can begin recording right into the workstation.
Balance multiple instruments with ease
Using your looper pedal as a creative tool for engineering means playing two vital roles at once: songwriter and editor.
Naturally, you'll need a loop station with features like MIDI sync, mono and stereo inputs/outputs.
If you find that your guitar tracks aren't quite working in tandem with your other loops, you can overdub guitar lines on your looper pedal until you're happy with the outcome.
5: Develop your live performances into true spectacles
Looper pedals are the live musicians ultimate weapon. Finding the best loop pedal for your style of music will amplify your ability to put on phenomenal shows.
Even a basic looper that's limited to two loops opens the door for greater control over your gigs. Let's talk about how:
Plug directly into a PA system
With the proper stereo outputs, you can hook up directly to the PA system at your gig (assuming there's one available).
Not only does this make it way easier to set up on stage, but you can feel much more confident in the sound quality than you would plugging into an amplifier alone.
Cover up mistakes like they never happened
Whether you have a basic looper or a feature-packed one, one of the best perks is the ability to undo and redo loops that you don't like.
You will inevitably make little mistakes when you perform live. Usually, you can use your pedal's footswitches to control the reproduction of errant tracks.
Most looper pedals have two footswitches, but some add a third or even fourth footswitch for enhanced feature navigation. In the case of the Aeros Loop Studio, you can overdub, undo and redo the desired component with track select, and you can do it with a single-press.
Other loopers may require external footswitches to accomplish this. With the Aeros, you can make it happen with a single, compact pedal.
Amplify your guitar playing with layering
Oftentimes you'll see audio engineers double guitar tracks. It allows them to introduce other effects to the track, as well as deepen and boost the guitar tone.
Looper pedals make this possible in a live performance setting. As we mentioned before, most loopers allow for either sequential or parallel looping, but not both. The majority of them focus on the latter, allowing you to stack multiple loops over your original track.
Even if you're planning to use only two loops, adding that layering can produce such an important effect on the song. Live shows are all about creating an encompassing soundscape.
Ever been to a gig where the band hits you with that "wall of sound"? A looper pedal makes this possible without having to bring in four other band members.
Extra notes and tips for better looping
With all of this information, there are some key things to know and plan for when using (or buying) a looper pedal.
Where does my looper pedal go in the chain?
In general you want your loop pedal at the end of a signal chain, but that isn't always true. When you want to remove certain effects such that they no don't affect a loop, you should put the loop above the FX producer in the chain.
Understand recording time
No single pedal has infinite memory and storage. Even the best looper pedal ever will have a limit to how much you can record in a given session. So, it's important to evaluate your needs in that regard, and plan accordingly.
How long do your live sets typically run? Do you need plenty enough loop time for lots of improvisation? How many tracks are you planning to play?
All of these should be considerations you make when purchasing your next looper pedal.
Singular Sound recently upgraded the Aeros to allow for up to 10 hours of mono recording time using a process called Dynamic Read.
You might not need that much, and if you're looking for a simpler loop station, there are loads of options on the market (we'll provide a quick buying guide in a moment).
Mono tracks vs stereo tracks
Understanding mono and stereo goes beyond looper pedals. It's an important piece of knowledge for any musician, whether they perform live or in the studio. A mono signal
Commands for looper pedals and how to use them
Start/Stop: a lot of loopers come with dedicated stop control, which offers a higher level of customization when you perform. You can use it to pause before a breakdown, stop certain tracks so that others can shine through, or build up the drama for the final crescendo.
Undo/Redo: As we mentioned before, undo and redo track commands are a guitarist's best friend. Select any repeating loop to undo, then record over it. If at first you don't succeed, try try again.
Track navigation: If the looper pedals you're considering offer sequential looping (reminder: tracks one after another), you'll need to master the functions that move the recording to the next track. Use this to craft a verse over your fundamental guitar line, switch to a verse, or nail an outro.
Footswitch navigation: separate footswitches do separate things. If your looper has two footswitches, it's likely that one lets you start a loop, and the other stops it. A good example here is the MXR m303 Clone Looper. It's right footswitch produces the play or stop command, and the left footswitch controls recording and dubbing.
Saving loops: saving your loops is crucial to practice and crafting a live set (or studio setup). Find out how your loop pedal saves tracks, and make sure you do it consistently.
Quick buying guide: the top looper pedals on the market right now
Every musician is different. The best looper pedal for you depends on what sort of music you make, how you make it, and what you are trying to achieve.
Basic looping techniques don't necessitate the most high-tech pedals out there. There are several affordable options that can work great for many looping artists.
However, the advent of the live looping musician is here. Looper pedals are being spotted more and more on top bands' pedalboards, and growing into a more significant weapon for studio musicians and engineers alike.
If you're serious about looping, it's a good idea to invest in one that will check all the boxes you need (or might need in the future).
With that in mind, let's take a look at the best looper pedal deals you can get right now.
Pigtronix Infinity Looper Pedal - $449
Our friends over at Pigtronix make one heck of a looping pedal. Balancing simplicity with high-functionality, Pigtronix Infinity Looper is one of the rare pedals that allows for loops in series (verse, chorus, bridge, et cetera). You can easily connect it to your DAW, transfer loop files, and even send your loops to monitors. There's a ton of top notch features for a pedal that's incredibly compact and portable.
MXR m303 Clone Looper - $149
If you primarily do basic looping and want an affordable, compact pedal that doesn't skimp on features, the MXR m303 Clone Looper will be right up your alley. One of its biggest assets is its sample rate capabilities. Where most loopers max out at the standard 44.1kHz sample rate, the m303 boasts 88.2kHz. It does have its fair share of limitations compared to its more expensive counterparts. Tracks can only be up to 6 minutes long and it can't loop in sequence, but it does have neat features like time stretching and expression pedal compatibility.
Electro-Harmonix 720 Stereo Looper - $181.40
Providing double the loop time of the m303, Electro-Harmonix 720 Stereo Looper is another simple, solid option for guitar looping artists. While it provides only parallel looping, its capacity reaches up to 10 independent loops, and allows for unlimited overdubs. The simple interface makes it a wonderful practice tool, but its reverse and half-speed effects make it a competent live performance looper.
TC Electronic Ditto - $99
The TC Electronic Ditto is one of the most recognizable names on the guitar pedal market. Simple, to the point and effective, the Ditto looper is a popular solution for artists who are looking to master
Headrush Looper Board - $899
Headrush Looperboard is the largest pedal on this list, and at $899, it's among the most expensive on the market. By and large, what sets Headrush's pedal apart from Electro-Harmonix 720 Stereo Looper or the TC Electronic Ditto is its massive interface. It's what you'd call a tabletop looper pedal, and it boasts a 7" touchscreen, onboard FX and more. However, its 4 track limit and pedal hybridity can make it cumbersome, and it's much too large to fit comfortable on a standard pedalboard. Nevertheless, it's an incredibly advanced device with all the tools (and more) for a serious looping artist.
Singular Sound officially has two looper pedals: the original Aeros Loop Studio, and the all-new Aeros Gold Edition. If the Headrush Looperboard oversteps its goals, Aeros Gold defines them. There's more loop time and higher sound quality. Using Dynamic Read, the Aeros looper provides near-endless recording time, up to 10 hours in mono. Let's examine some of its top features:
Parallel and Sequential Looping
Write your loops in sequence to create full song parts, then layer your tracks on top for a deep and complete sonic arrangement. Aeros allows you to play up to 36 unique loops (6 tracks sequentially, and 6 tracks parallel)
Touch-screen and Seamless UI
The Aeros' 4.3" touch-screen display is more than a pretty face. It displays all of your loops with color-coded wave forms, and keeps you locked in with cues for your upcoming actions. What's more, Aeros Firmware Update 5.0 revamped the entire user interface to make all your settings and actions accessible hands-free.
Live Mixing Mode
Aeros Loop Studio and Aeros Gold Edition represent the only looper pedals on the market with a built-in Mixing Mode, accessible from the home screen. Once you're there, you can edit the master volume for your mix, or change the volume levels on individual tracks hands-free, using the scroll wheel.
Autoquantize
Go beyond the tap tempo and guesswork with Autoquantize. As of Firmware 5.0, you can automatically quantize your song out of any freeform track.
Connection to the BeatBuddy and MIDI Maestro
Singular Sound's flagship trio does more than three pedals worth of work. Connecting the Aeros Loop Studio to the BeatBuddy via MIDI allows you to automatically sync your loops to the BPM selected on the BeatBuddy, play song parts out of order, use dedicated stop control, pause/unpause, and more.
Loop More Than Just Guitar
While the Aeros Loop Studio is a guitar looper pedal at heart, it by no means stops there. Connect your bass, MIDI keyboard, drum pad, or any instrument that takes a 1/4" cable. With a pre-amp, you can even loop your vocals live.
Let's loop back around . . . what do you need to know?
We wrote this guide to share some new, under-the-radar ways of using a looper pedal. To recap, you can use one to:
Revolutionize your practice routine (work out your riffs, easily edit mistakes, and try new things)
Act as a full band, even on your solo project (add all the instruments you need and rework songs without drama)
Use it to add FX to your performance (lots of pedals like the Infinity Looper and Aeros have added effects like reverse track, fade in/fade out, and more)
Use your looper for production and engineering (record right into a DAW, add and mix layers on-demand, save and share loops)
Improve your live performances (quickly fix errors, lengthen solos and crescendos, and create a wall of sound.
Remember to get accustomed to basic looping functions like:
Start/stop
Undo/redo
Save/share
Dedicated footswitches
And learn the foundations of looper music by mastering the difference between mono and stereo recording, recording time management, audio cable management and device maintenance.
The market hosts a vast array of looper pedals to choose from. Remember, the best looper pedals are the ones that fit your music. Simple but effective loopers like the TC Electronic Ditto can work wonders for many. Some live loop artist may want the advanced tech and amenities of the Aeros Gold Edition or Pigtronix Infinity Looper, and in-between you can find wonderful pedals like the Electro Harmonix Stereo Looper, the MXR Clone Looper and more.
If you have more ideas for how to get the most from your looper pedal, join Singular Sound's community forum and let us know! Additionally, sign up to receive our email newsletter, which will fill you in on all the latest product developments, upcoming sales and coupons, company news and more.
Follow our social media channels for product demos, collaborations, giveaway announcements and general tomfoolery.
Check back on our blog for in-depth guides on Singular Sound products, as well as general tips and ideas for musicians across the industry who are looking to learn more and get a leg up.
Singular Sound is dedicated to the ongoing evolution of our products and outlook. If you have suggestions for features, concerns with your device or general questions, please reach out on the forum or email support@singularsound.com
Thanks for reading, and keep rockin'!
]]>
https://www.singularsound.com/blogs/news/definitive-guide-to-cable-management2023-04-12T15:13:14-04:002023-08-24T11:48:21-04:00The Definitive Guide to Cable Management and StorageTravis Goure
Poor cable management can lead to frustration, wasted time, and even accidents. Audio cable organization makes performing and recording easier and more enjoyable. In this definitive guide, we'll explore the best practices for cable management and storage, so you can keep your workspace tidy and safe.
Cable management and storage might not be the most exciting topic, but it's an essential one for anyone who wants to keep their workspace, studio or stage clean and organized.
Poor cable management can lead to frustration, wasted time, and even accidents. Audio cable organization makes performing and recording easier and more enjoyable.
In this definitive guide, we'll explore the best practices for cable management and storage, so you can keep your workspace tidy and safe.
Assess Your Needs
Before you start organizing your cables, take the time to assess your needs. Consider the number of devices you have, the length of the instrument cables you need, and the location of your power outlets. Having a clear understanding of your goals will help you choose the right solutions for your workspace.
For musicians, there are some special considerations. Balancing your space with the necessary gear can be tricky.
Take note of the main power sources. If you're daisy-chaining pedals on your board, ensure the primary power source is located near your amp.
Speaking of which, how many amplifiers are you running? This goes double for performing live, where you can't control the positioning of your gear as much as you can in the studio or practice space.
If you're traveling for gigs, having a concise setup is vital. Which cables are going to maximize your efficiency?
Label Everything
One of the most critical steps in cable management is labeling. Labeling cables will save you time and headaches when you need to identify a specific patch cable or device.
Use color-coded labels or markers to make it easy to identify each cable's purpose as well as where it connects.
Invest in Cable Management Accessories
There are many cable management accessories available that can help keep your workspace organized. Cable trays, cable sleeves, and cable covers can all help conceal cables and prevent them from becoming tangled or exposed.
Consider which accessories will work best for your workspace and invest in quality solutions that will last.
Tripping over cables on stage or in the studio can mean more than just a ruined song. It can mean damage to your amps, guitars, pedals or even laptop.
Minimizing slack can be crucial, but keeping your cables themselves safe is important, too. Fortunately, there's a device that solves both these issues at once. Give it a look: the Cabli. Here's a glance at what it does:
Keeps cables safe and wrinkle free in a lightweight, compact space.
Wraps both end of your instrument cables at once, so you're done in seconds flat.
Allows you to pull the exact amount of slack you want, so your studio, practice space or stage is neat, tight and efficient.
Create a Charging Station
If you have multiple devices that need to be charged, create a designated charging station. This could be a drawer, a shelf, or a charging dock.
Having the dedicated space for charging will help to develop the habit of keeping your devices ready for action.
Performing live takes a great deal of preparation. Nothing ruins a set quicker than a dead battery or a software crash. If you're using your laptop to connect a DAW, make sure you're at 100% battery, and double check to make sure your software, backing tracks, or plug-ins are all properly set.
Separate Your Cables Based on Their Function
Another way to streamline the process of performance (especially in the studio) is to organize and separate your audio cables by the function they serve.
Then, when you get in a situation where a cable shorts, or isn't long enough to connect your gear, you'll know where to grab the replacement. We'd recommend focusing on these categories.
1/4" Instrument Cables
By far the most common cable for musicians, quarter inch audio cables are a staple for connecting guitars, basses, and other instruments to your amp. You can never have too many of these, so stack em' up (maybe in your new Cablis) and put them together.
XLR Cables
A must for connecting your microphone to the PA or amplifier, XLR cables are a staple of any studio, practice space, or stage.
5-Pin MIDI Cables
MIDI-enabled pedals and gear are becoming more and more common in music, and a lot of setups can't live without them. We recommend having a few on hand.
Patch Cables
Used for connecting pedals to other pedals and saving space on your pedalboard, keep some patch cables on hand for the sake of convenience and neatness.
USB Cables
Songwriting and editing in the digital age means doing a lot of work in a DAW (digital audio workstation). DAWs like Pro Tools, Logic Pro and Ableton offer an unbelievable range of effects, EQ options, and stock digital instruments.
You can connect your MIDI keyboard, MIDI controller, microphone and more using various USB cables. The subsets of USB cables that you'll encounter most frequently are:
USB-B Cables: the standard for MIDI keyboards, this will allow you to plug directly into your desktop or laptop.
USB 2.0: often used to plug in USB microphones
USB-C: Newer models of Macbooks and other Apple products now use USB-C cables.
Learn Proper Cable Wrapping Techniques
If you don't have a Cabli Cable Management System, you'll want to learn to wrap your cables yourself. Taking the quickest route there seems convenient, but can result in a much shorter life for your cables, as well as shorts and dead connections.
You can check out our blog for guidance on how to wrap audio cables, but here are a few key takeaways to bear in mind:
Never pinch your cables. Wrapping instrument cables too tightly is the most common mistake musicians make.
Don't tie your cables. Not only can this cause kinks in the cable, it can produce shorts in the wiring itself.
There are better options than the "Over the arm" method. While using the "over over" style of cable wrapping is far better than most other options, it can still cause the gradual deterioration of your cables.
Instead, do the "over under" method. Here's what it will look like:
Common Cable Problems and How to Fix Them
Cable Humming
Ever plug in your guitar cable and it starts humming right away? This is arguably the most common problem musicians encounter with audio cables.
If you're experiencing this, the cable may be unbalanced. If it's working parallel to another cable that's unbalanced, it's going to cause that annoying hum.
Make sure you're always buying balanced cables to prevent unwanted noise.
Cable Mixups
This might seem obvious, but keeping track can be trickier than it seems. For instance, the difference between a standard TS instrument cable and a TRS cable is tough to see. Here's the difference:
This is important, because if you plug a TS cable into a mixer, you'll get a mono signal. If you want a stereo signal, you need to use a TRS cable.
Make sure you're double checking your gear, and bear in mind the importance of organizing your cable types.
Let's Wrap it Up
This concludes our guide to audio cable storage. We know it can seem a bit daunting to remember.
Using the Cabli for cable storage makes things much, much easier. Let's take a look at it in action.
]]>
https://www.singularsound.com/blogs/news/aeros-gold-firmware-5-02023-04-06T17:26:21-04:002023-08-24T11:55:39-04:00Exploring The Aeros Gold Edition Looper Pedal and Firmware 5.0Travis Gourethe much anticipated Firmware Update 5.0.0 is out on Wi-Fi. In this post we will explore the new features that make Aeros Gold Edition another evolution in our industry-leading loop pedal.
Two major updates to Singular Sound's looper pedal have officially arrived. On the hardware side, the Aeros is now available as the Aeros Gold Edition, an all-new look with silent buttons.
On the software side, the much anticipated Firmware Update 5.0 is out on Wi-Fi. In this post we will explore the new features that make Aeros Gold Edition another evolution in our industry-leading loop pedal.
Let's dive in.
Sleek, Silent and Powerful As Ever
The Aeros Gold Edition loop pedal offers the same incredible core functionality as the original. You can create 36 unique loops, mix your volume live, save and export your beats and more, all on a bright touch-screen display.
There are two changes that make Aeros Gold Edition unique and exceptional. First, we brought a polished and classy look to the pedal with new, golden footswitch tops.
Still, the buttons are more than just a pretty face. Our product development team worked with manufacturers to alter the landing spot of each button, allowing premium dampeners to be added to the pedal's metal housing.
This means cleaner recordings in the studio, a more pleasurable practice experience, and a seamless live show.
Firmware Update 5.0 Has Arrived: Backing Tracks, Autoquantize and More
In addition to our new hardware upgrade, the long-awaited Firmware 5.0 is out, and ready to be downloaded on Wi-Fi. Note that all firmware features are available on the original Aeros Loop Studio as well as the Aeros Gold Edition.
If you'd prefer to watch the new update in action, watch the video below from Joe Vitale.
Additionally, you can read the full forum post here, but now, we're going to take a look at all the newest features available on your looper pedal.
Autoquantize Mode
The best looper pedals adapt to your music. Choose ‘Auto’ in ‘Song Grid Mode’ to enable Autoquantize Mode. This allows you to quantize freeform recordings on the fly.
Here's how it operates:
Define tempo of recording based on start and stop points
Set length to decide how many measures recording will be quantized to
Auto BPM Range setting sets tempo range for autoquantized track
Multi-tempo song setting to enable Autoquantize for every part
Use Aeros as MIDI transmitter to control device, e.g. the BeatBuddy
Enable ‘Send Stop at Empty Part’ to stop drums or playback devices during recording
MIDI Transmitter (Master)
The Aeros Loop Studio can now act as the MIDI Out in sync with other devices. Here's how to use it:
Set ‘MIDI Mode’ to Transmitter (MIDI Master) to send internal clock, time signature, transition, Start, and Stop commands to MIDI Output
Individual behaviors can be turned off in MIDI In/Out settings
Aeros ignores incoming clock but still responds to non-filtered CC commands
Optional MIDI Out behaviors include RPO command, sending MIDI Start, and sending Stop
Auto Record
Start recording from stopped state once input audio signal meets specific threshold
Set threshold in Behavior Settings
Aeros action button will say “Arm” instead of “Record” when stopped
Hands Free Slide Out Menu
We've taken the Aeros user interface to a new level in this update. More options and more freedom provide superior control during performances. Mastering a looping pedal has never been easier.
Here's the gist:
Hold down bottom left Aeros button to engage menu
There are two separate menus: Playing and Stopped. Different options will be available based on which mode you're in. All of these can be edited in Hands Free settings, but you'll get abilities like:
Mixer
Switch RPO/ROP
Undo, Mute, Reverse, Solo, Fade to Mute
Lock/Unlock Track, Sleep Screen, Save Song, Clear Song, Delete Last Part, Open Album, New Song 2x2, New Song 6x6
Please note that these settings cannot be used while you're recording or overdubbing a track.
You can now scroll through options on the home screen with the built-in scroll wheel. "Select" will be performed using the right-most button on the Aeros Gold. Here are some redesigned screens.
Clean functionality is part of what makes Aeros Gold Edition one of the best looper pedals on the market. Let's take a look at the screen grabs so you can get a better feel for what we mean.
Stopped Screen Redesign:
The icons you see listed on the right side are as follows:
Edit Song
Home
Save
Create Song
Songs
Additionally, you have the metronome icon (set to "On" in this picture). Below that, you can see the number of measures of count-in time, which is customizable. Next to that, the "Record" and/or "Playback" options. This dictates whether the count-in will occur just before recording or after playback begins.
On the next row down, you'll find the Tempo setting. In addition to the BPM, this will show whether the MIDI clock is being sent or received. If you have a mismatch between the internal BPM of the song and the external BPM, the text will turn red.
Next to Tempo, you'll find the customizable time signature.
Some more options available with hands-free command are:
MIDI Mode: Select whether the Aeros acts as the Transmitter (Master) or Receiver (Slave).
MIDI In: Start
Record/Playback: whether Aeros begins recording or playback when receiving a MIDI Start command.
This can be edited using the touch screen!
MIDI Output
Merge/Thru/Out/Off
Albums and Songs Page Redesign:
All Aeros songs are now inside folders called ‘Albums.' Albums can be named and hold songs organized by Date, Name, or ‘Track’ (in a Custom Order).
Pressing the 3 dot menu in the top right or holding the bottom left Aeros button will open up the Songs Slide Out Menu and allow you to change the track order.
Songs List is now just called ‘Songs.' You can find the Songs page inside every album. Inside the Song page you can press and hold the bottom left Aeros button to bring up a Slide Out Menu for the Songs.
(Albums/Songs) options can now be explored using the wheel, and you can interact with each selection using the buttons.
The right Aeros button will open a selected album or song when it is tapped.
If you hold down the right Aeros button while selecting a song, it will engage the Multi-Select mode. Multi-Select can also be selected in the Songs Slide Out Menu.
While Multi-Select is enabled, tap the Middle Aeros button to Move a song or multiple songs. To copy song(s), hold down the Middle Aeros button.
Copy and move actions are also available as options in the Songs Slide Out Menu. If Multi-Select mode is not enabled, choosing one of these options in the Slide Out Menu will only affect the currently selected song in the Album.
You can delete an album by pressing the Trash icon when the album is selected.
Loop Pedal Settings Menu Redesign:
All device settings have now been organized into categories, as follows:
Routing
Behavior
MIDI
MIDI IN
MIDI Out
Hands Free
Pedal
Fades
System
Diagnostic
All these settings can be accessed hands-free using the wheel, and options for the currently selected setting can be toggled using the right Aeros button.
Any slider-based settings allow you to "Edit" its value using the right-most Aeros button. Press it to activate the slider, then use the wheel to change the value.
Tapping the bottom left Aeros button will cancel the change.
Tapping the right button will confirm it.
Use the same process to alter any settings with +/- integers, such as Time Signature under song settings.
You can tap the middle button over any selection in the settings page to get more info on its function.
Backing Tracks
Backing Tracks represents one of our biggest features to date. You can now upload backing tracks into the Aeros as .wav files! Here's how it works:
Once you boot the Aeros with the SD card inserted for the first time, it will reformat the empty SD card or ask you to convert existing files (Read Bottom of Forum Post First)
Once formatted, the SD card will have a Backing Tracks folder which you can drag and drop your files into.
The Aeros will only support .wav (PCM) files that are 44.1kHz and 24bit. They can be mono or stereo.
To import a file, you must be in an empty song or create an empty song that is in freeform mode (we plan to make backing tracks compatible with Autoquantize and Quantize mode soon). If you wish to import multiple tracks per part, you must turn Sync Tracks off. If you wish to have sync tracks on, you can only import one backing track per part into the first track.
Backing tracks must be loaded sequentially starting with the first track.
We may expand the possibilities for file formats and sync rules later but this is a great first step
Step-by-step guide to load a Backing Track:
Click the pencil icon to edit the song
Make sure you have Song Grid Mode set to freeform. If you want to import multiple backing tracks per part, you must have the Sync Tracks setting off.
Note: You cannot change the Song Grid Mode to freeform and then load the file, first change the setting, hit save, open the edit screen again, and then start importing tracks.
Scroll down and select Load File with your finger on the touchscreen
Choose a file from the list using the touchscreen. This can also be done using the wheel to change the selection and the right Aeros button to choose an option.
Once selected, you will return to the song settings screen, click Save in the top right to load in the backing track.
Repeat steps 3-5 to load multiple backing tracks into a song part
Fade Time
We've made fade settings their own categories in the settings menu, and made them customizable. You can now independently set Start, Stop, mute and unmute fades to a custom time (1-60s).
To do this, set it to "Timed" to choose the desired value.
Expression Pedal Setup (EXP)
Our brand-new Expression (EXP.) pedal setup page has been added to the settings menu. After pressing "Calibrate," simply follow the steps on-screen to set up your connected expression pedal.
Offscreen Actions
We've made it possible to know when pending offscreen actions are incoming. A small bar with the same color as the upcoming event banner will fill up from bottom to top along the height of the track.
For example, if you set a long track to mute at the end of the track, you will see a gray bar rising on the right side of the track until the Mute banner appears.
USB Access to Internal Memory
You can now access the internal memory of the Aeros on your computer through the USB port, making backing up your songs an easy process.
To access the internal memory: With the Aeros powered OFF, connect it to your computer via USB and then power the Aeros ON.
Do not connect the Aeros while powered ON or the memory will not be accessed until it is rebooted
To access the SD card, insert it in the SD card slot before turning the Aeros on while it is connected to your computer via USB.
Improved Undo/Redo
The Undo/Redo functionality has been improved to allow for multiple levels of undo/redo. This means that you can now undo and redo multiple actions in a row, rather than just the last one. This is especially useful when you are trying to make complex edits to your loops.
Improved Song Navigation
The Aeros now allows you to navigate between parts of a song more easily. You can use the left and right foot switches to move between parts, or use the new Song Navigation screen to quickly jump to a specific part.
On-Screen Notifications for Received MIDI Commands
The Aeros will now display the MIDI commands it receives if they are switching settings on or off. Note: this currently only works for switching ROP mode to RPO mode and vice versa.
Default Naming Convention
You can now customize the default name for every new song on the Aeros. The change will take effect after editing the setting and making a new song. Old songs will not be affected.
One press song part change
Change the song part in 6x6 just like the song parts in 2x2, with one tap to transition. The parts work like the tracks in 6x6, when selecting an empty part, a recording will be cued in the empty part.
If you tap Next Part again while there’s a pending transition to an empty part the first part will be selected again and transitioned to.
Keep pressing the Next Part button to toggle through the song parts sequentially.
It is suggested that you set the Change Parts behavior setting to End of Loop to get the most of this setting - that way you have time to select different parts before the transition occurs.
On screen labels as buttons
You can now tap the on-screen button labels using your finger! The response is not as good as the physical buttons for multiple taps but works well for the first tap.
Multi time signature/tempo
You can now have songs with either multiple tempos (one per part), time signatures (one per part), or both!
Auto record next track toggle
Turn off the Automatic recording function in 6x6 when selecting an empty track, instead you will have to manually start a recording once the empty track is selected. Settings > Behavior
Loop Decay
The Loop Decay will decay the track’s base layer every time a new overdub is started by the amount set in the Decay Rate. If you set the decay rate to 50%, the base track will decay by 50% or become half as loud when an overdub is started. If you set the decay rate to 100%, the base track will decay by 100% or be totally silent when an overdub is started.
Note: this is a destructive audio process.The decay process cannot be reversed. It is recommended that you save and copy a song before adding loop decay to it to avoid decaying and losing any old recordings.
The Loop decay will only engage when a new overdub layer is started, the loop decay does not apply at every loop seam.
Loop decay is able to be turned on and the decay rate can be set in the song settings. Currently the decay rate cannot be changed without stopping audio and saving the song.
Other Improvements and Bug Fixes
In addition to the above features, the Aeros 5.0 firmware update includes a number of other improvements and bug fixes, including:
Improved audio quality
Improved audio routing
Improved file management
Improved synchronization with external devices
Fixed bugs related to MIDI mapping and MIDI clock synchronization
Overall, the Aeros 5.0 firmware update is a significant improvement over previous versions, and adds a number of highly requested features. If you own an Aeros looper, we highly recommend updating to the latest firmware to take advantage of these new features.
To get the latest news the moment it happens, subscribe to our email newsletter. Make sure to follow us on Instagram, TikTok and YouTube for product demos, artist features and more.
]]>
https://www.singularsound.com/blogs/news/aeros-update-5-0-02023-02-10T16:41:33-05:002023-08-24T11:53:23-04:00Read Before You Update your Aeros Loop Studio to Firmware 5.0.0Travis GoureMore]]>
Hey Aerosnauts! Our most ambitious firmware update yet is already out on beta. Aeros Loop Studio version 5.0.0 contains some long-awaited and often requested features.
Read on to hear about some of the big additions. But first, we want to give you an important heads up.
Aeros Loop Studio is Changing File Types
Firmware 5.0.0 will alter the construction of Aeros song file structure. This will only happen if you convert your files when you download the update. A pop up with the convert option will show anytime the old file structure is detected.
This shouldn't pose any problems to your data. However, to be extra safe, we recommend hitting ‘NO’ to the convert pop up and backing up your existing Aeros files before starting the conversion process.
Don't worry, we've got a quick tutorial to help you complete that process. Read up on the Aeros Loop Studio 5.0.0 forum post to see how.
5.0.0 New Features and Changes
This is by no means a complete list, but here's some of the incredible new capabilities and features coming to the Aeros:
Backing Tracks
By far one of the most requested features for the Aeros looper, we've finally brought it to life. Play along to a backing track by using the SD card to load .wav files (24 bit 44.1kHz PCM) directly onto the Aeros.
Hands-Free Navigation
We've done an overhaul of the looper's UX. Navigate menus and customize options hands-free using the Aeros wheel and buttons.
Autoquantize
Create a quantized song from your freeform recording on the fly. The Aeros can automatically detect your tempo and loop length, quantizing your track to 1, 2, 4, 8, or 16 measures within a customizable tempo range. If you set the length manually, you will have access to the full 40-300 BPM range on the Aeros.
New MIDI Capabilities
The Aeros can now act as a MIDI Transmitter (Master), sending internal clock, time signature, transitions, start/stop commands, and more via its MIDI Output. When in MIDI Transmitter mode, the Aeros can still respond to any incoming CC commands.
Auto-Record
Choose whether you’d like the Aeros to start recording once the button is pressed, or have the button arm the Aeros to record only once the instrument is played. For the latter, a recording will only begin when the audio reaches the Auto-Record threshold. The threshold is editable in the Behavior settings.
--
We're excited for you to try out all of the new features, and to see the music you make with the expanded functionality and creative possibilities. Now's a perfect time to join the Singular Sound forum and see all the discussion around the Aeros Loop Studio.
]]>
https://www.singularsound.com/blogs/news/audio-cables-for-musicians2023-01-30T13:56:51-05:002023-08-24T11:49:16-04:00Why are Audio Cables so Important for Musicians?Nicole McCrayMore]]>
When it comes to making music, audio cables aren’t the sexiest topic of all. But sometimes, the most basic topics or details can make the biggest difference in your music. It’s worth breaking down how audio cables help your setup, and what role they play in your music.
Truth is, instrument cables have a major impact. Let’s go over all the important details.
What Are Audio Cables?
Audio cables hook up to your gear and send an audio signal to be output by devices like guitar amps or PA systems. Additionally, you can use them to plug into an audio interface or pre-amp in order to record in your favorite DAW (Digital Audio Workstation).
Types of Audio Cables
There are a host of different audio cable formats. Selecting the correct one is a crucial part of a successful performance. First, we’ll review common types of cables. Then we can talk about quality and brand.
Analog Vs. Digital
Analog cables transmit audio through continuous waveforms. There are two important subcategories to note: balanced and unbalanced. Balanced cables cancel out noise like electrical humming or interference. They have three internal wires (ground wire, positive polarity, and negative polarity). Unbalanced cables, on the other hand, have just two wires (ground and positive polarity). These wires are much more likely to pick up any background noise than a blanched cable.
Digital cables transmit audio differently through a sequence of 1’s and 0’s rather than electricity.
The conductor allows electricity to pass through the wire. It is responsible for the power of the cable. The size of this part matters, because if it’s too large or too small it will corrupt the purity of the signal from its original audio source.
The Shielding
The shielding helps to eliminate any noise the conductor allows through. This is especially important with regard to unbalanced cables, where noise chatter is more common.
Connectors
Connectors may just look like shiny accessories since they come in different colors and finishes. However, they play a major role in ensuring the signal is uncorrupted. When you purchase a guitar cable, focus in on the quality of the engineering, not the aesthetics.
Cable Examples
Let’s look at a few different audio cables you may use in the studio.
Usually used for microphone connections, XLR cables are used in both studio recording audio and live performances. They are balanced analog cables made to work over lengthy distances.
A TS cable is an unbalanced analog cable that is most often used to connect a guitar to its amplifier.
TRS cables offer three different conductors to offer a balanced signal. The only real difference between this cable and a TS cable is that it has more conductors. TS cables have one conductor.
Have you seen those tri-colored plugs that connect to matching inputs on TVs? Those are RCA cables. Musically, they are commonly used in turntables.
USB cables are another example of a basic digital connection. The USB cable is universal to allow computers to connect with other devices, but is also used in microphones, MIDI keyboards and more.
MIDI cables are one of the most important instrument cables of all. They can sync any MIDI-enabled gear to playback devices, DAWs, fx pedals and more. For instance, the BeatBuddy drum machine hooks up to the Aeros Loop Studio and MIDI Maestro via MIDI.
Do Audio Cables Make a Difference?
Your audio cable can make a huge difference in your quality of sound. The more balanced the cable is, the less likely you are to deal with interference or damage to your recording and performance audio. That's why taking proper care of your guitar cables is vital.
The Top 3 Things to Consider With Your Audio Cables
The quality of materials. It can make or break your performance. The better the quality, the more strength and durability the cables will have.
Engineering standards. Make sure that the cable you’re purchasing is compatible with any industry standards, especially when it comes to 5-pin MIDI cables.
Lastly, make sure the physical design is correct so that the cable actually works for your specific situation. Consider getting a cable organizer to streamline your setup and eliminate slack.
Choosing the Right Audio Cable
With dozens of audio cables, brands and options for this market, it can be confusing. It’s worth asking a professional to help you choose the best option for your specific situation.
After all, music is a collaborative experience. Asking questions is vital, even for things as simple as holding your guitar pick correctly.
As we continue to experiment and learn in the music industry, we progress and evolve. If you aim to make a career out of your music, ask studio musicians how they made it.
]]>
https://www.singularsound.com/blogs/news/7-apps-for-bassists2023-01-13T17:37:21-05:002023-10-02T16:20:54-04:008 Apps That Can Make You A Better BassistTravis GoureMore]]>
This article was written by our friends at Soundstripe:
If you’re new to playing bass, or if you’re just looking to sharpen your skills, then you’ll want all the help you can get. Whatever technique you’re trying to improve on, there’s probably an app to help.
If you’ve ever wondered about apps for bass players, you aren’t alone. 90% of music-related apps are marketed toward guitar players. That can be discouraging, but don’t worry! With these seven apps, you’ll be sure to find something to help you on your low-end journey. Let’s get started.
The Metronome by Soundbrenner
With over 8 million downloads and a 4.7-star rating, Soundbrenner's Metronome app is the highest-rated and most-used metronome app in the world. It's a must-have for bassists of all levels, offering a beautiful and intuitive interface packed with all the features you need.
Soundbrenner's Metronome app offers rock-solid precision, allowing you to create any rhythm in the world. This is particularly useful for bassists, who often need to play complex rhythms and syncopate with other instruments. You can change the time signature and subdivision, and emphasize beats by setting accents, which is perfect for practicing those tricky bass lines.
The app also offers powerful customization options, including over 20 different sounds. The ability to switch between a dark and light theme is also a nice touch.
The app also features world-class setlist management, allowing you to save your rhythms and load them to play in the metronome at any time. This is particularly useful for bassists who need to practice specific songs or sections of songs.
Soundbrenner's Metronome app is available for free on both iOS and Android. For more information, visit the Soundbrenner website. This app is a fantastic tool for any bassist looking to improve their timing and rhythm skills.
Yousician
Yousician is a mobile-based app revolutionizing how bass guitar players learn and hone their skills. It uses sophisticated algorithms to present songs, chords, and practice exercises in real time. As users play along with the app, they can track progress and challenge themselves with increasingly difficult progressions over time.
Additionally, the app contains tools such as tuning assistance, and offers visual feedback on playing accuracy so that users make sure their technique stays on point. Yousician not only provides the opportunity for players to learn new songs, but also helps make existing pieces better. With its user-friendly interface and easy accessibility, Yousician promises to take bass playing to new heights.
JamTracks
JamTracks is an amazing app to help bass players of all levels hone their playing skills. With a collection of over 600 songs and counting, you can easily find the perfect song that fits your style with simple filters.
Once you’ve picked the perfect track, it’s time to start jamming. All tracks are skillfully mastered to give you an ultra-realistic musical experience. Utilize optional drum and percussion loops, chord progressions, and bass lines so that you can find whatever groove fits your style. JamTracks will also measure your progress with built-in performance analytics, so you can always stay ahead of the game when it comes to improving as a bass guitarist.
And if you’re looking for a less conventional method for jamming, try out someroyalty free music for background jam tracks. This makes it easy for budding players to gain an understanding of harmony, texture, and advanced techniques like improvisation. JamTracks is an excellent resource for learning new styles, giving you free rein to explore the likes of funk, soul, jazz, and rock without being confined by a genre or specific artist. Ultimately, using royalty-free new music as part of your practice routine can help build strong fundamentals that will benefit you in any musical scenario you may encounter as a bassist.
Fun practice tip - Use SFX when feeling limited. With SFX, you can explore a new range of sounds and experimental techniques that can help to diversify the sound of your instruments and expand the musical palette you offer as a bassist. SFX includes effects like distortion, auto-wah, wah-wah, chorus, flanger, delay, and many more. Each one offers unique nuances that can be tailored creatively to liven up your playing and make it stand out from the crowd.
Bass Guitar Tutor
Whether you’re a beginner or an experienced bassist looking for some fresh ideas, Bass Guitar Tutor is the app for you. This unique interactive learning tool allows users to progress at their own pace and get personalized, actionable advice from experts in fingerstyle, slap bass, and improvisation.
With access to over 300 lessons and exercises-- plus playlist recommendations for practice time-- you gain access to an extensive library of audio and video tutorials with full explanations along the way. Developing your skills can be fun and rewarding as you increase your playing confidence within this supportive online environment. Download Bass Guitar Tutor today to see how it can help take you to a higher level.
Bass Pro
Bass Pro is another app for aspiring bassists to level up their performance.. The app not only provides more than 1,000 interactive exercises designed to improve all aspects of your bass playing, but also has the option for step-by-step progress tracking and a connected metronome.
With its user-friendly interface and clear instructions, Bass Pro is the perfect guide for beginners looking to get started on their musical journey, and a useful tool for more advanced practitioners in need of refining their technique. Plus, with improvements made regularly based on users’ feedback, Bass Pro keeps getting better and better. So why wait? Get yourself hooked up with this modern wonder and start mastering those bass lines today.
Fret Trainer
Learning to play the bass guitar takes dedication, hard work, and practice. Fortunately, with Fret Trainer, a revolutionary app for bassists, you can significantly improve your chops from the comfort of your own home. It enables users to select any team of notes used in a song and create exercises that can help turn these notes into muscle memory.
Additionally, Fret Trainer’s extensive library of songs contains tracks from popular bands and genres, so there is something for everyone. With this app’s powerful analytics tools and interactive games, it has never been easier to make real progress on the bass guitar. Start developing those skills now with Fret Trainer.
Tonebridge
Tonebridge is an innovative and user-friendly app that can help you elevate your bass guitar skills. It has a vast catalog of songs featuring backing tracks and allows you to play along with tracks from some of the most iconic bands. With Tonebridge, you have access to thousands of instruments, amplifiers, and pedal effects from over 6,000 popular songs – opening up a world of new possibilities for your playing.
The user interface is intuitive and easy to navigate, allowing you to find your favorite playing styles quickly. Furthermore, the app only requires a one-time purchase fee for unlimited access to its entire song library. From beginner exercises to complex techniques for bassists looking to master their skills – Tonebridge has something for everyone.
JamUp
JamUp is another app that’s perfect for any level of skill. It Gives its users access to an array of features and tools that are designed to help them hone their skills in bite-size chunks, such as jamming along with simple chord progressions, learning to read tabbed notation, and practicing scales.
It also includes play-alongs from top performers across multiple genres, giving players the opportunity to learn from some of the music industry’s best artists. The best part of JamUp? Its ability to provide real-time feedback on your performance. This allows users to accurately identify weaknesses and develop areas of improvement.
OnSong
OnSong replaces the mess of paper and binders with interactive, auto-scrolling, and transposable chord charts right on your tablet or phone. It’s the epitome of what a 21st-century songbook should be.
The app lets you import and build a library of chords and lyrics with support for Dropbox, Google Drive, SongSelect, Planning Center, and more. On stage, you can tap to turn pages or sync the app to foot pedals to control it hands free. (We have a lot of our MIDI Maestro users using the two together!)
The app can do more than just organize your set list too! It can:
transpose songs
write songs
share with multiple band members
control stage lighting
display song lyrics
and more
Find the app on the App Store today, and use our link to save 10% when you choose your plan.
The Bottom Line
These days, there are plenty of fantastic apps available to help bassists hone their skills and become better players. From beginners to bass aficionados, any one of these apps can make learning the bass fun and rewarding.
--
Author Bio: Zac Carr is a Chicago-based content writer for Captive Demand, a full-service marketing agency offering demand generation, web development, SEO, CRO, and content creation solutions.
]]>
https://www.singularsound.com/blogs/news/singular-sound-quick-gift-guide2022-12-05T15:29:21-05:002023-08-24T11:40:28-04:00Singular Sound's Quick Gift Guide: Pedals, Accessories and MoreTravis GoureWhether you've got a musician in the family, or want to drop a hint about your wish list, we're here to help you out. Read on for our official Quick Gift Guide -- everything you'll need to pick the perfect present for friends and family.
]]>
It's December 6th. Have you finished your holiday shopping? Well done if you have! But if not, there's no reason to worry.
Whether you've got a musician in the family or want to drop a hint about your wish list, we're here to help you out. Read on for our official Quick Gift Guide -- everything you'll need to pick the perfect present for friends and family.
The Cabli: Efficient, affordable, smile-inducing
What it does:
The Cabli is our innovative cable management solution. The lightweight, compact device winds both ends of your audio cables at once, finishing in seconds flat.
Keep cords safe, extend the life of your guitar cables.
Pull the perfect amount of slack every time
Fit all your favorites: 1/4", XLR, right-angle, MIDI, SpeakOn (more. . .)
Christmas-colored (looks pretty beneath the tree)
Perfect for:
The cable collector
The neat freak
The studio aficionado
The stage designer
What they'll say:
"I didn't even know they made these!"
"I've been waiting for something like this . . ."
"Are you calling me messy?"
The BeatBuddy: Dynamic, powerful, authentic
What it does:
The BeatBuddy brings the best feature of a drum machine and guitar pedal in one compact device. Choose from hundreds of styles and genres, customize fills and transitions, switch song parts on demand, and so much more.
24-bit studio quality sound
Real, drummer-recorded drum beats
Software to create and edit beats, make setlists and more.
Add amazing new packs, sets, and songs on demand from the Premium Library
Perfect for:
The solo artist
The jam-session hero
The sick-and-tired of unreliable drummers
The pedalboard builder
What they'll say:
"This is going to change my gigs forever."
"Look at all these options!"
"I can finally kick Jeff out of the band"
BeatBuddy MINI 2: Lightweight, Inventive, Affordable
What it does:
BeatBuddy MINI 2 offers the same core functionality as the BeatBuddy in an ultra-portable, authentic-sounding drummer pedal.
200+ styles and genres
16-bit gig-standard sound
Dynamic function knobs (change tempo, genre, volume, song)
Beat-display screen to keep perfect time
Perfect for:
The beginner guitarist
The budget-minded professional
The minimalist performer
The coffee-shop favorite
What they'll say:
"I never knew how badly I needed this!"
"This fits perfectly on my board."
"Jeff's still getting kicked out of the band."
Aeros Loop Studio: Innovative Live Looping
What it does:
The Aeros Loop Studio is a multi-track looper pedal that transcends traditional looping boundaries. Write loops in parallel and sequentially, mix tracks live, go freeform, and more.
Molded connector shells for long-lasting durability
Sending best wishes to you and yours!
From the whole team at Singular Sound, we hope your holiday season is full of warmth, camaraderie, and joy. In order to give you the best service possible this month, we wanted to share a couple things to keep in mind.
We will be observing a company vacation later in the month, we will send out an email, text, and blog post to give further info there.
If you made our gear a part of your holiday, we'd love to see it! Share your pictures and videos with us on Instagram, Facebook and TikTok. Click each link to follow our socials.
Happy holidays, and keep rockin!
]]>
https://www.singularsound.com/blogs/news/guitar-pedal-stompbox-guide2022-11-28T13:03:41-05:002023-08-24T11:48:53-04:00Effects Pedals: The Handy Guide to Stompboxes in your Home StudioNicole McCrayThe guide below will provide all the info you'll need to differentiate between types of effects pedals, and how sound engineers or guitarists make an informed decision on the pedal that best suits their recordings.
Effects pedals bring a unique style to your music. They offer alternative ways of driving the sonic arrangement of your tracks. If you’re a guitarist, you’ve most likely used one or two in your practice or performance.
However, effects pedals are not only for guitarists, nor are they strictly analog. When you go through any recording process, sound and audio software plug-ins can offer the same type of effects.
If you’re new to performing or writing music, or haven't experimented much with fx pedals, you might be wondering which ones are best to craft your sound.
The guide below will provide all the info you'll need to differentiate between types of effects pedals, and how sound engineers or guitarists make an informed decision on the pedal that best suits their recordings. So read on to discover how you can up your recording game in the home studio, or level up your live performance.
What are Effects Pedals?
Before diving into the kinds of effects, let’s talk about the effects pedals themselves. Put simply, effects pedals are sound processors in pedal form. They are typically hooked up between an instrument and an amplifier. You'll often hear them called "stompboxes" or guitar pedals, usually controlled via a built-in footswitch.
The goal of fx pedals is to create unique tones, make a song stand out, or achieve a specific style. Thousands of stompbox and pedal manufacturers worldwide provide unique takes on guitar pedal. Let's check out a few of them.
Types of Stompboxes
There are countless types of guitar pedals to choose from. Let’s do a quick review of some of the most popular effect pedals for guitarists and musicians, as well as some of the best models you can purchase based on your budget.
Delay - musicians and listeners alike love the ethereal echo provided by delay pedals. U2’s “The Edge” provides a popular, example, and they did it long before digital hardware could optimally replicate the analog tape loop effect. Now, of course, you can loop right in the studio.
Reverb - somewhat akin to the delay effect, reverb provides the expansion of sound by reflecting it within a certain space. It adds depth to music, and is often used by studio producers in post-production mixing and mastering.
Distortion - distortion has many names associated with it. Drive, gain, crunch, and fuzz all refer to ways of distorting a signal. You may want to experiment to see which distorted sound works best for your music.
Some distortion pedals can double as preamps or full-blown amp simulators. One such example is the VOX Valvenergy Copperhead Drive.
Modulation - another broad category of sound like distortion, pedals featuring modulation might cover rotary speaker, flanger, tremolo, flanger, phaser, and chorus effects. Modulating your instrument signal will animate to your sound, and some pedals offer rate controls to sync action to the music’s tempo.
Some classic modulation pedals that guitarists use include the MXR Phase 90 and Strymon Lex.
You will discover countless other fx options as you look at pedals, like Noise Gate, Compressor, Limiter, Pitch, etc. As a musician, it’s important to research and discover what these audio effects can do for your music.
Tips for Musicians with Effects Pedals
Usually, effects pedals are designed for guitarists, and are made to run through an amplifier.
Depending on the effect you're going for, you may need to utilize a low pass filter to get rid of high-end control, especially when using the distortion pedal, to prevent unwanted buzz.
Stompboxes can be expensive, underscoring the importance of choosing the right one. Once you have a clear picture of your budget, you can save up for the pedals you want most. You can often try them out at local music stores to get a feel for them before buying.
Thus far, we’ve covered single-effect pedals. However, there are multi-effect pedal units that you can purchase as well, designed to offer an array of effects within one device. This obviously offers a higher level of convenience, but let’s discuss the pros and cons of each pedal category.
Pros and Cons of Single-Effect Pedals
Single-effect pedals are generally easier to use, as you already know which sound is being featured, so you don’t have to scour menus or scroll through tons of settings. It’s also easier to see which pedals are on or off when playing, so you can easily adjust them as necessary.
However, single-effect pedals must be individually powered and will eat up battery power quick if you don't have a dedicated power supply.
If you purchase more than one single-effect pedal, having many of them together can lead to what is referred to as “tone suck” and mess with your sound. You'll want to be careful to keep the signal between them clean, particularly in live music settings.
Pros and Cons of Multi-Effect Pedals
Multi-effect pedals provide a range of different effects in one unit, which has great appeal. There may also be a wide variety of options within the effects, such as ping-pong delay, dotted 8th note, etc. Additionally, you don't have to worry as much about daisy chaining multiple pedals, making it easier to set up at your next gig.
However, having multiple options like this can be challenging, particularly if you're just starting in your fx pedal experimentation. Multi pedals often make quick adjustments tougher mid-performance as well, requiring more steps to switch between sounds.
You may also find that the quality of each effect is inferior to ones produced by their single-effect pedal counterparts.
Understanding Stompboxes
Downloading some audio software, or working with a music licensing subscription, can be helpful in demonstrating the different styles you can curate with effects pedals.
Experiment with the sounds in your recordings and see what products provide your music with that special “something.” Exploring all of this is incredibly fun, so take your time! Plus, always consider checking out new resources and tools for guitarists to improve your skills.
Hopefully, this guide has provided you a more in-depth look at stompboxes, and the effects that help give your music a lasting impression. Continue to work on your music, chase your passions, and Keep Rockin’.
]]>
https://www.singularsound.com/blogs/news/footswitch-tutorial-4-tips2022-08-19T19:08:35-04:002023-12-11T13:00:06-05:00Footswitch+: 4 Ways to Master Your Foot Switch PedalTravis GoureMore]]>
Since then there have been three more generations, culminating in the Footswitch+, a new and amped up version that takes the BeatBuddy and BeatBuddy MINI 2 to the next level with customizable options and long-term durability.
It lets you add accent hits to your beats, pause/unpause songs, tap tempo, alter the BPM and more.
However, the Footswitch+ goes beyond that. Mastering its functions will help expand your creative potential and make the BeatBuddy drummer pedal an even greater powerhouse.
Here's 4 How-To's for Singular Sound's Footswitch+
#1: Change Folders, Songs, and Beats Hands-Free
Our product development team pays close attention to the critiques and requests we receive on our User Forum. One we see often is that musicians don't want to have to bend down to scroll through different genres and sets while they're performing live.
It's worth noting that, for BeatBuddy users who don't have a foot switch, you can make playlists on the BeatBuddy to save all the different songs for your set in one place.
However, you can also scroll and surf the BeatBuddy library hands-free with Footswitch+ ergonomic buttons.
To activate this ability, go into your BeatBuddy settings. From there, select Footswitch Settings. On that menu, you can change what action the BeatBuddy will perform if the external footswitch is pressed. Set this option to perform the "song/previous song" while stopped.
#2: Customize Your Accents + Effects
You can edit the actions performed by these two buttons using the BeatBuddy Manager.
For instance, the default accent hit is a crash cymbal. If you would prefer it to be an open hi-hat, a ride cymbal, or a bass drum strike, you can change it easily.
Here's some other unique functions you can use:
A comedic rimshot (ba dum tsss)
A cymbal swell
Crash outro (the more abrupt hit and hold crash cymbal you're familiar with)
#3: Use as a Momentary Switch
We engineered the Footswitch+ to work in tandem with the BeatBuddy, but not onlywith the BeatBuddy.
You can use it as a momentary footswitch to close the circuit on a signal temporarily. Momentary footswitches are only active when your foot is pressing down on the pedal. They are distinct from latching foot switches, which "latch" into place, and keep the function active until pressed again.
With the Footswitch+ operating as a momentary switch pedal, you can control sound effects, activate sustain on a synthesizer or electronic keyboard, start and stop sequencers, drum machines and more.
Guitarists can use it to switch channels on amplifiers, and bring a greater amount of command to their pedalboard and performances.
#4: Play Barefoot for Maximum Comfort
Perhaps it's not so much a tip as it is a suggestion, but something we love about the latest Footswitch+ is that it is designed to be playable without shoes on.
It comes with ergonomic, easy-press buttons, unlike the clunkier, sharper buttons you'll find on many other foot switch pedals.
It might sound silly, but having gear that is ready to play without any prep can pay dividends when it comes better practice, and the sheer enjoyment of playing music.
Hear It From the Users Themselves
We have a diverse and active user forum for musicians, producers and enthusiasts to discuss Singular Sound gear, making music, and addressing concerns.
Tons of talented users find new ways to write, practice and perform with the BeatBuddy and Footswitch+, and they share their insights with all of us.
Sign up to join our community, and get the lowdown on all the ways a footswitch can boost your creativity. Plus, get a full rundown of every Firmware Update on the Aeros Loop Studio, BeatBuddy and MIDI Maestro from the developers themselves.
We're always looking for new ideas proposed by our forum members, and working hard to address the concerns we see mentioned in discussions. Join the party! We can't wait to see you there.
Looking For More?
If you want to stay up-to-date on all our content, deals, discounts and product updates, these are the best ways:
We're here to help you get the most out of your Singular Sound gear, so you spend more time engaging with the things you're most passionate about. Keep us up to date on your endeavors, and most of all,
Keep rockin'
]]>
https://www.singularsound.com/blogs/news/how-to-wrap-audio-cables2022-08-11T16:24:29-04:002023-08-24T11:42:43-04:00How To Wrap Audio Cables & Increase Their LifespanTravis GoureMore]]>
Audio cables are finicky. Studios and stages have long been battlefields for guitarists trying to keep them organized and working.
The question of how to store cables has many answers. There are as many methods as there are musicians, but everyone agrees on one thing: keeping guitar cables working over the long haul is tough.
Fortunately, there are a few surefire ways to increase the lifespan of your cables. Read on for our quick and easy tutorial, plus, see the product that can do all the work for you.
Rule #1: Don't Pinch Your Cables
When you're in a rush trying to get to a gig, or trying to get your gear off stage for the next act, the temptation is strong to simply grab a fistful of cable and throw it in a bag.
The problem is, not only will your cables get tangled, they're also likely to get pinched. A pinched cable is arguably the quickest way to ruin its connection. That's because pinching it actually thins out the cable itself, thus increasing its resistance and preventing the proper electrical flow to your instrument or amp.
This is why you'll see musicians take great care to wrap cables in a smooth circular motion.
So however you wrap your guitar cables, make sure you don't see a crease or pinch anywhere. Then you'll be off to a good start.
Rule #2: Don't Tie Your Cables
Again, this is probably something you already know. However, when push comes to shove, we often have to make compromises to save time, and this is one way musicians quicken the rate at which they wrap and unwrap their audio cables.
Plus, if you don't know the proper way to wrap cables, tying it would seem like a reasonable thing to do. No one actively tries to harm their cables. One time I tried to ask a sound tech how to wrap my XLR, and he, seeing that I had tied my 1/4" just before, told me that I should never play a show again.
Don't listen to something like that. Keeping your cables healthy is about helping you play music for a long time, and for less money. Just like learning to play guitar, taking care of your gear is a process of practice and experimentation.
Rule #3: Don't Do The Over-Arm Method Forever
You've undoubtedly seen the common cable wrapping method known as the "Over-Over" or "over the arm" method, seen below. In fact, you've probably seen it used by professional musicians and roadies. And, after all, it's not the worst way to go about it, since it will initially prevent your cable from pinching.
However, while it might not do much harm to new cables, it will deteriorate the cable and flow over time. It can cause breaks in its shielding, and when you're dealing with noise-heavy XLR cables and instrument cables, you're going to notice it when you play.
Instead, do the "Over-Under" method, seen below.
The name can be sort of confusing, but the primary difference between "Over-Over" and "Over-Under" is that when you do the latter, each twist effectively "cancels out" the last, such that once you're done wrapping it, you could throw the cable and it would unravel seamlessly.
But hey, we still haven't gotten to the best option of all, so stick with us.
Rule #4: Skip All the Rules and Get a Cabli
In the end, cables are just a tool to help us do what we really want: write and perform our music. Finding ways to ensure the longevity of your gear while maximizing the amount of time you get to spend on music is what it's all about.
There aren't a lot of products on the market made to wrap up cords, let alone ones designed especially for guitar and microphone cables. Not too long ago we rolled out the Cabli, and it goes beyond just protecting your cords for the long-haul.
The Cabli wraps both ends of your cable at once, so you'll be done in a matter of seconds.
The Cabli leaves your wrapped cable in a sturdy casing, specifically designed to keep them safe while maximizing efficiency.
Tired of tripping on a 1/4" while you're performing? With the Cabli, you can pull out just the right amount of slack, and keep the rest inside, leaving your practice or performance space tidy.
Keep your cables organized. The Cabli is compact, coming in at 7x1.68 inches.
It may be small, but the Cabli can fit as much as 30 feet of cable inside of it.
Buy four or more, we'll throw in a Cabli gear bag to store them. It can fit up to 5 Cablis, and you can hang it up in your practice or studio space.
On top of all that, it's affordable. You can purchase a Cabli for just $19.97. Or, for $39.97, we'll pre-install a deluxe, 24" braided 1/4" cable with gold plated connectors)
Join our user forum to get insight from fellow musicians, sign up for our newsletter to get the latest deals, and follow us on socials for some hilarious content.
]]>
https://www.singularsound.com/blogs/news/how-to-become-a-session-musician2022-06-28T16:19:00-04:002023-08-24T11:42:30-04:00How to Become a Session Musician: Gear and Advice from the ProsTravis GoureMore]]>
Being a session musician is a simple goal. It is, however, tremendously difficult to achieve.
Everyone's path to becoming a studio musician is unique. There's no one way to be successful, but by gathering advice from the pros, you can give yourself the tools to make it in the industry.
So we asked the best. Read on to find out how to become a session musician. From the gear, to the production, to the practice routine, we've got you covered.
How Do Session Musicians Get Started?
New undertakings are intimidating when you're starting out. Should you start by buying up all the gear you can? Learning professional engineering software? Networking?
Become a Multifaceted Player
According to the pros, it starts with becoming proficient in diverse genres of music. A session guitarist needs to be able to play Blues on Monday and Metal on Tuesday, both with precision and style. If you have a specific specialty, good! That means you have a model for developing your skills. Apply that to today's most popular genres. It's recommended that studio players become adept at:
Pop music
R&B styles
Latin music
Country music
Hip-hop styles
According to the latest data, these are among the most popular genres being produced this year. Ensuring your performances are up-to-date and current is a vital skill to succeeding in the recording industry.
Perfect Your Timing -- But Also Your Feel
It's fundamental that if you want to be a professional guitarist, your timing has to be impeccable. You can't be clipping on your tracks or missing cues. That's all true.
However, there will be instances where the person, band, or engineer you're recording for will want a more stylized performance, not a mathematically perfect one.
This can happen for a number of different reasons.
For instance, if you are playing along with a drummer who isn't on time with the click, then you'd have to accommodate that. Alternatively, if the producer wants to achieve a less finished feel to a track, improvisation is often called for.
Camilo Velandia, studio guitarist for Enrique Englesias, told us: "Sometimes playing a groove exactly to the grid is not the best feeling thing. . .at the end of the day we're making music, and the click is just a reference. If I get a session where the drummer is off, I'll ask the producer if anyone is going to quantize the drums. . ."
That's why one of the most important pieces of advice we've heard is simply to tinker with your instrument whenever you have the chance. The more you experiment and play, the better your feel for your gear is going to be.
Learning to Market Yourself
Once you feel confident in your skills, the goal becomes getting the jobs themselves. Often, these come from direct connections in the field. If you have those, fantastic -- but they are hard to come by, and if no one knows your name, where do you start?
Create an Online Presence
The music industry continues to shift exponentially more online as time passes. Finding clients and gigs by word of mouth alone is no longer a viable option in the long term.
In fact, a lot of studio sessions are now done remotely, where recording musicians are expected to produce studio-quality recordings from their home. We'll discuss the optimal gear for that, too.
Make sure you create, develop, and maintain social media pages, particularly Instagram and YouTube. Having a following is important, but it's not the only reason to be active on social media.
The main reason is to be easy to find. Even if you don't have tons of followers on your channels, you still want to ensure that you are easily recognizable as a session musician, and that your work is readily available for consideration.
Create an EPK
Do you know how to make an Electronic Press Kit? If not, head over to our recent blog for a step-by-step guide. Just like promoting your album or show, this will be your ticket to establishing yourself and marketing your skills.
In short, an EPK gives someone a snapshot of all of your music, media, and relevant statistics that can be used to evaluate whether or not your services should be used.
Early on, of course, it may feel like you don't have a lot to show. That doesn't mean you shouldn't be prepared. Preparedness, in fact, is one of the key attributes that studios look for when they hire a session guitarist.
One of the biggest pieces of advice from that article was to attend gigs, and support local bands. The same holds true here. Find artists who are involved in the recording industry in your area, and support them.
Nothing will ensure your progress like sincere effort to endorse likeminded musicians. The music scene is notoriously competitive, but it is also a game of connections. Those connections are best made through goodwill.
Gear Up, and Create a Home Recording Studio
You knew this was coming. Using the same gear as the pros doesn't make you one, but it is a major component of creating the sound that studios are looking for from guitarists and musicians like you.
First, we'll talk about the categories of gear you need, and then offer some top notch options for each of them.
To be a session guitarist with a home studio, you'll need:
Multiple guitars
Multiple amps
Guitar and Bass pedals
Microphones
A professional DAW
A high-quality recording interface
Monitors
Studio-quality headphones
Plenty of instrument cables and adapters
A desk and a chair
3rd party plug-ins and additional software
Mind you, this is just scratching the surface. When we interviewed Camilo Velandia in his home studio, he showed us an incredible assortment of instruments, cabs, amps, plugins and more which he has accumulated over years of performance.
You don't need to have all of that right away, but what you do need is the necessary gear to be able to create any style and sound requested by a client.
If a band is seeking a bassist to play a bass line in the style of the Red Hot Chili Peppers, would you be able to do it? After all, that means more than just a melody reminiscent of their music. It means trying to match Flea's famous bass guitar tone.
Consider, for instance, their song "Give it Away." To match a bass tone like that, you'll need pedals that can add crunch to the notes. Alternatively, a song like "True Faith," by New Order calls for a very top-heavy bass sound, which requires a lot of care in the production stage.
The pros all agree on this: you have to be a lot of things to a lot of different people, and that takes more than talent alone. It takes a diverse array of music gear. Here are some great options for those just starting out.
Instrument Essentials
You'll want to have both electric and acoustic options for playing guitar on a track. We recently did some research into which guitars are the most versatile. While it's impossible to say objectively, some of the names that came up the most were the Gretsch Falcon, American Standard Tele, and Eric Clapton Stratocaster.
What about acoustics? A few years ago our friends at Roadie Music published a great blog about acoustic guitars used by the pros. Check it out to see why brands like Taylor and Yamaha consistently top the list of gear used by professional musicians. Specifically, a great one to start with is the acoustic/electric Taylor 314.
Other instruments you might consider adding to your arsenal are:
Classical guitar (which requires an additional set of skills)
Electro-Acoustic guitar (cost-effective versatility which can be handy in a small studio setting)
12-String guitar
Recording Gear
Playing the music isn't the whole story for a session musician. The quality of the recording itself, as well as the post-production value, often dictate the success or failure of a performance.
Invest in a full-feature, robust DAW.Avid Pro Tools, Logic, and Ableton generally lead the way for studio-quality recording, though this is by no means a rule.
With that in place, consider the equipment which is receiving the signal for your recording. You need an interface which can handle a dynamic range of sounds. Universal Audio's Apollo series is highly regarded, but there are countless quality options from brands like Solid State Logic, Focusrite and more.
Microphones fall under this part of the process, too. This goes double if you're a drummer, and you've probably experimented with dozens of mic placements over the years to find your perfect tone.
You don't need a Neumann to get studio-ready sound (unless. . .), but the truth is, a high-end microphone is a necessary investment for a home studio. The "industry standard" so to speak, is the Shure SM-58. Start there, and work your way up.
There's still much more to dive into here. While we won't cover all the bases in this post (that would take days), there are a few other things you've probably spotted in studios which are integral to quality recording, like:
A multi-channel pre-amp
A headphone amp
A power conditioner (think of it like a surge protector, but better)
Mind you, you could add analog compressors and EQ devices to a rack, but their digital counterparts have come a long way in the past decade, so we'll skip those for now.
Production Gear
We already mentioned that the DAW is the ground floor of your recording. No take is perfect as is. Professional sound takes a trained ear to properly mix and master a track. What else do you need to succeed at production?
Studio Monitors
You can't ensure the quality of your mix without listening to a true-to-sound recording of it. Purchasing high-fidelity studio quality monitors is crucial to make sure that your take really is where it needs to be.
Expensive models like the Dynaudio Core 59s will certainly take the cake here, but there are options that won't break the bank quite as much. Genelec's middle-tier speakers will work, and if you're really strapped for cash, at least grab a pair of Yamaha HS-5s.
A Reliable Computer and Monitor
Some people write, record, and mix on their laptop. Anything is possible nowadays. For a home studio, however, it is still recommended to have a high-powered desktop and large monitor to do your work on. For one thing, it provides a neater environment for the recordings. Secondly, having a reliable source of memory and avoiding crashes is paramount to the job of being a session musician.
Recent iMac generations are a fantastic option, particularly the newer ones with the M1 chip. Other reliable desktop (and one laptop thrown in for convenience) options are:
Have you ever watched a professional producer mix a track? They usually will listen to the recording through different mediums. Once through the monitors, once through headphones, even in a car. You'll want to cover all possible bases, and having a pair of great headphones is a massive help.
Now the less flashy stuff: audio cables, mic stands, cable adapters and more.
It might seem trivial, but we can assure you that these foundational tools make a studio run smoothly.
Cables
To cover all the bases, you'll need the following cables:
1/4 inch - 1/4 inch instrument cables
XLR cables
TRS tip cables (check out thisaudio cable guidefor more info on what makes a TRS different from a TS cable)
Optical cables
USB cables
MIDI cables
Firewire and Lightning Port cables
Power cables
There are plenty more to be had, and plenty more to learn about wiring your home studio, but this is a good place to start. If you want to consolidate some of these, particularly the digital-ready cables like USB and Firewire, you can pick up a multi-adapter.
Another pro tip: try to make your cables balanced. They are significantly more effective than unbalanced cables at minimizing room and external noise. For more on cable balancing, see this article from Boxcast.
Cable Management
A clean room is a clean mind, right? That goes double for a creative environment. Studios notoriously get messy when audio cables aren't organized. Invest in a cable management system to straighten things out.
Singular Sound's Cabli lets you hold up to 30ft of any audio cable in a neat, compact device that can be wound up in less than 5 seconds. Once it's in, you'll never have to deal with excess slack, since you can pull out only the desired amount. See it in action here:
Music Stands
Ensuring the longevity of your instruments and gear means not leaving them on the floor, and certainly not in the sun.
Both mic stands and instrument stands are the building blocks of a safe studio. Consider getting keyboard stands, laptop stands, and more, in case you want to operate keys or MIDI controllers for your recording.
Plugins and VSTs
The last thing we'll mention in our gear rundown is digital plugins. These are software packs that pair with your DAW, and lend everything from FX to amplifiers without using analog equipment.
You can find a plugin for everything. Some of the more common ones to seek out for session musicians are fx plugins like reverb, delay, tremelo, overdrive and distortion. Guitar pedals can do the job there, too, but tweaking the audio files after recording means using a VST.
Production plugins are vital, too. Companies like Izotope make suites of VSTs to let you compress and EQ, control vocal tracks, pitch correct and more. Having that tool kit at your disposal brings a diverse array of options that will make your job much, much easier.
There are, of course, plugins that act as the instruments themselves. If you have a MIDI controller, you can check out programs like Arcade from Output, which is a subscription-based software that offers hundreds of sounds, samples, and note kits to create with. You can change their key, arpeggiate chords, edit macros and more for $10/month.
That's it for the gear rundown! Remember, this is meant to be your starter pack. There is no end to the list of gear that can help you boost your efficiency and quality. As your career evolves, you'll tailor your equipment to match your process, style, and needs.
Quotes From Professional Musicians
Let's finish up our guide with the words of the musicians who have seen success in this competitive industry. Remember, everyone's journey is unique, and there's no set path to finding your place in the recording scene.
Camilo Velandia -- Grammy Nominated Guitarist
"The road that I chose to take, there is so much information, and I am so. . .incredibly addicted to growing as a musician. . .I feel like I always have to be learning something different. . .I keep myself learning new things. There's always so much to learn."
"I have days where I'll show up at a session and things just flow. . .and I have days where I sit here and I'm like, 'who am I kidding?'. . .it's just one of those things where you have to keep growing."
George Price -- Busker, Multi-instrumentalist, Recording Artist
"I took a lot of my inspiration from what other people were doing. There's loads of instructional videos and what people are working on, and what ideas they've got going. . .and I take those ideas and work them into my practice routine."
"There are so many talented people out there who want to work in music so you need to arm yourself with as much as you can that will set you apart and ensure you do the best job. The rest is about being in the right place at the right time."
"Much of the music industry is based on things you have no control over so you have to be able to shrug things off and enjoy the good things that come along."
]]>
https://www.singularsound.com/blogs/news/aeros-loop-studio-update-20222022-05-05T16:13:18-04:002023-08-24T11:54:42-04:00Looping Pedal Update 2022: What's New With the Aeros Loop Studio?Travis GoureMore]]>
As we hit the stride of Spring in 2022, music is in the air. It's a time of new life, new goals, and new creative ideas.
Time to bust out the Aeros Loop Studio and get playing. Before you do, though, read this update. There are tons of new features to explore. Get the most from your Singular Sound looping pedal.
Read on for the latest updates, future features and more.
Official Aeros Loop Studio Update 2022
In recent months we've rolled out a few major Firmware Updates for the Aeros, and released crucial, long-requested features. What are they? Where are they? How do you get them? Don't worry, I know literally all of that.
Aeros Firmware Update 4.0.Xx
Firmware update 4.0.x was a huge step forward for the Aeros. We brought in the Dynamic Read memory system, which increased recording time from 20 minutes in mono to 10 full hours.
Dynamic Read allows the .wav files in your song to uploaded incrementally, freeing up space on the RAM and ensuring there is always memory leftoveras you record. That means, you guessed it: truly unlimited overdubs.
4.0.0 also introduced the Cancel Recording feature. Previously, committing the cancel recording action would trigger a brief playback on the press. Now, you can set the 'Play/Stop All' button to release, and simply press it to end the loop recording with no latency.
Firmware Update 4.1.x
We followed up our last jump forward with some more majorly requested features. Firmware 4.1.x added our first MIDI expansion, which serves two primary functions for the Aeros Loop Studio.
First, we revamped the entire MIDI Engine. This allows the Aeros to do more with the MIDI commands it currently has, and gives us more options to create new ones in the future.
Second, we added MIDI Song Select: simply navigate to the Edit Song page, and scroll down to the feature "MIDI Select Song," and select "On."
See the demos for these updates below:
Firmware Update 4.2.x
More massive features came along with our most recent update. Top of the list is: Automated Fade In/Out, Reverse Feature, and new languages.
Fade in/out: Users have always been able to perform a manual fade in/out using the scroll wheel, but we recognize that's somewhat impractical, especially for a live looping performance. Our latest update offers an automated Fade In/Out function in the Mixing View. Simply activate the feature from the settings menu and operate it through the built-in mixer. Perfect for adding the finishing touches to your set.
New languages: Salut les musiciense français! Ciao ai nostri amici italiani! こんにちは日本人ユーザー! Our latest update adds 5 new languages to the Aeros. Simply select the language you want and restart the device. The new options are: French, Italian, Japanese, Chinese, and Spanish. English remains available too, of course.
If you're already a seasoned Aeros veteran, skip down to the next section for the intermediate and advanced tips.
For now, let's start off with the basics. Knowing the fundamental functions of your looper pedal will give you a huge leg up in the creative process.
1: Choosing Between 2x2 and 6x6 Modes
The Aeros boasts the highest loop capacity on the market. Using our 6x6 mode, you can create up to 36 unique loops per song.
However, our 2x2 mode is a star for a reason. Sometimes, creating music within smaller confines actually improvescreativity. It can help you to give each element the treatment it deserves.
If you're just getting started with the Aeros, we recommend playing in 2x2 mode. What that means is you'll be able to lay down 2 sequential tracks (like verse, chorus, verse, chorus) with a layered track on top of each of them (this is known as parallel looping).
Loopers almost always make you choose between one of those two looping styles. The Aeros more than doubles your potential by offering both.
Start in 2x2 mode and work your way up.
2: Learning the Colors and Cues
The Aeros utilizes a color-coded waveform system to keep you engaged and in the loop. Here's a rundown of the ones you'll encounter:
You'll notice that the Yellow Waveform refers to something called an "overdub." What's that? Essentially adding an overdub means adding one additional layer to an existing loop. It helps to give your music that layered effect!
The Aeros offers unlimited overdubs, but keep in mind that each new overdub will merge the previous overdub to the base layer.
Take some time to familiarize yourself with these, and you'll be well on your way to mastering live looping with the Aeros Loop Studio.
3: Using the Mixing Mode
The Aeros boasts a built in live mixer. You can find the Mixing Mode through the main menu, where you can modify the master volume of your song, or the volume of each individual loops.
Our latest firmware update, 4.2.x also added an automated Fade In/Out feature. We created the Mixing View to enhance your live looping performance, and boost your creative control.
Intermediate/Advanced Looper Pedal Tips
Here are some higher level notes and tips for Aeros users.
1: Editing the Count In
It may seem minor, but nailing the count in on a new loop can make a big difference. You can edit how many measures the click track plays prior to commencing recording. Get the speed and space you're comfortable with.
2: Master Track Locking
Though locking tracks is not an especially advanced feature, it can take some practice to utilize it properly. A locked track is one which remains the same as you move to different parts of the song.
There are two prerequisites to locking a track that need to be mastered for effective usage. First, you can only lock or unlock tracks while you have a single song part. And second, you must lock tracks sequentially (you have to lock track 1 before you can lock track 2, and so on).
Locked tracks will be denoted both by the lock icon above the selected track. See here:
4: Differentiating the different timing indicators
Below are the various ways to check your timing during a play session on the Aeros:
Note: beat lines will only appear when you're in quantized mode.
The Looper Pedal of the Future: What's Coming for the Aeros?
There's a lot to look forward to on your Aeros loop pedal. Future updates are going to continue bringing crucial and creative features to the device.
Here's a sneak peek at what we're working on the lab:
Auto Decay: allows you to set a percentage of "decay" to the volume of one of your loop layers. That way, you've got more headroom as you continue adding layers.
Clip Indicator: gives you a better picture of when your audio is clipping. Plus, input levels will always be displayed.
Auto Quantize: let's you turn any freeform idea into a quantized song. It will autoquantize the first track of the song. This will be an independent mode which can be set before recording.
MIDI Master: the Aeros will be able to send clock and certain commands to synchronize with other devices.
Expanded Hands-Free: a lot more hands-free options for you. . .and maybe a surprise or two.
General UI Updates: redesigns, aesthetic changes and more.
Thanks for Looping!
We're happy to have you in the Singular Sound family. Creative collaboration between musicians is central to our company. We are always looking for ways to improve our devices, so you can improve your performance.
Join tons of active musicians on the Singular Sound user forum, and share your favorite tips and techniques.
Most of all, keep rockin'
]]>
https://www.singularsound.com/blogs/news/asmr-drum-set-beatbuddy2022-04-01T11:51:39-04:002023-08-24T11:54:35-04:00Crinkles, Taps, and Pen Clicks: We Made an ASMR Drum Set for the BeatBuddyTravis GoureMore]]>
*Whispering* Hey. . .happy April Fool's Day. We celebrated around the office by creating a new drum set for the BeatBuddy drum machine pedal.
We took everyday items we had around the office and professionally mixed them, so their ready for your next live drum machine performance.
Yes, it's April Fools Day. No, we're not joking. Download the new drum set here.
Based on the samples used, the ASMR drum set works well with Hip Hop, R&B, and Reggae rhythms, acting as an almost dilla-esque kit. This is due to the fact that some of the snare samples are slightly off, giving beats an organic, syncopated tempo feel.
What are some of the sounds you might hear?
A bottle of red pepper flakes
A spray bottle (not sprayed at anyone in particular. . .)
A book
A knife
Whole coffee beans
See if you can pick them out.
Watch our latest YouTube video and see it in action. Plus, you'll get to know some of the members of the Singular Sound team.
]]>
https://www.singularsound.com/blogs/news/earn-more-money-at-gigs2022-03-23T13:48:26-04:002023-08-24T11:44:47-04:00Looking to Earn More Money at Gigs? Our Latest Video Tells AllTravis GoureEarning a living as a gigging musician is tough. The time, energy and expenses that go into perfecting your setup and performance can be daunting. That's why it's important to make each gig worth your while. Our latest video shows you how.
Earning a living as a gigging musician is tough. The time, energy and expenses that go into perfecting your setup and performance can be daunting. That's why it's important to make each gig worth your while.
Singular Sound met up with guitarist Jesse Ricca to find out how he uses the BeatBuddy and Aeros Loop Studio to get more paid gigs, and bring the heat every time.
]]>
https://www.singularsound.com/blogs/news/learn-guitar-in-20222022-03-04T20:13:01-05:002023-08-24T11:47:04-04:00Learn Guitar in 2022: Resources and Tools for GuitaristsTravis GoureThere have never been more tools, resources and tutorials available to musicians than there are today. Let's dig in to some of the best ways to learn guitar in 2022.
Learning guitar is a continuous process. There is always another component to add to your repertoire, more styles to experiment with and songs to play.
There have never been more tools, resources and tutorials available to musicians than there are today.
If you want to learn guitar, you can find an unbelievable cache of advice and training just by searching the web. Plus, most of it is free or highly affordable.
Let's dig in to some of the best ways to learn guitar in 2022.
Ultimate Guitar Tutorials and Phone App
We recently posted a blog sharing five of this year's best phones apps for guitarists. Among them was Ultimate Guitar's comprehensive suite for guitar tabs, tips and tutorials.
Ultimate Guitar's website and phone app are the best for learning guitar using tabs. Reading guitar and bass tabs is a valuable skill in itself, and it offers a more robust understanding of your instrument than just playing by ear.
Whether you use Ultimate Guitar's website or phone app, you are going to have access to countless courses, and a bustling user forum where fellow musicians are sharing their best tips.
In the app, you'll find a built-in guitar tuner, a playlist creation tool to save your favorite tabs, and the ability to access them offline.
The app for iPhone and Android costs $9.99 a month, or $39.99 a year.
All Guitar Chords
If you're a beginner to guitar or bass, then learning the major chords is the best place to start. You can do this freely and efficiently using All Guitar Chords.
The website is free to use, and offers easily digestible visual diagrams for chords, as well as guidance on how to play in different chord positions.
Simply choose the note you want to learn the chord for, and click which type of chord you're looking for. Getting a diagram for a C Major is easy, but you can get much more in depth if you'd like, such as practicing an augmented F# chord.
All Guitar Chords comes equipped with a diverse array of other tools to help you along your journey to master the guitar. Look at their guitar arpeggios, scale identifier, metronome and guitar tuner, to name a few.
Scroll to the bottom for the "How to Use Chord Finder," writeup, which is the perfect introduction to working with the tool.
Metronomes and Drum Loops
It sounds simple, but learning to play in time is a massive component of mastering the guitar. Practicing to a click track will offer greater benefits than simply playing a song by itself.
That's why it's vital to take advantage of devices which keep the song on beat.
The internet is stocked with free metronomes like those from Soundbrenner, Musicca, and JamPlay. All of them let you customize the BPM, beat count, and more.
However, if you want to take your experience a step further, it's worth looking into a drum machine pedal or drum looper. The benefit is clear: you will be immersed in a real musical experience, which has major implications for how you express the cadence and tonality of a song.
We created the BeatBuddy drummer pedal for this precise reason. It is designed top to bottom for guitarists and bassists to improve their creative command, and progress their abilities, fast.
BeatBuddy offers more than 200 musical styles, genres and drum beats to match your songwriting needs. You can customize the BPM live, and add intros, outros and drum fills with the tap of a foot.
It's better than a metronome. It's real drum sounds, recorded by real drummers, and gives you the experience of playing with a live band. After all, there's no better way to learn guitar than through real musical immersion.
Roadie Coach: A New Age Learning Tool
In the spirit of embracing unique and progressive methods to learn guitar, let's introduce the Roadie Coach. This innovative device is not just a smart recorder, but also a music tutor and MIDI controller all rolled into one. It's a new-age tool that brings a fresh perspective to learning music, making it a worthy addition to our list.
Imagine having the ability to instantly record your performances whenever inspiration strikes, with the Coach seamlessly attached to your instrument. This feature alone makes it a great tool for capturing those spontaneous musical ideas that often come and go. But the Roadie Coach offers much more than just recording capabilities.
The real game-changer is the companion app that acts as your personal music tutor. It provides instant on-screen feedback and personalized tips based on your performance. This interactive guidance ensures that you stay on the right track as you learn, making the learning process more engaging and effective.
Whether you're a seasoned musician looking to refine your skills or a beginner just starting your musical journey, the Roadie Coach offers a transformative learning experience. It's designed to elevate your skills and ignite your passion for music, making it a truly invaluable tool for any guitarist.
Learn Guitar with Video Games
It's 2022, and any list of guitar resources would be incomplete without something unique and progressive. Believe it or not, you can actually learn to play guitar on your gaming console.
We're not talking about Guitar Hero here. We're talking about Rocksmith by Ubisoft. While this option is not free, it is an incredible way to get younger and more technologically inclined players involved in the learning process.
Rocksmith for Guitar and Bass contains over 80 interactive lessons. You'll need a specific guitar cable designed for your console, but any guitar or bass with a 1/4" input jack will be compatible.
You can play along with your favorite songs, play with another friend, and learn guitar from the ground up. Plus, it's available in English, French and Spanish. Beware though, the lessons are not especially in-depth, and might have a shelf life as you improve your skills.
One-on-one Lessons (with a Modern Twist)
Many will say that the only real way to learn guitar is to have a personal teacher. There are clear advantages to this. For one thing, they can focus on your individual strengths and weaknesses and tailor a lesson to your needs.
The problem is, the time it takes to travel to and from those lessons piles up, and often there is a rate hike for the privilege of being in a one-on-one setting.
But it's 2022, and there's a happy medium. As a result of the Covid-19 pandemic, video conference lessons have become more popular than ever.
What's even more cooler than that, scores of wonderful teachers who used to only offer in-person lessons have now shifted their focus to accommodate people who want to stay home.
If you're someone with a tight schedule, or just want to learn from the comfort of your home, this might be the way to go. Oftentimes, the video call lessons are more affordable than what you would have paid to meet in person.
Looking to find teachers, and don't know where to start? We recommend Take Lessons. Their website lets you easily search teachers and tutors for all kinds of things, (maybe you want piano lessons, too) and lets you filter by area, price, age and gender.
What's Your Favorite Way to Learn Guitar?
Thanks for reading our guide. We hope it gave you a little extra insight into the next step in your musical journey. We know that this is only a small taste of all the methods players use to learn their instrument.
Have an idea that isn't on our list? Comment it below! Learning an instrument is a community effort. The best way to improve your skills is to listen to the people who have done it. So let us know.
Sign up for our email newsletter to get the latest Singular Sound news, and be the first to hear about discounts, deals and promotions. Visit our website to see all the products we offer to drive your musical passion.
Don't forget to check back on our News page for our newest blogs, and most importantly, Keep Rockin'.
]]>
https://www.singularsound.com/blogs/news/5-apps-for-guitarists2022-01-13T13:21:19-05:002023-10-02T16:20:23-04:005 Handy Apps for Guitarists in 2022Travis Goure
There are countless phone and tablet apps on the market. A lot of them are confusing, ineffective, or not worth the price. After trying out dozens, we found the 5 best apps for guitarists that will actually help your performance.
Practicing, gigging and touring in the modern music landscape is more complicated nowadays, particularly with the limitations imposed by Covid-19.
There's nothing wrong with a good old analog setup, but embracing new technology can increase the efficiency of your practice and performance.
There are countless phone and tablet apps on the market. A lot of them are confusing, ineffective, or not worth the price.
After trying out dozens, found the 5 best apps for guitarists that will actually help your playing.
Read on to get going.
1: "Guitar Tricks" for Learning Guitar
When you hear the phrase "an app to help you learn guitar," you may think that it only applies to fledgling guitarists who need lessons about chords and tunings. Guitar Tricks offers that in spades, but it also offers highly advanced courses for experienced guitarists.
Guitar Tricks bridges the gap between a haven for beginners and a place for highly skilled players.
Follow step-by-step videos for each tutorial, or find lessons covering your favorite songs.
Guitar Tricks comes with a whole slew of useful guitar tools like the Scale Finder, the Fretboard Trainer, downloadable tabs and video playback.
Browse collections, song libraries and genres to find what's best for you.
Guitar Tricks costs $19.99 a month, but you can buy a yearly subscription at the rate of $15 a month.
Find it in the Apple and Google Play app stores.
2: "The Metronome by Soundbrenner" for Keeping Time
Finding a reliable digital metronome should be easy, right? You'd be surprised. I mean, we tried. Some were really expensive (what?), some were inaccurate, and some just flat out didn't work.
Finally, we found Soundbrenner's metronome app. Check it out:
Soundbrenner is known for their Pulse and Core, watches that vibrate a song's BPM while you play. They're fantastic products, and the app is set up to sync with them, but you don't have to purchase one to use the metronome.
It comes with a BPM scroll wheel, multiple time signatures, tap tempo, and a visual representation at the top. Plus, you can save individual presets to match the songs on your set list.
Soundbrenner's metronome is always free to use, but you have the option to buy access to unlimited songs and setlists, unlimited sync to iCloud, and more. Soundbrenner Plus costs $7.99 a month, or you can pay the annual fee at a rate of $4.99 a month. Go check it out!
3: "Ultimate Guitar" for Guitar Tabs, Bass Tabs and More
If you learned to play guitar in the internet era, it's safe to say you likely got your first guitar tabs from a website like Ultimate Guitar. Even if you've been playing for decades, you've almost certainly have seen this name come across your radar.
Now, Ultimate Guitar has developed a phone and iPad app for Apple and Android, which brings the bulk of their website to your cell phone. But is it any good?
It boasts "the world's largest catalog of guitar, bass & ukulele chords, tabs, and lyrics. . .' and its unbelievably high ratings seem to back it up.
Here are a few things that make the app a good fit for guitarists, whether you're a touring musician or an enthusiast:
1.4 million guitar tabs and chords
On-board tuner
Offline access to the tabs you download
Playlist creation to compile your favorite tabs and guitar chords
Left-handed mode
Dark mode (ideal for your next bar gig)
Perhaps best of all, Ultimate Guitar's app gives you ability to actuallyedit your tabs. You can change the chords, transpose, and even change the lyrics to personalize your favorite projects.
Though you can find many of the tabs for free, you'll need to upgrade to Ultimate Guitar Pro if you want to access many of the features listed. It's $9.99 a month, or $39.99 a year, and definitely worth a closer look.
4: "Harmonious: Music Theory" For In-Depth Musical Scholarship
Have you wanted to learn more about music theory lately? Have you been saying you'll get to it for about 5 years now? Don't sweat it, we found a little gem of an app.
Though it isn't a big name, it gives you access to an unbelievable cache of musical knowledge, with tutorials, easy-to-read lessons and more.
Made by developed Jared Updike, Harmonious is "the exhaustive piano and guitar chord and scale app for students, composers, songwriters, arrangers, and working musicians."
You can start with tutorials on navigating the app, as well as using all of its different features. The "Theory: Straight, No Jargon," is a fantastic introduction for those of us who find the often (verbose, arduous intricacies of theory) to be somewhat annoying.
However, if you're ready to really dive in, you can. Learn to read music, use interactive fretboards and pianos, audio examples, even mode diagrams.
Sometimes the lesser known tools are the best tools. Harmonious only cost $5 per month, and is well worth the small expenditure.
5: "Guitar Tuner - Chromatic" for Accurate Tune-ups
There's dozens and dozens of guitar tuner apps available for Apple and Android, so why Chromatic? Because it's simple, accurate, and free.
Pop it open and this is what you see:
It may not be terribly glamorous, but that's exactly what makes it worthwhile. As you can see, the free version is accompanied by a few ads, but it never affects the performance, and it never stops you from tuning up.
After all, it's unlikely that you don't have a tuner on your pedalboard. But in instances where you're on the go, or don't have your full setup, it never hurts to have a reliable program on your side.
Our advice? Don't pay an arm and a leg for a tuner app that might be marginally more accurate. Guitar Tuner - Chromatic gets the job done just fine.
Please note: Guitar Tuner - Chromatic is only available on iOS. For Android users, we recommend Guitar Tuner - Simple Tuners. It's free, and offers much of the same functionality and ease-of-use. You can find it in the Google Play Store now!
5: "OnSong" for Streamlining Your Setlists and Charts
OnSong replaces the mess of paper and binders with interactive, auto-scrolling, and transposable chord charts right on your tablet or phone. It’s the epitome of what a 21st-century songbook should be.
The app lets you import and build a library of chords and lyrics with support for Dropbox, Google Drive, SongSelect, Planning Center, and more. On stage, you can tap to turn pages or sync the app to foot pedals to control it hands free. (We have a lot of our MIDI Maestro users using the two together!)
The app can do more than just organize your set list too! It can:
transpose songs
write songs
share with multiple band members
control stage lighting
display song lyrics
and more
Find the app on the App Store today, and use our link to save 10% when you choose your plan.
6: Wr(app)ing It Up
Having on-the-go tools for your guitar is a win-win. You get diverse, affordable technology without taking up more space on your pedalboard.
Easy access to guitar tabs, tuners, chord diagrams and music theory concepts gives you a leg up anywhere, and it gives you the ability to practice anywhere you bring your instrument.
We think all the aforementioned apps are worthwhile, and they come with minimal cost. Find them on the Apple or Google Play store.
Make sure to follow our blog for valuable, up-to-date content for guitarists, bassists, and any musician looking to drive their passion.
]]>
https://www.singularsound.com/blogs/news/5-forums-for-guitarists2022-01-13T13:20:53-05:002023-08-24T11:37:28-04:005 Forums for Guitarists You Should Join in 2022Travis GoureWhat are the best forums for guitarists in 2022? Finding a vibrant, current community is an incredible way to learn more about your gear, local community, and even find live gigs. We cover 5 guitar and music forums you should join in 2022.
In this blog post we are going to talk about the best forums for guitarists and musicians you can join right now. If you're new to the idea of forums, you might think it's a waste of time. But is it? Are forums a dead medium?
Not even close. In fact, one of the world's top forums, Reddit,grew its user base by 44%from 2020 to 2021.1 in 4 adults in the US uses Reddit. That's an incredible statistic.
So much so does Reddit dominate the forum landscape, that 5 of Feedspot'stop 35 music forumsare subreddits.
Joining music forums gives you the chance to share your music, find like-minded musicians, and grow your community.
So, besides Reddit, where should you start? Here are 5 guitar forums worth joining in 2022.
1: The Gear Page Music Forum
The Gear Page boastsmore than 1.5 million users every month. Musicians from all across the globe meet there to discuss topics ranging from "Recording/Live Sound" to ""Vintage" Instruments."
Their general music discussion forum "The Sound Hound Lounge," has nearly 100 thousand threads, and 3 million messages.
Not only is it one of the liveliest music forums on the web, it's one of the most user-friendly. Search by topic, latest activity, trending and media.
There is an incredible array of gear-specific Q and A's, as well as gear reviews and demos.
It's easy to join, and it has a beautiful community of engaged, passionate musicians.
2: The Singular Sound Gear Forum
If you haven't seen it before, Singular Sound actually has abustling user forum. If you own one of our products, or are considering getting one, join in to get insight and tips from other musicians.
Not only can you find user-written tutorials and how-to's,you'll be the first to get the details on the latest Singular Sound firmware updates and MIDI expansions.
Naturally, we have threads for discussion on each one of our products with color-coded topics. However, for new members of the community, we have the General Discussion, where you can get info on anything you want, whether it's Singular Sound related or not.
Access more than 30 topics, and search by different categories and tags to get what you're looking for, fast.
Singular Sound is a forum for musicians first. That's the backbone of our work, and it's what we're passionate about. We'd love to see where your passion takes you.
3: Music Banter Forum for Musicians
Great music forums are simple. Music Banter isn't specific to guitarists or gear. It's a lively forum where all aspects of music, both producing and consuming it, are discussed.
In a clean format, Music Banter combines blogs and forums into one place. You can go to "The Music Forums," separated by genre, explore "The MB Reader," where you can find the latest album reviews and "create your own music journal."
The Community Center is where you'll introduce yourself and get to know fellow musicians. There are threads to discuss your hobbies, interests, even a place to talk about Philosophy.
Music Banterboasts more than 70,000 registered members, and over 1 million posts. Once you register you can customize all of your messaging and browsing options, and connect instant messaging mediums like Yahoo Messenger, AIM and Skype.
Sound old school? We like it that way. Update your profile with a biography, location, interests, and musical preferences. Find likeminded musicians and gearheads in your area.
It's free, and takes less than a minute to join.
4: SoundonSound Gear and Technique Forum
Sound on Sound (SOS) is more than a forum. It's a magazine and a repository for recording and business advice. On top of that,it's the go-to spot for learning guitar techniques.
Sound on Sound averages more than1.7 million page views a month, and over 1 million monthly visitors. Interestingly, US readers only make up about 34% of visitors. Sound on Sound has become a unique, cosmopolitan network of musicians and sound techs.
Here are a few handy features that make S.O.S. such a good community:
A detailed glossary of technical music terms, so you don't get left in the dark.
Technique tutorials, podcasts, and articles to learn more about your instrument and home studio.
The"Sound Advice" section," with dozens of categories and Q and A's from Technical Editors
Reviews of new and vintage gear from experienced users, ranging from DJ Gear to Drum Machines.
That's just scratching the surface. Sound on Sound's magazine is detailed, authoritative, and up-to-date.
It's one of the best communities you can join at any step in your musical journey.
5: Ultimate Guitar Forum for Guitarists
Recently, we did a blog post on the best apps for guitarists. Among them was the Ultimate Guitar phone and iPad app, which offered thousands of editable guitar tabs for all genres and styles.
There's more to UG than guitar tabs. There's also a huge community of guitarists and bassists discussing everything from technique to band promotion.
The "World's largest community of guitar enthusiasts" averagesmore than 5,000 users online at any given time. It maxed out back in June of 2018 with more than50,000of its members online at the same time.
Follow "Hot Discussions," or register and head to the "New Members' Sandbox," containing an FAQ and rules for new members.
Of all the forums we've discussed, this one might be the most diverse. If you can't find a song tab you were looking for, you can go into the "Tab Requests" thread, where you can "vote for requests. . .or create a new one."
Share your music, lyrics, or poetry. Hit the "Classifieds" to seek out new band members or find gear.
Our personal favorite? The Gear Building & Customizing thread, where over 700,000 posts have been created of musicians sharing their custom amp, guitar and pedal builds.
Ready to Join?
Guitar forums are more than just gear talk and promotion. Meeting and developing relationships with fellow musicians is incredibly rewarding, and its those lasting experiences which make your musical journey what it is.
Joining and participating in a forum means getting the insights you never would have if you didn't.
We're incredibly proud of theSingular Sound communitythat our forum has developed. We hope you want to join us.
Hey, maybe we'll see you on there soon. In the meantime, follow our blog for useful, up-to-date music content, and sign up for our email newsletter to get deals and discounts before anyone else.
Find us onInstagram,Facebook, andYouTube. We're always updating our content, and taking suggestions from customers for updates.
Thanks for reading, and keep rockin'
]]>
https://www.singularsound.com/blogs/news/holiday-vacation-announcement2021-12-23T14:42:43-05:002023-08-24T11:55:47-04:00Holiday News: Company Vacation, Shipping Updates and MoreTravis GoureSingular Sound has a company-wide vacation from Dec. 24th to Jan. 2. Please read this post to see how that affects shipping times and support query response speed.
The holidays are an incredibly busy time for families and companies alike. Singular Sound is dedicated to fostering creativity and innovation for musicians all year, but sometimes that means taking a rest to recuperate our energy. With that in mind, Singular Sound will be offering a company-wide vacation (Dec. 24th through Jan. 2nd) to its employees as they spend time with their families and get a well deserved break from work.
However, we will still do everything in our power to make sure you feel cared for and heard during the holidays, and that begins with giving you clarity on what you can expect from us.
Singular Sound is a small company of dedicated musicians and professionals. That is what makes us so driven to create products and services that maximize your passion and creative potential. And it also means that our shipping times and response rates will slow down slightly as our employees enjoy the holidays.
All online orders placed between Dec. 23rd and Dec. 31st will ship after the new year. Responses to support queries may also be delayed over that time period, although we will do our best to answer each query in a timely manner.
Thank you for bearing with us during this period. We hope that wherever you are you are having a warm, wonderful holiday, and we wish you the best of luck in all your musical endeavors this new year.
Best wishes always,
Singular Sound
]]>
https://www.singularsound.com/blogs/news/4-aeros-tips2021-11-16T13:11:25-05:002023-08-24T11:36:50-04:004 Tips to Get the Most Out of Your Aeros Loop Studio PerformanceTravis Goure
The Aeros Loop Studio is a multifaceted 6 track looper pedal with built-in screens and onboard mixing. In this post we'll make sure you're getting the most out of it.
The Aeros Loop Studio is a multifaceted 6 track looper pedal with built-in screens and onboard mixing. In this post we'll make sure you're getting the most out of it.
Whether you've got the Aeros, or you've been considering buying one, this blog will get you prepped to crush your live performances.
Let's get to it.
1. Take Advantage of Dynamic Read
Did you know? We recently rolled out our latest Aeros firmware, which increased its recording memory to up to 10 hours.
Previously, audio files had to be loaded to the device's RAM in their entirety before starting a song. With Dynamic Read, audio files are loaded continuously in sections, allowing for a massive boost in space on the Aeros. How much? You get up to 20 minutes per track of mono recording.
With that in mind, it's time to look past the limits of what looper pedals have done in the past. With the Aeros, you can create without the heavy parameters so often imposed by clunky devices and focus on creating the music you want to create.
2. Learn the Code, Master the Looper Pedal
"Color coded waveforms" sounds nice and all, but if they don't serve a function, then what's the point? We've carefully crafted each of our colors to serve a specific, pivotal purpose. If you learn what they mean, you can optimize your Aeros Loop Studio performance.
Don't worry, we brought pictures:
Naturally, the red and green colored waveforms will be familiar. If you key in on the yellow and faded ones, though, they point to a bit more of an advanced technique. If you didn't know, the Aeros allows for unlimited overdubs. When you go to record one, the waveform will show in yellow over the track you're overdubbing. Faded blue waveforms represent layers that haven't been finished. It's important to note that undone layers can be brought back into the composition, or written over.
It's not just the waveforms that are color coded. The "Track Clocks" are, too.
Check it out:
The function of Track Clocks is to show you how much time has elapsed on a given loop. The ones to focus on are:
Gray clock: indicates that an entire track is muted.
Grey clock with green outline: you are currently selecting the muted track.
Clock with a hole: indicates that the selected track has an unfinished layer.
Clock with a big hole: indicates that a base layer of the track was undone, and can now be redone or recorded over.
Clock with white border: indicates that the selected track is locked.
We built these to make sure that you never get lost in the loop. By getting to know them, you'll quickly build a dexterity for the Aeros that will take your performance to the next level.
3. Full Sync w/ the BeatBuddy Drummer Pedal
There's no doubt, the BeatBuddy is our baby. So naturally we had to design the Aeros to be totally compatible with it. Syncing the two together is simple. You can watch the walkthrough here:
Once you've integrated the two pedals, they make an incredible duo. Your tracks can be quantized to the beat, or even to the measure. "Quantize to measure" means that the Aeros will start and end recordings at the beginning or end of the measure. That gives an increased level of flexibility to match your play style.
You may, of course, write in "freeform mode," which won't quantize your tracks at all. The BeatBuddy and Aeros Loop Studio together turn you into a complete one-man-band. You'll get big, authentic sound, and unrivaled creative potential.
4. On-board Mixing for Total Live Looping Control
One thing that sets the Aeros Loop Studio apart from other looper pedals is its DAW-like capabilities. We packed it with an onboard mixer, so that you can control individual tracks with ease.
To reach the mixer view, simply head to the menu and select it. Once you're there, you'll see a fader dedicated to each of the tracks you've recorded, plus the "master" level. You can use Aeros' scroll wheel to change the volume of each of them. That means you don't have to bend down while you play.
Want that chorus riff to really punch? Not a problem. Want to blast the drums and swells for the big finish? Just a scroll away.
Take a look at it in action:
What did we learn?
We hope you feel better acquainted with your Aeros loop pedal. Here's a short summary for your reference.
Our Dynamic Read memory system vastly improves the Aeros' recording time. Utilize it!
Learn the color codes, both for waveforms and track clocks. This will help you to be grounded in your loops and improve your live performances.
Pair it up with the BeatBuddy! By syncing the devices, you get dual quantizing abilities, and you supercharge your live looping sound.
Master the onboard mixer. You can get there from the menu. Practice changing volume levels hands-free.
There we go. Now you're an Aeros expert. We can't wait to see what you make with it. Our gear is meant to drive your passion, and we're always looking for constructive feedback to work into our updates. Drop a comment and tell us what you'd like to see next!
]]>
https://www.singularsound.com/blogs/news/4-beatbuddy-tips2021-11-04T13:07:13-04:002023-08-24T11:40:58-04:004 Tips to Get the Most Out of Your BeatBuddy Drum Machine PedalTravis GoureMore]]>
Our flagship drum machine pedal was created to solve a common problem: it's really hard to find a drummer. Some aren't available, others are unreliable, and some just aren't very. . .good.
So we designed a stomp box with the authenticity of a drummer, but without all the drama. Then, we packed it with tons of professionally recorded beats.
If you've joined the BeatBuddy family, thank you. We are always brainstorming new ideas to evolve and improve the pedal. But while you wait for firmware updates, there are some tips and tricks that we can give you right now.
No time to waste. Let's get right to it.
1. Advanced Accent Hits With the Footswitch+
If you've seen our BeatBuddy tutorial videos, or used one for a while, then you know about adding accent hits with the Footswich+.
Tapping the Footswitch+ in time with your beat will give you an array of cymbal sounds to add, making your track sound even more authentic.
Here are a few advanced tricks that will give you an edge when you're playing:
The Cymbal Swell
Ending your set with a crash cymbal crescendo is sick. That's just common sense. You can actually emulate it with your BeatBuddy drummer pedal and Footswitch+. Simply press the crash cymbal accent repeatedly and quickly, and your BeatBuddy will create an incredible swell effect for the big finale.
The Rimshot (For Comic Relief)
If you can make the crowd laugh, they'll love you forever. You can load a rimshot sound (you know. . .ba dum tss) into your accent hit using the BeatBuddy Manager. And, bonus: you can load applause as well for another comedic angle.
Ending Outros With a Crash
This one is similar to the cymbal swell, but offers a more abrupt ending to your song or set. Hit the pause and accent buttons at the same time. This will give it that nice closing effect you're used to. But first, go through the BeatBuddy Manager to make sure your accent button is set to a crash cymbal.
Check it out:
2. The BeatBuddy Song Matching Tool
Cover songs are a great crowd pleaser. Adding one to your set can amplify crowd engagement and bring new life to your performance.
We've created a massive database of beats to emulate popular tracks from all genres, and all of them can be loaded into your BeatBuddy. Then, we organized them so you can search by artist name, song name, genre, device and more.
All of this is available in the BeatBuddy Song Matcher Tool, and it works for more than just cover songs. You can find beats that work best with your band's style and energy. Part of a worship team? Choose the "worship" category in the genre dropdown for all the BeatBuddy drum loops that will bolster your set.
The same goes for punk bands, jazz bands, ska bands. . .you name it. We've got you covered.
3. The Sobriety Function
Little known fact about Singular Sound's BeatBuddy: it can get drunk. Since we took out the unreliability out of the drummer, we figured we should still let it have a couple beers. . .or several.
The "Sobriety Function" can be accessed via the settings menu. Once there, you can make your BeatBuddy stay stone cold sober, or add drunkenness bit by bit.
Be warned: the more alcohol BeatBuddy drinks, the more erratic his playing will be. But don't worry, it'll still sound pretty killer.
4. Hands-Free Navigation w/ Footswitch+
We talked about using the Footswitch+ to create unique sounds for your live performance. But you can program your pedal to help you even more than that.
From the BeatBuddy Manual: "To navigate within a folder hands free, use the right footswitch button to advance to the next song in the current folder, (you can set the other button to go back one song in the folder from the settings, by default the right footswitch is song advance while stopped). By default, holding the right external footswitch button down will exit or enter a folder."
A New BeatBuddy Expert is Born
We hope you feel more in tune with your BeatBuddy now. Check out all of our tips and tricks blogs to get a higher level understanding of your favorite Singular Sound gear.
Comment below your own tricks with the BeatBuddy, or tell us what you'd like to hear in our next blog post. We want your feedback!
Until next time, keep creating the music you're passionate about. And keep rockin'.
]]>
https://www.singularsound.com/blogs/news/worship-music-with-beatbuddy2021-09-27T16:13:11-04:002023-08-24T11:47:59-04:00Playing Worship Music with the BeatBuddy Drum Machine PedalTravis GoureYou may have heard that the drums are the most vital component of worship music. That's because it drives the energy of the song. The BeatBuddy gives you complete command over that energy, and that means your message will shine through.
Performing worship music is important to any congregation. It helps people to engage with the service and builds a community around your church's message.
Creating a powerful sound involves a great deal of practice. Bands that perform worship music have to work hard to get their music tight. Having the right gear can help Sunday service go off without a hitch.
Our BeatBuddy drum machine pedal is the perfect companion for performing worship music. It shows up on time, stays in time, and expands the creative possibilities at your disposal.
Make better worship music with the BeatBuddy. Here's how it works:
Better Symmetry with BeatBuddy
Being a worship leader is a huge undertaking. And when you're leading the band, that means you need to dictate how the drums are being played and when. You need your dummer to change tempo and volume on a dime.
Sometimes, that's tough to find. The BeatBuddy drum machine pedal gives you that right out of the box. You can switch song parts, add transition fills, adjust accent hits and change the volume with the tap of your foot. That means your drums are on point every time.
That means less practice time, and more confidence. Not to mention, practicing to an authentic, professionally recorded drum beat is better than a click, and everyone in the band is going to improve as a result.
Truth is, a lot of church bands can't practice every single day. Having to meet up with a drummer for every practice is daunting. By getting yourself a BeatBuddy you can always practice to a beat, whether you play guitar, bass or keys. Practice by yourself so that when you come together, every one is sync.
You may have heard that the drums are the most vital component of worship music. That's because it drives the energy of the song. The BeatBuddy gives you complete command over that energy, and that means your message will shine through.
Listen to two top-notch Worship Leaders explain how it works for them:
Authentic Sound, Authentic Content
Every single drum pack we release is recorded onreal drum kits. Most drum machines can't hold a candle to the real thing, and that's a shame. When the drums sound plastic or robotic, it doesn't produce authentic energy.
Think about it. A drum kit isn't just an amalgamation of noise. The bass drum, snare drum and kick drum all have their own frequencies, and you play them with dynamic velocities.
And that's what gospel music is all about. Bringing an authentic message through sincere sound. When you take the stage with the BeatBuddy, you're bringing truly professional drum samples with you. With studio quality 24bit non-quantized sound, you get a drummer pedal that sounds human.
Here's how we do it:
Hundreds of Drum Styles to Play With
Experimentation is an important component of musical growth. Guitarists -- worship music guitarists in particular -- often work hard to build a pedal board with tons of unique effects. This way, when they need to create a powerful atmosphere, they are always up to the task.
A drum machine app can't effectively simulate a real church drum kit. The best drum for church is one that can match the diversity of your worship set, which often spans genres, moods and tempos.
The BeatBuddy comes right out of the box with more than 220 drum styles, 24 genres, and 10 different customizable drum sets. Mix and match sounds to complement your performance style. Play a hard rock style on a Latin drum set. Techno patterns on blues drums. If you can think it, you can play it.
Want more? Singular Sound's Premium Library is absolutely stacked with our latest beat inventions. We recently released packs like "Jazz Beats," "Brazilian Percussion," "Modern Classic," and many more. You can get all of them (we mean lots of them) packed into one Premium Library SD card for only $219. Here's what's included:
The BeatBuddy Song Matcher
Want to cover one of your favorite worship tracks? We built a powerfulsong matching toolthat gives you the precise beat you need to perform classic worship songs.
Tracks like "Mighty to Save," by Hillsong and "Who am I (Friend of God)" by Casting Crowns are part of our default library. That means you can get matching beats for free. The beat patterns we've included are versatile enough to be used an any kind of service, whether you're playing traditional hymns or progressive rock.
Playing a recognizable, powerful song is a wonderful way to engage your audience. We've made it easier than ever. The BeatBuddy drum pedal and BeatBuddy song matcher are the ultimate dynamic duo for worship bands.
The BeatBuddy Manager for Drum Set Customization
Speaking of customization, the BeatBuddy Manager software comes included with every BeatBuddy. Use it to create, name and organize your different projects, make edits to accent hits and sounds, and upload them to your drum machine pedal using an SD card.
Check out the BeatBuddy Manager tutorial below:
You can also use that SD card to get the latest BeatBuddy updates from our development team. Most of them are free! We try to put one out every couple of months. With customer feedback and passionate experimentation, we are always working to take the BeatBuddy to the next level. Let your gear evolve with you.
Here's What You Need to Know
Purchasing a BeatBuddy drum machine pedal from Singular Sound is an investment. It pays dividends from the practice room to the stage. The authentic, award-winning sounds are sure to engage the congregation, and the vast array of styles is perfect for any church band looking to practice and hone their sound.
Plus, your BeatBuddy comes equipped with a 2 year warranty and top-of-the-line support. It's built to last.
Join thousands of musicians across the world taking their performances to the next level with the BeatBuddy. Get better results from the stage to the studio. Make sure to check out the rest of our innovative gear on the Singular Sound main page.
]]>
https://www.singularsound.com/blogs/news/what-is-reverb-1012021-08-07T02:37:28-04:002023-08-24T11:41:32-04:00Singular Scholar Series: What is Reverb? 101Travis GoureMore]]>
Reverb is a dear friend for so many of us. It gives volume and character to our vocals, and even cleans up our mistakes. For guitarists, bassists and vocalists alike, a good reverb pedal is a staple in any gear setup.
Websites are constantly reviewing reverb pedals, new and old. You can watch demo after demo on YouTube and compare features to find your ideal device.
It's a blessing for sure. Believe me. My high school band played "Lucky" by Radiohead at the talent show and I was flat the entire time. Which is weird, since I distinctly remember shimmying at one point from how confident I felt. Whatever. The point is: every time I've gotten on stage since then I've asked the sound tech for a "nice, long reverb."
But what is reverb, actually? And how did we get to the point where pedals come in all shapes and sizes according to our preferences?
The Science of Reverb: What is it?
If you were to attend the American Academy of Audiology, you might study under a guy named Michael Valente. He developed a simple reverb definition in his book Audiology Treatment. He called it "a persistence of sound after the sound is produced."
He was talking about reverb in the context of sonic therapy. Still, let's use that as a working definition. Whatever you describe it as, we know it adds length and depth to a sound.
If that's how we perceive reverb, how does it actually happen?
As you probably know, it's a natural phenomenon. When you sing a note, play a chord or clap your hands, the sound you emit is subject to manipulation from the environment.
If you belt out an absolutely silky G4 in a huge church. . .that's sick. But also, that sound is going to reflect off the walls, the furniture and especially the air that extends down the aisles and fills the room.
Those reflections pile up on each other, and the more there are the longer the sound will take to dissipate, or "decay." That's what creates the "persistence" to which Valente was referring.
In fact, it turns out every object in your room has something called an "absorption coefficient." That measures how much a certain surface absorbs sound vs. reflects it. Architects would even take this into account when constructing churches or concert halls. They'd design spaces to maximize the reverberation potential.
Folks were allllll about this during the 19th century. A physicist named Walter Sabine even created an equation (named after himself) to determine a sound's time of reverberation. I don't know what all the symbols mean, but by experimenting with it Sabine was able to determine that the length of reverb depends on how reflective the entities in the room are. If the reflection is "coherent" - meaning it absorbs very little sound - it'll take longer to decay. Here's the equation:
That kind of scientific consideration is important for music. For centuries now, composers have conducted performances in cathedrals, ballrooms and even caves to give their music a larger force.
The History of Reverb in Music
If you were in a 1940s pop band, what would you name it? The Harmonicats? I bet.
The first time producers created a reverb effect on a professional track was for a band by that exact name. That was in 1947. They put a microphone in a bathroom, tossed in a speaker and hit record. That validates the fact that all I do for my vocals is sing in the bathroom with a sock over the mic.
Sure, there were recordings with reverb before this, but all that meant was putting the singer further away from the microphone. In the case of The Harmonicats, they were creating reverb, not just capturing the kind you get from adding more space.
What was so novel about the bathroom trick was that Bill Putnam Sr. (producer for The Harmonicats) could change the amount of reverb at will, not to mention stop and start it whenever he chose.
The fact that the song was successful may have strengthened the push in production to increase artificial reverb, and create better and better devices to do it.
Plates, Levers and Backlit Buttons
Then, someone (the engineers at Elektromesstecknik, a German music company) figured out that if you hand a metal plate inside a big box and use a transducer to input sound into it, the plate will vibrate, creating an effect similar to those you get from modern reverb pedals.
Elektromesstecknik (EMT) began creating devices that would pick up the sound from within the box and transfer it into the main signal output. As a result, EMT became a mammoth in music history. Their flagship plate reverb device, the EMT 140, is still used today.
But they didn't stop there. Their EMT 250 (1976) marked the point at which artificial reverb moved from analog to digital.
If this were the 1988 movie Twins, the EMT 250 was Danny DeVito and the 140 was Shwartzenegger. Like, uh, one second.
Like this:
The 250 was smaller than the 140. It had shortcomings, but it was state-of-the-art and more stable than its predecessor.
Even so, plate reverb devices remained subject to outside noises and therefore had to be isolated as much as possible. That limited recording efficiency.
These early digital reverb devices had a rolling chassis, levers and backlit buttons. The levers were the main mechanism to control the reverb. A lot of brilliant minds made this happen. Among them was Barry Blesser, an MIT professor who managed tocreate an algorithm for the machine's cues and circuitry.
Digital reverbs started to roll out more and more over the next decade, most of which offered an affordable alternative to the EMT 250, which sells for more than 10k to this day. All of the new devices created various ambient spaces by layering lines of delay feedback. Then, they would have them conjoin as they were dispersing.
That now-vintage tone is still highly sought after, whether for its inherent authenticity or nostalgia purposes.
Digital Reverb Forever. . .and Ever
Now we're in 1999. Y2K is right around the corner, and SONY simply does not care about the coming robot revolution. They come out with the DRE S777. Where all previous digital reverb devices had been based upon algorithms, the S777 used actual audio samples from real world spaces.
This became known as convolution processing, and it produced sounds with higher fidelity to natural reverb than any of its predecessors.
This was a massive progression in the way reverb was viewed, processed and recreated. The pedals we have now - or the ever more popular plug-ins - formed from this focal point. They grew more and more compact, efficient, and customizable.
That brings us to today, where reverb pedal giants like the Strymon BigSky are now accompanied by special effect reverbs, memory cards and foot switches capable of controlling the size and shape of a reverb sound. And it will just continue to grow.
Pretty wild to think that it began with The Harmonicats' "Peg O' My Heart," an instrumental rendition of an Irish love song dating back to the early 20th century.
Class Dismissed
Thanks for coming to "What is Reverb? 101" Not sure yet what we'll do for 202, but it'll be even more in depth, and as funny as this one was (i.e. marginally).
We create all our content around the questions, concerns and suggestions of our customers. Whatever you want to learn or ask about, please let us know in the comments section.
The Singular Scholar Series is a rolling blog of humorous histories and in-depth discussions. Get early admission to class by following us on:
We're all students of music and history. We hope our content helps to drive your passion forward.
Keep rockin' everyone.
]]>
https://www.singularsound.com/blogs/news/midi-maestro-live-performance2021-08-04T19:12:40-04:002023-08-24T11:41:49-04:00How the MIDI Maestro Improves Live PerformanceJay PackouzMore]]>
Performing live takes courage. Sharing a personal creation with others can breed self doubt. Personally, I spend a lot of time before a live performance thinking about logistics. When am I going to talk? How am I going to pattern my loops? How will I be able to switch between pedals while staying in time with my song?
Products that ease my anxiety are always at the top of my list to buy or demo. Practice makes perfect, but smart products are huge help, too. The MIDI Maestro is a MIDI foot controller that lets you connect to, and seamlessly control, your live set up.
Understanding the technical side of MIDI is a vast undertaking. For the purposes of this article, I'd like to share with you what makes MIDI devices so important to you. Knowing how to use them is the first step.
In essence, your MIDI controller sends a MIDI (which stands for Musical Instrument Digital Interface) signal to another device. This could be your amplifier, synthesizer or computer. Then, that device makes sense of that signal and returns the sound you're looking for.
MIDI interfaces offer you customizable channels and opportunities to switch devices live. You might use one to switch the channel on your guitar amp, or tweak a certain effect during a song. These options put you in control of your gear, so you can focus on the music itself.
The Live Show Savior: On-the-spot Customization
Picture this: you've secured a gig downtown on a four band bill. You're set to play third. But during the second performance, the band goes over their time. Rather than cutting them off, the sound guy informs you that you'll have five fewer minutes to play your set. Tough break. But it happens.
You realize that you structured your set around the original time slot. Losing a song means ditching the original plan completely. It seems like flirting with disaster.
With most MIDI foot controllers, changing things last minute would be a nightmare. Since MIDI controller software is hard to come by, you'd have to manually change your presets. But now you can get on theMIDI Maestro mobile appand make the necessary changes on the spot. Even if your set starts in 1 minute.
The MIDI Maestro comes pre-loaded with BeatBuddy Mode and Aeros Mode. This means you can communicate right out of the box with all your Singular Sound devices at once.
Organize your loops to match the drum sample coming from your BeatBuddy, mute/unmute tracks on the Aeros, even undo them to play them better. It's only a few foot taps away, and the individual foot switch displays give you clear direction.
Our all-star trio is a powerhouse for live looping and live performance. But, using our MIDI live isn't exclusive to Singular Sound products. Let's dive into the custom preset, and how it can work with your gear.
MIDI Maestro Custom Mode
Our MIDI foot controller is ready to join forces with the gear you know and love. By entering the "Custom Mode" on the MIDI Maestro, you can set the device up to communicate with any pedal or instrument you've got.
For me, I need a MIDI device that will communicate with Ableton. I do much of my live instrumentation, samples and effects through that DAW. Building a custom preset on the MIDI Maestro grants me one-touch access. They talk like old friends.
Our good friend Doug Hanson posted a MIDI Maestro Custom Mode tutorial on Youtube. He discusses how he uses the Maestro to communicate with Ableton, giving him effect customization on-the-fly.
How The MIDI Maestro Helps YOU
Tutorials are sick and all, and we're always here to answer your questions. But I want to break down how the MIDI Maestro actually makes your live performance easier.
The One Man Band
Being in complete control of each musical component is crucial. The BeatBuddy offers different drum parts, transitions, fills and accents. MIDI Maestro lets you operate those in one device. Cut down on the pedal tap dance and focus on commanding the stage.
Do you play electronic music?
You might spend much of your set tweaking oscillators and filter controls. I do. You're adding decay one second and removing it the next.Setting up your devices with a MIDI foot controller gets you hands free access to up to 6 commands per bank, and 10 banks total. That means up to 60 unique buttons.
Using the BeatBuddy, you can play song parts out of order for when you want to extend that killer chorus or breakdown. Most of all, you can put your energy into precision effects.
The Singer/Songwriter
What about the singer/songwriter carving out an intimate experience for coffee shop patrons? If that's you, I commend you. There are few things as emotive as a close quarters set of reflective music. The MIDI Maestro is the perfect companion for you. Through Custom Mode, you can build guitar and vocal layers through a looper pedal with one toe-tap. Just like that, you'll get a full sound in small spaces.
There are countless possibilities in a MIDI controller performance. We want to know how you play. Comment on this post with how our products show up in your live performance. We're always looking to feature customers in our content.
Conclusion: a MIDI Interface for You
Your experience as a performer is unique and significant. We've set out to create a MIDI device that puts power and efficiency into our customer's hands (or feet).
Our number one goal is to have a collaborative relationship with you. We want to answer your questions, note your ideas, and grow our products alongside you.
That's why we craft our content around our community's interests. If there's something you want us to write about, post a comment!
In the meantime, subscribe to our email newsletter for hilarious, exclusive updates. You can also follow us on twitter @singularsound, Instagram @singularsound and Reddit at r/SingularSound.